

This easy Guyanese oil roti recipe for beginners makes melt-in-your-mouth paratha style flatbreads with flaky, buttery layers. Serve this popular flatbread as a side with your favorite meals.
If you’ve made roti a few times and feel like you have the hang of it, check out my more advanced Guyanese Paratha (Oil) Roti recipe.
What is Guyanese Oil Roti?
Guyanese oil roti is a flatbread. It was brought to Guyana by Indian indentured laborers in the 1800s. Roti is very similar to a Malabar or Kerala Parotta. It also has many similarities with roti canai.
- What is Guyanese Oil Roti?
- Why You’ll Love This Easy Guyanese Roti Recipe
- Guyanese Oil Roti Ingredients
- Different types of fat for your Guyanese oil roti
- How to Make Easy Guyanese Oil Roti
- Roll Dough into a Log
- Square roti shaping (the easiest way to form a roti loi)
- Rest Dough and Preheat Tawah or Skillet
- How to Clap the Oil Roti
- Substitutions & Variations
- Equipment
- Best pan for Guyanese roti
- Tips for the Best Roti Dough for Beginners
- Storage
- Frequently Asked Questions
- Easy Guyanese Oil Roti (Paratha)
In the Caribbean roti has many names. What we call oil or clap or clap hand roti in Guyana, is also called parathas in Trinidad and Tobago and buss up shut when it is shredded into pieces. In Jamaica you may hear roti skin when referring to this roti. In other Caribbean islands you may just hear roti or paratha.

When I was growing up in Guyana, my mother made roti nearly every morning. What I found most fascinating about her daily ritual was the fact that she never used a measuring cup or utensils. Everything was made from instinct and with love.
Guyanese oil roti tastes so delicious. Making it can be daunting and takes practice. I’ve simplified some of the steps to make this the easiest roti making recipe you’ll ever try. It delivers results that even a beginner will be proud of.
Why You’ll Love This Easy Guyanese Roti Recipe
- Easy to Make: Did I mention that this recipe makes roti making easy? Making Guyanese oil roti doesn’t have to be hard. Traditional roti is made without yeast and requires a bit more time to work the dough and rest it. These step-by-step instructions ensure you make the perfect roti, with minimal effort even if it’s your first time.
- Delicious: Although this recipe includes some shortcuts, the taste and texture is authentic. No one will be able to tell you took the non-traditional route to make it.
- Versatile: You can eat roti for breakfast, lunch, dinner, or a snack. Enjoy it as is, with a pat of butter, or serve it with your favorite saucy dishes.
Guyanese Oil Roti Ingredients
Making Guyanese roti doesn’t require many ingredients. I guarantee, you already have most if not everything that you need already.

- All purpose flour: You will need an additional 1 cup for dusting.
- Baking powder: This leavening agent creates pockets of air as soon as the roti hits the hot pan. It makes the bread fluffy.
- Rapid rising yeast: This ingredient is the key to having a soft roti on your first try
- Warm water: About 110°F is good. Warm water makes the dough easier to work with and also yields softer, fluffier bread.
- Room temperature fat: Use vegan butter, ghee or oil. Below I go into detail about each option.
- Cooking oil: Use a high heat oil like Sunflower, avocado or vegetable.
- Sugar: You won’t taste it but this activates the yeast and keeps the dough soft for longer.
- Salt: This enhances the overall flavor so don’t skip it!
See recipe card for quantities.
Different types of fat for your Guyanese oil roti
Most Guyanese people use vegetable oil or ghee to make the lois (cone shaped roti dough). My mother uses oil and melted butter combined, and that’s what I used for a long time. In this recipe I used vegan butter (Earth Balance Soy Free Butter) and I loved the layers of the roti with the vegan butter. You can also use a light oil like sunflower oil, avocado, light tasting olive oil or vegetable oil.
How to Make Easy Guyanese Oil Roti
Make the Dough
In a large mixing bowl add the flour, baking powder, salt, sugar and rapid rising yeast. Mix together with a whisk until combined. Then make a well in the center of the flour mixture and add the warm water. Use a silicone spatula to mix the water and flour together to form a soft dough ball. This is my easy no knead method


Form a Dough Ball
Cover the dough ball with a kitchen towel and let rest for 20-30 minutes. After the dough has rested for at least 20 minutes, divide the dough into 5 equal pieces.


Easy way to create layers in the roti dough
On a floured surface, roll a piece of dough out until it is a large, round, flat disk (like a large tortilla). Add about 1 tablespoon of fat to the rolled out dough, brush the fat over the entire surface of the rolled out dough. Then sprinkle with about 1/4 teaspoon of flour.


Roll Dough into a Log
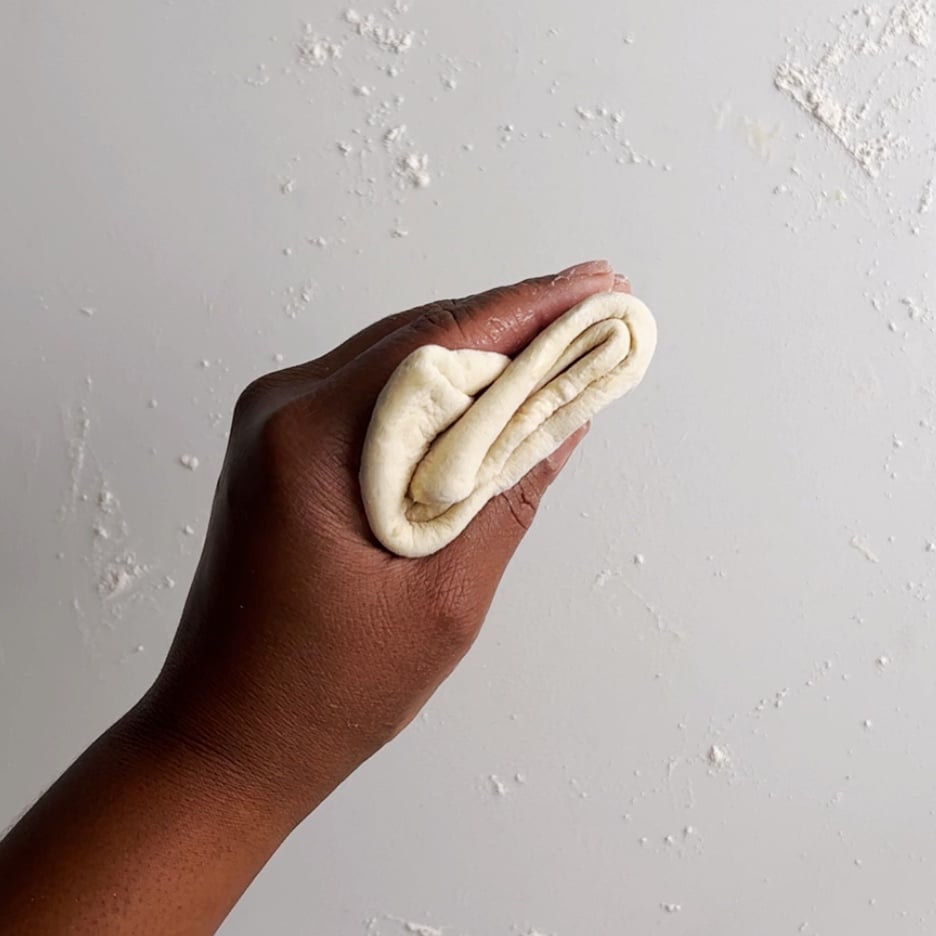
Then roll dough into a log. Next, Swirl the dough log around your finger to form a circular dough ball that looks a lot like a cinnamon roll. Then tuck the loose end of the log into the bottom of the rolled up dough. Repeat for other 4 pieces of dough. Want to learn how to make the traditional cone shaped loi? Then check out my traditional Guyanese oil roti recipe.


Square roti shaping (the easiest way to form a roti loi)
I was 9 years old when my mom taught me how to make roti. “The easiest way to form the loi (layered roti dough) is to make it into a square,” she told me. So here it is the easiest roti shape you will ever make.
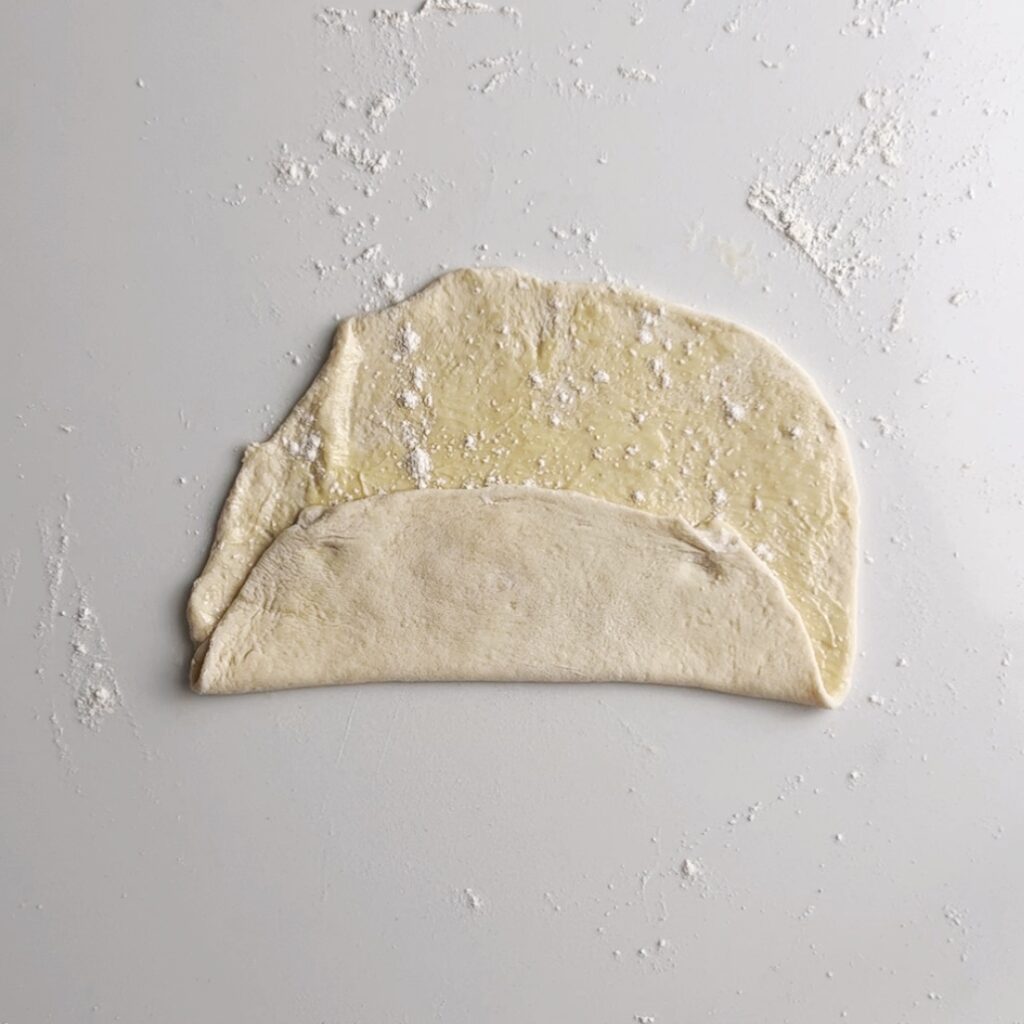
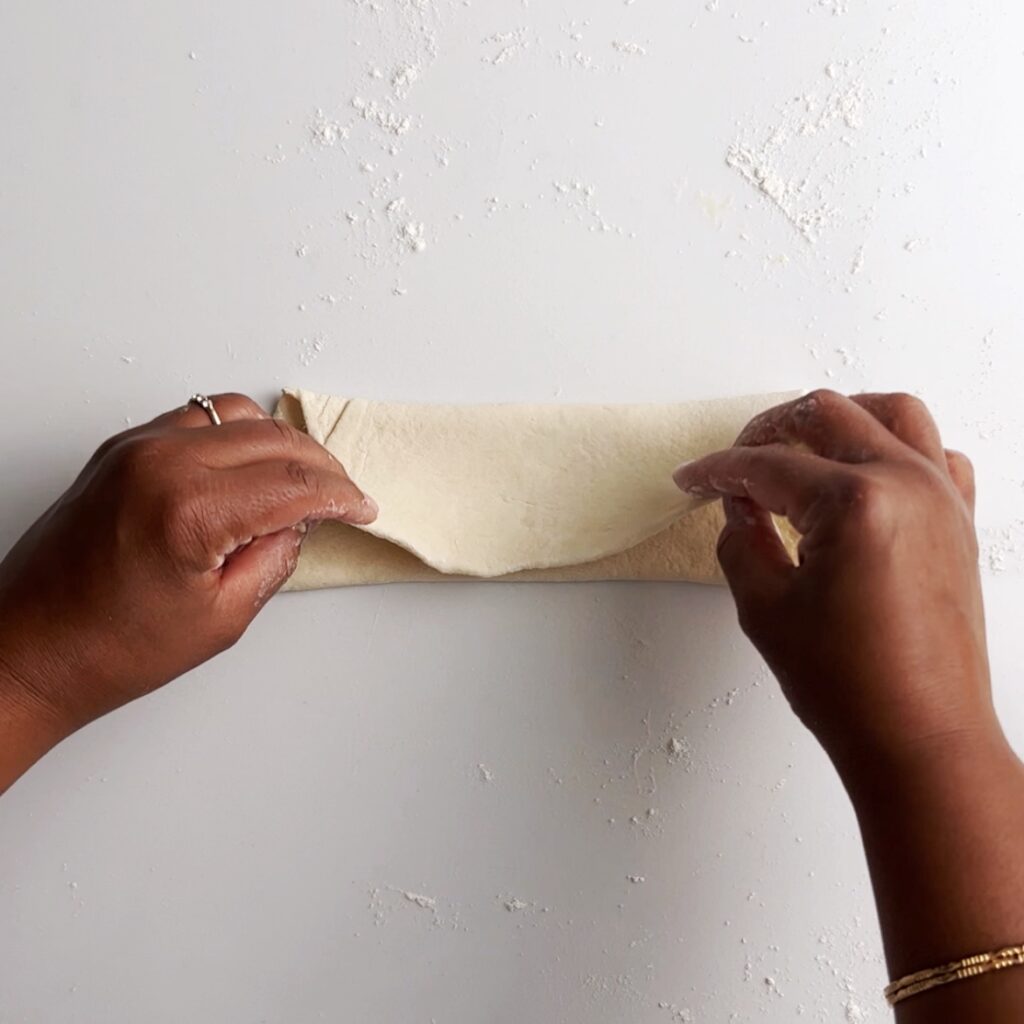
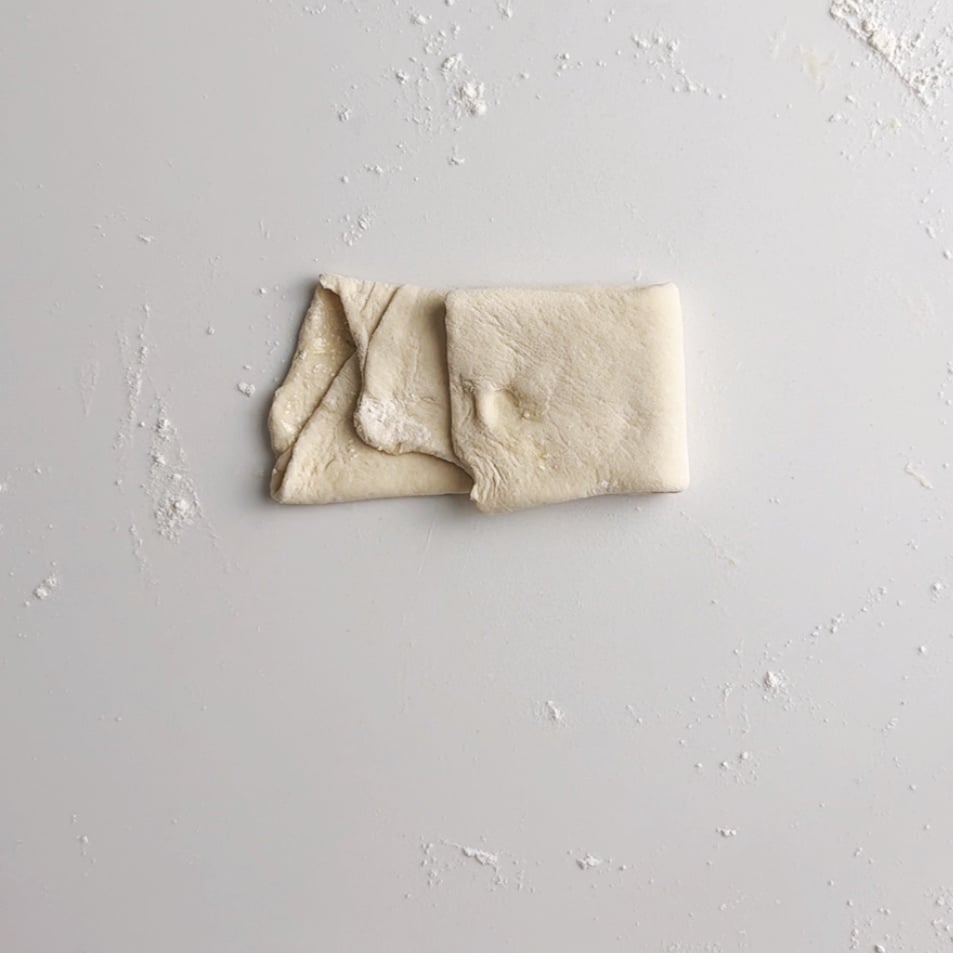
Start by folding one end of your buttered and floured flatted roti dough up to the center. Then fold the other end over to meet the edge of previous fold. Next, the right edge over to meet and the center. Then fold the left edge to meet the right fold.
Rest Dough and Preheat Tawah or Skillet
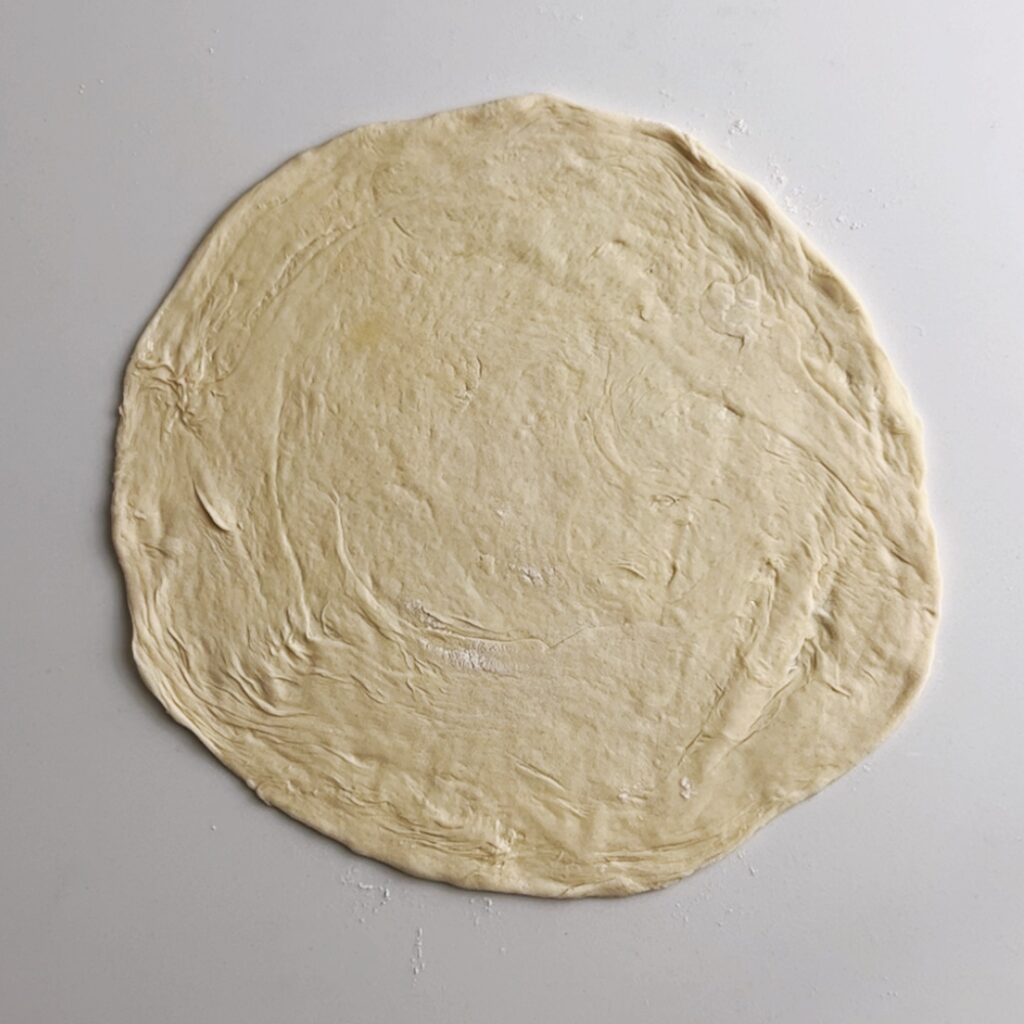
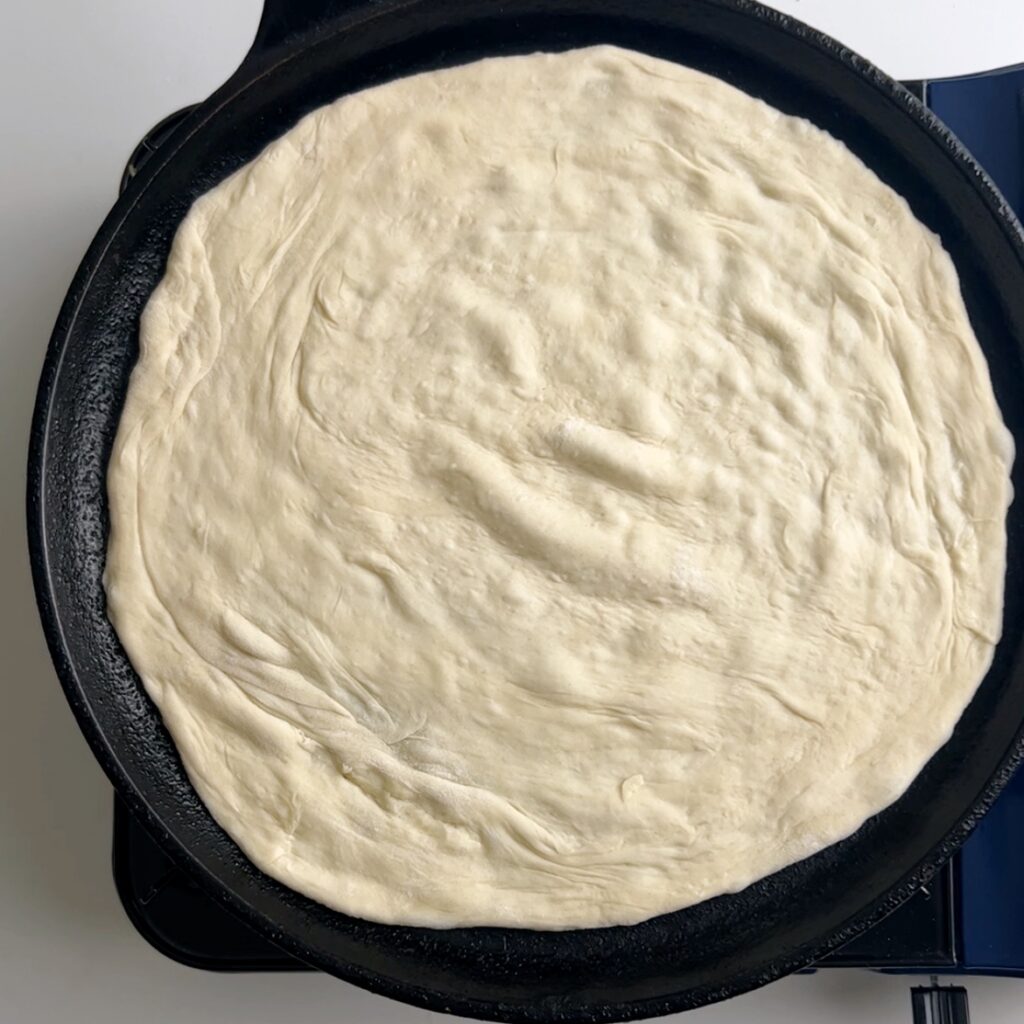
Cover and let sit for 5 to 10 minutes. Preheat a large skillet / tawah (traditional cast iron skillet for roti) on medium heat. Roll out one of the buttered roti doughs (oiled off roti) into a large thin disk, about ⅛ inch thickness (like a large tortilla).
Cook the Guyanese Oil Roti
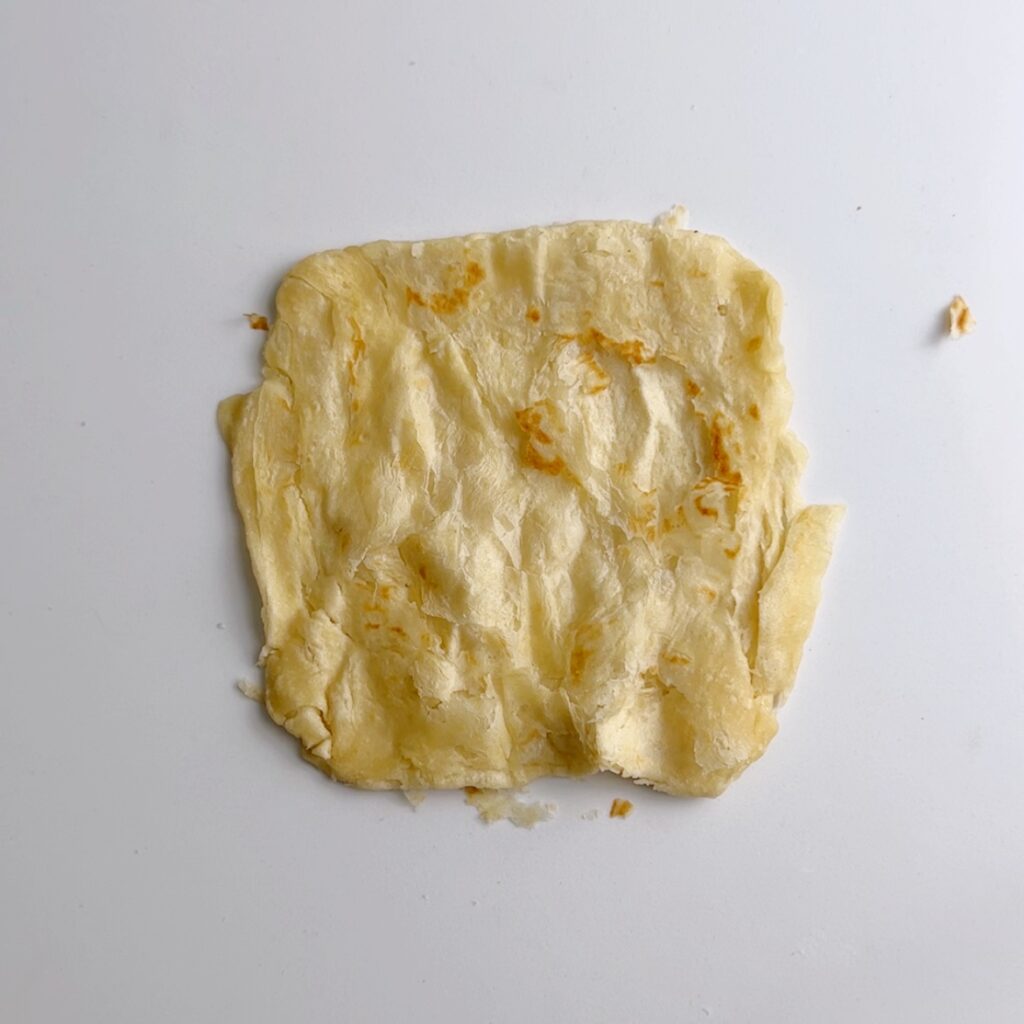
Place roti on the warm skillet or tawah. Cook until tiny bubbles / air pockets appear on the top of the roti (for about 30 seconds to 1 minute).
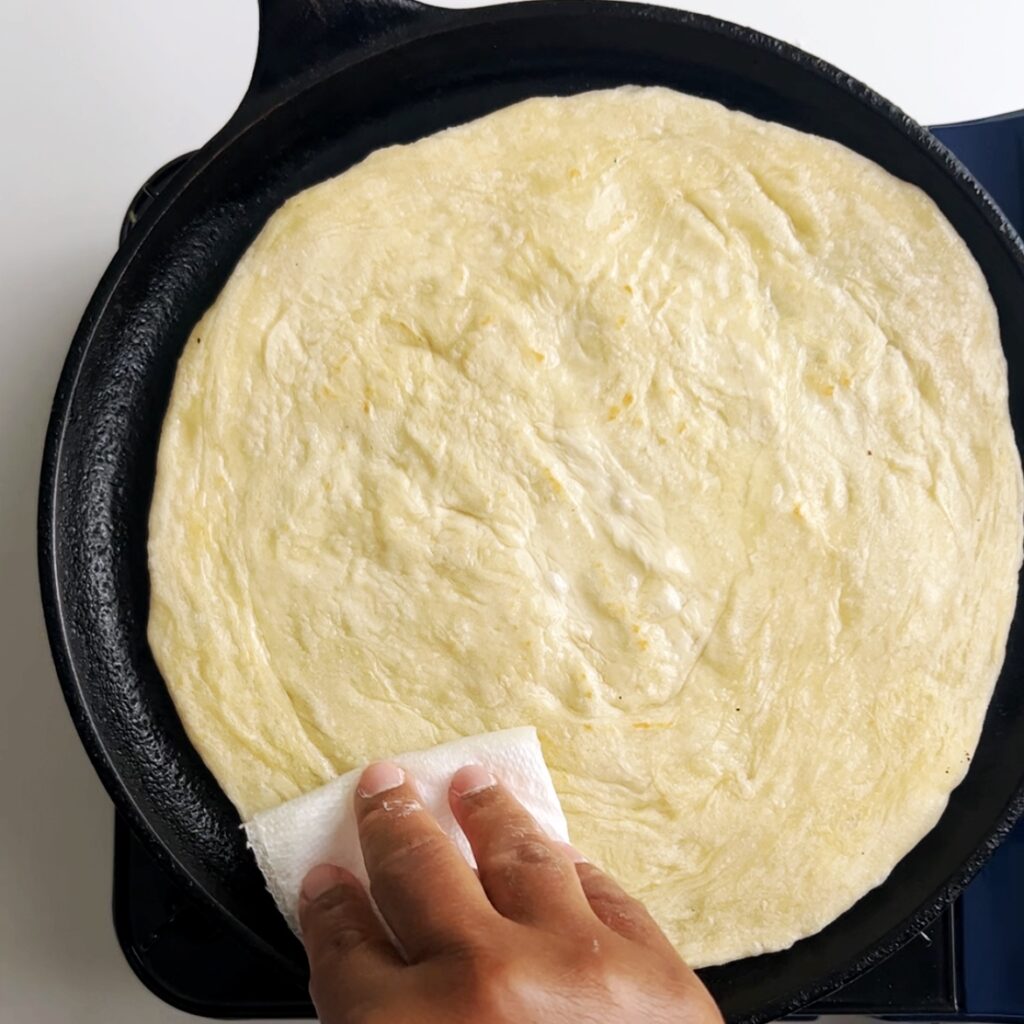

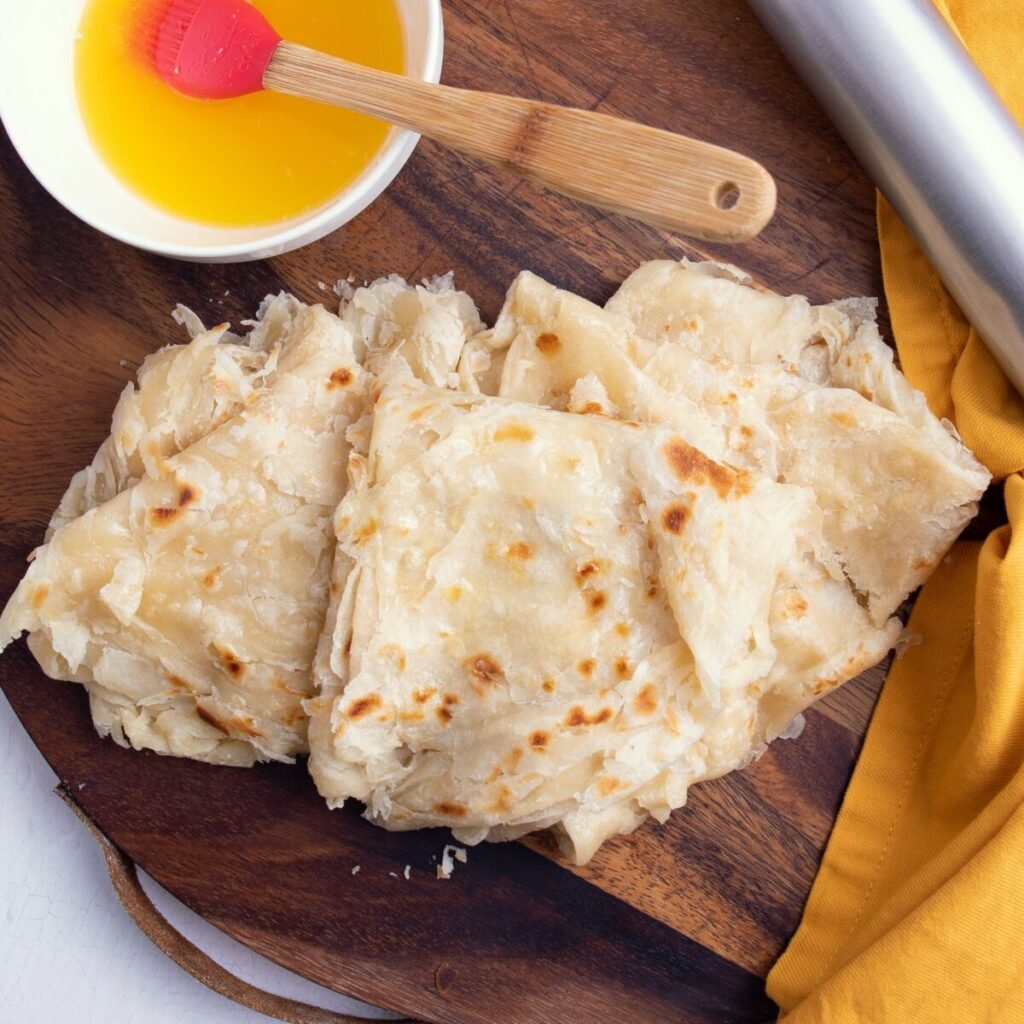
Flip and brush with cooking oil and cook for another 30 seconds (or for as long as it will take to apply the oil). Flip again and apply oil to the other side. Cook for an additional 30 seconds to 1 minute, then remove from heat.
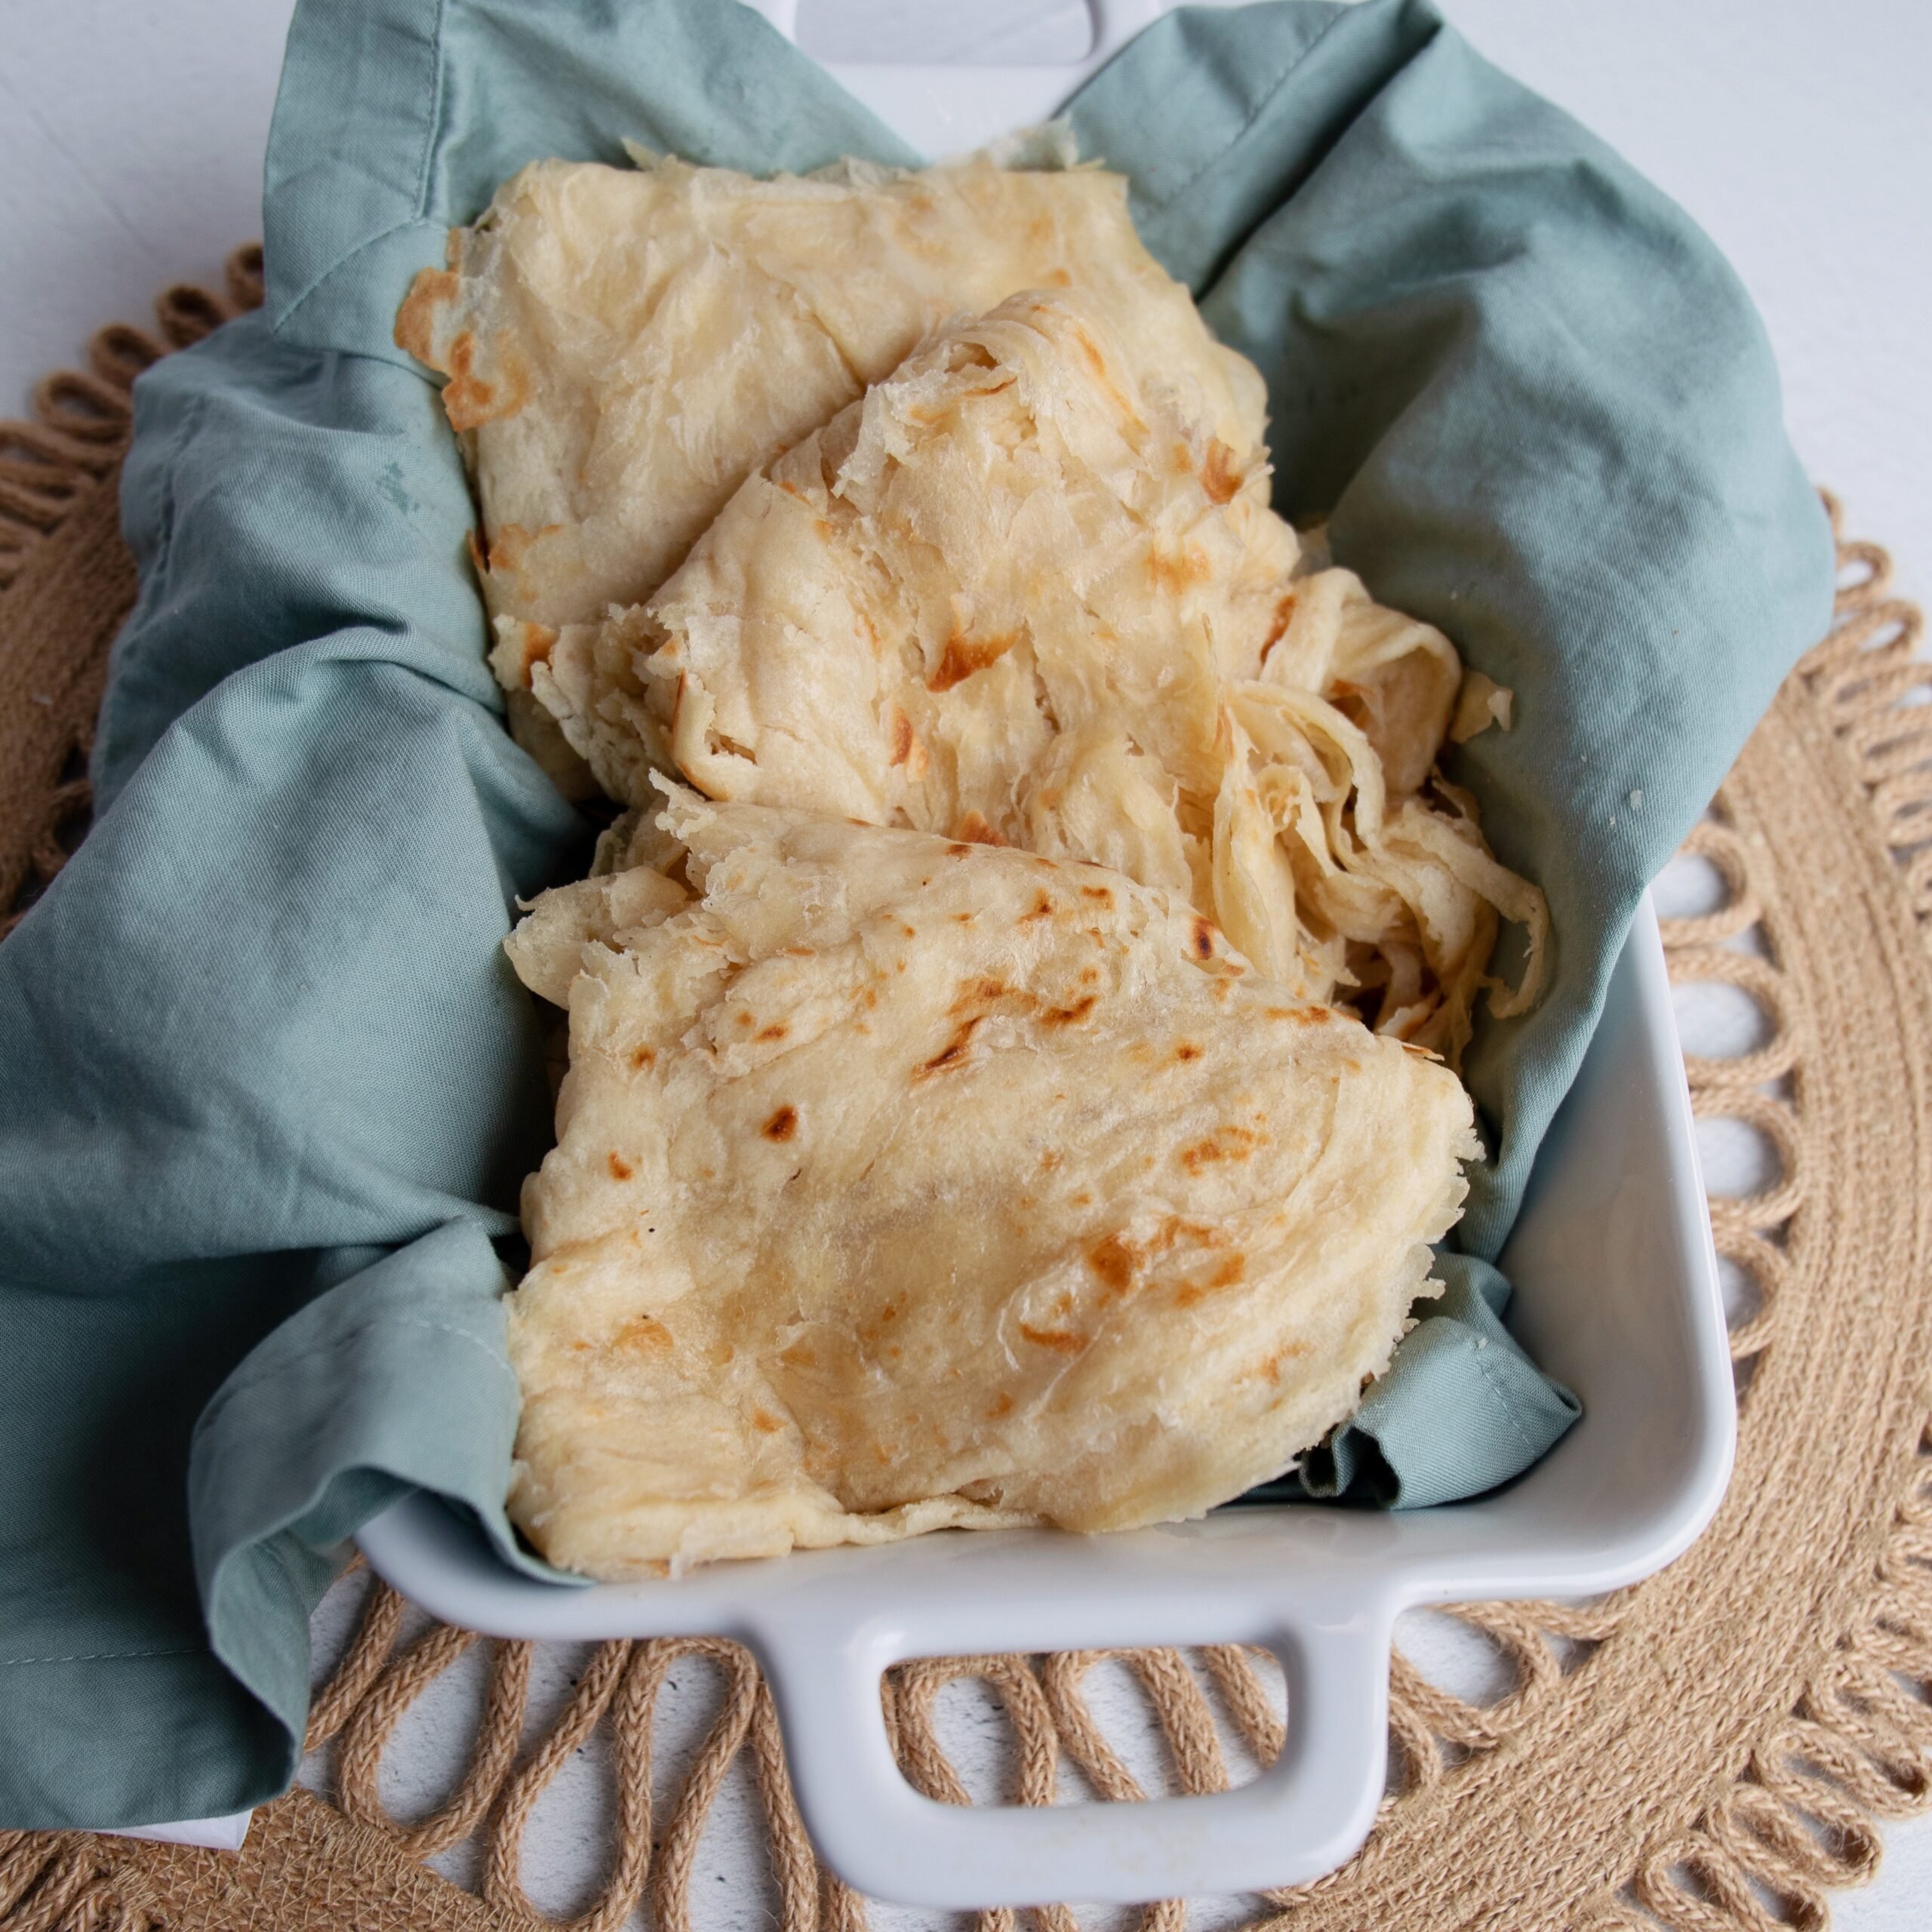
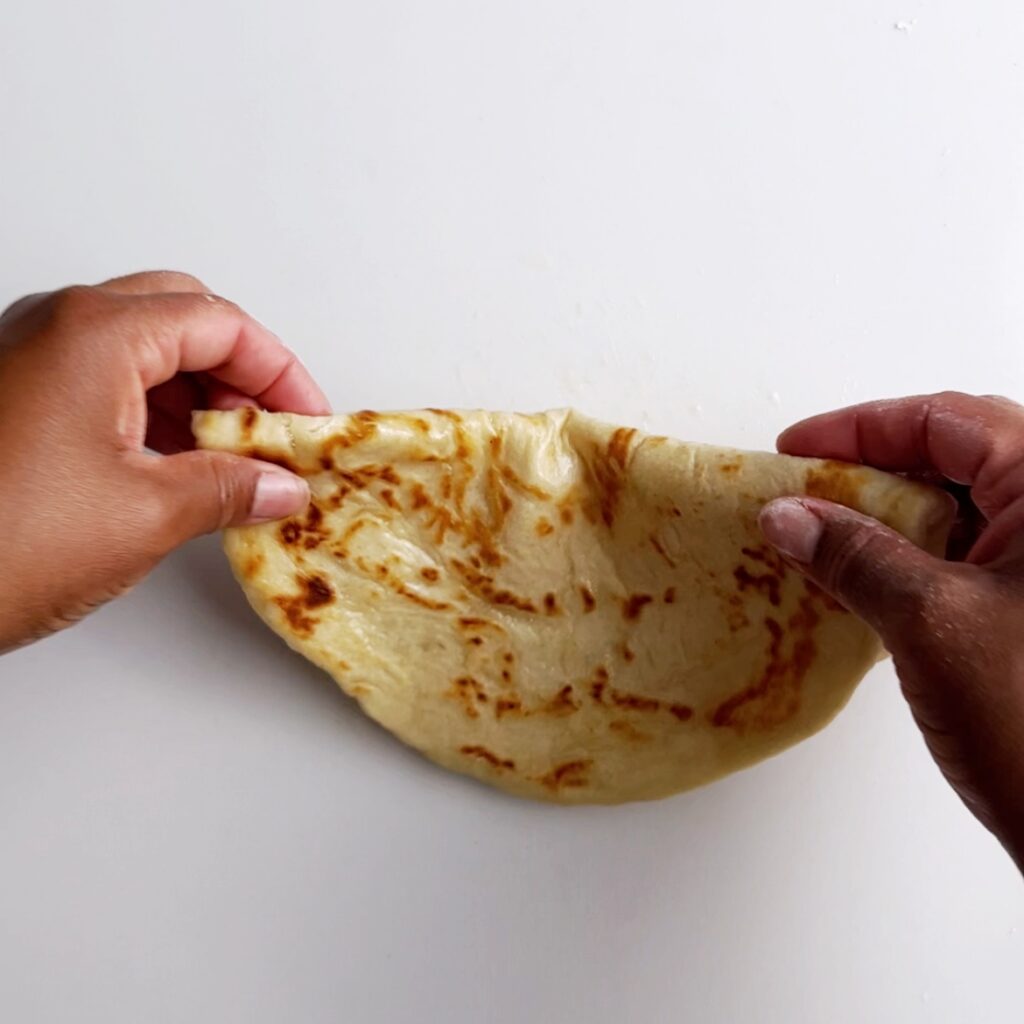
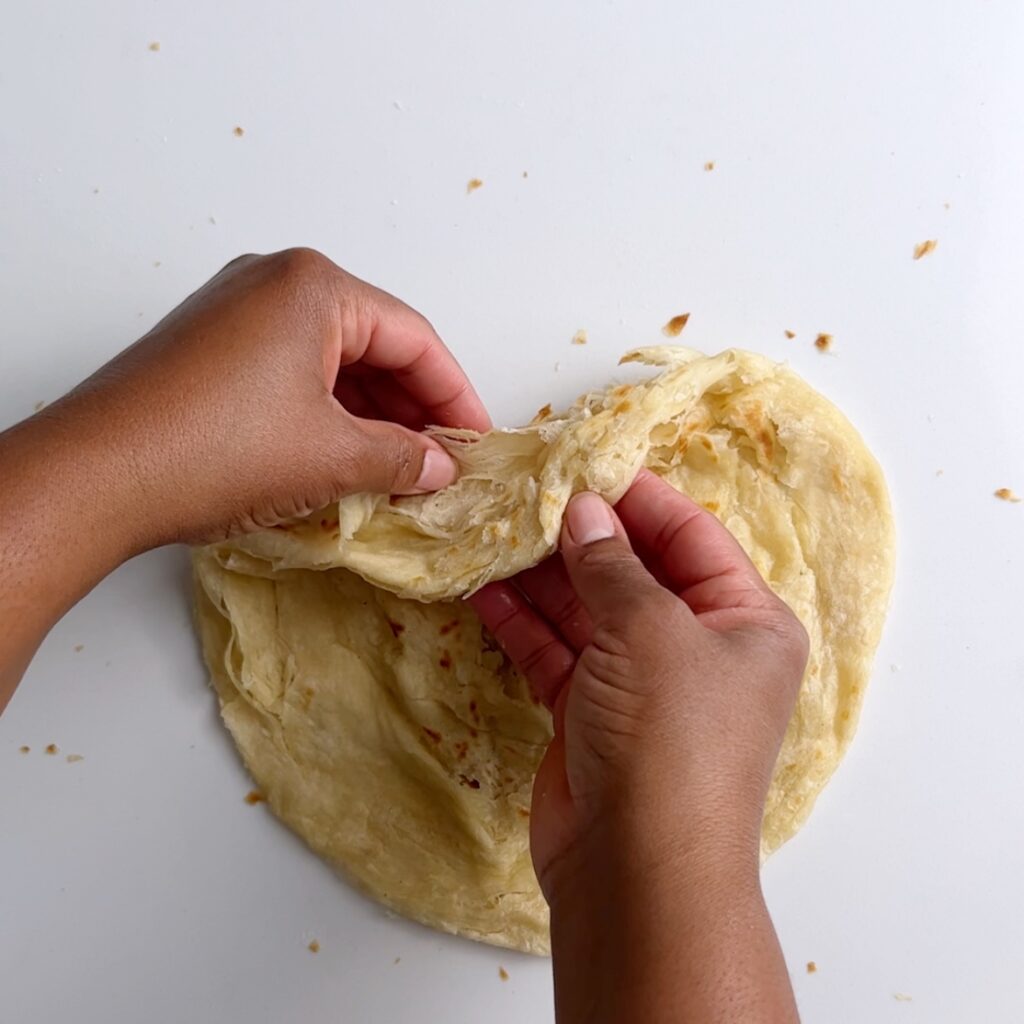
How to Clap the Oil Roti
Clap the roti to release the air pockets and create flaky layers. To clap the roti place the cooked roti on a flat surface. Fold it in half then forcefully push it into itself with your palms (clapping). Similar to compressing an accordion.
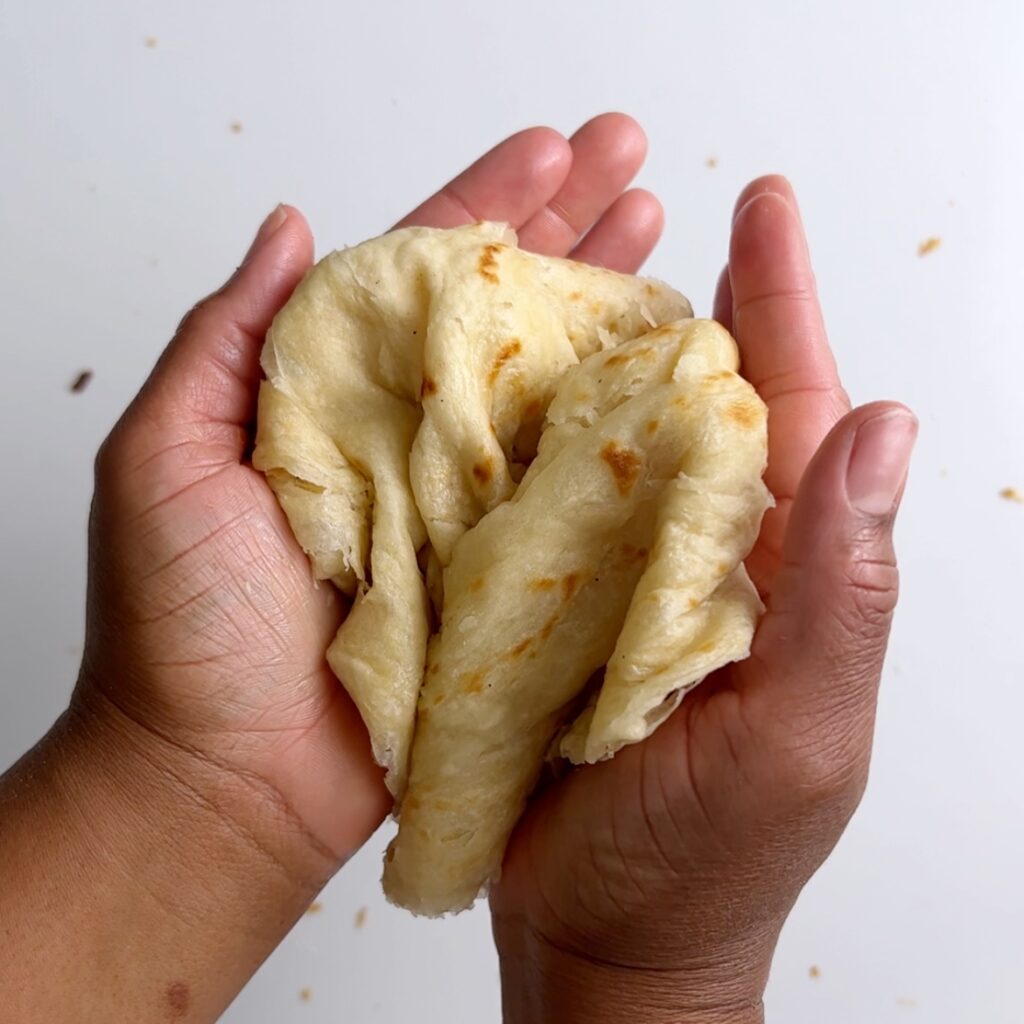
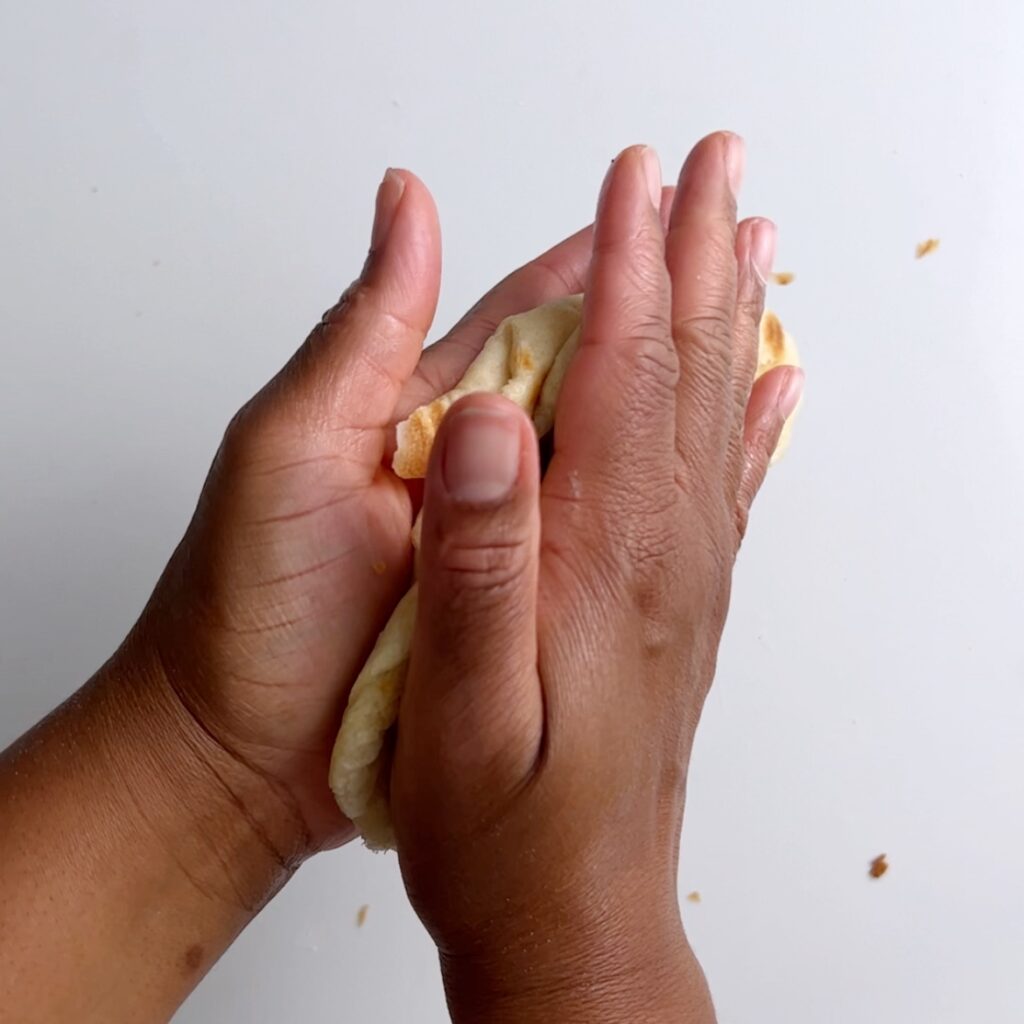
Repeat the roti clapping steps 2-3 times until the roti layers loosen.
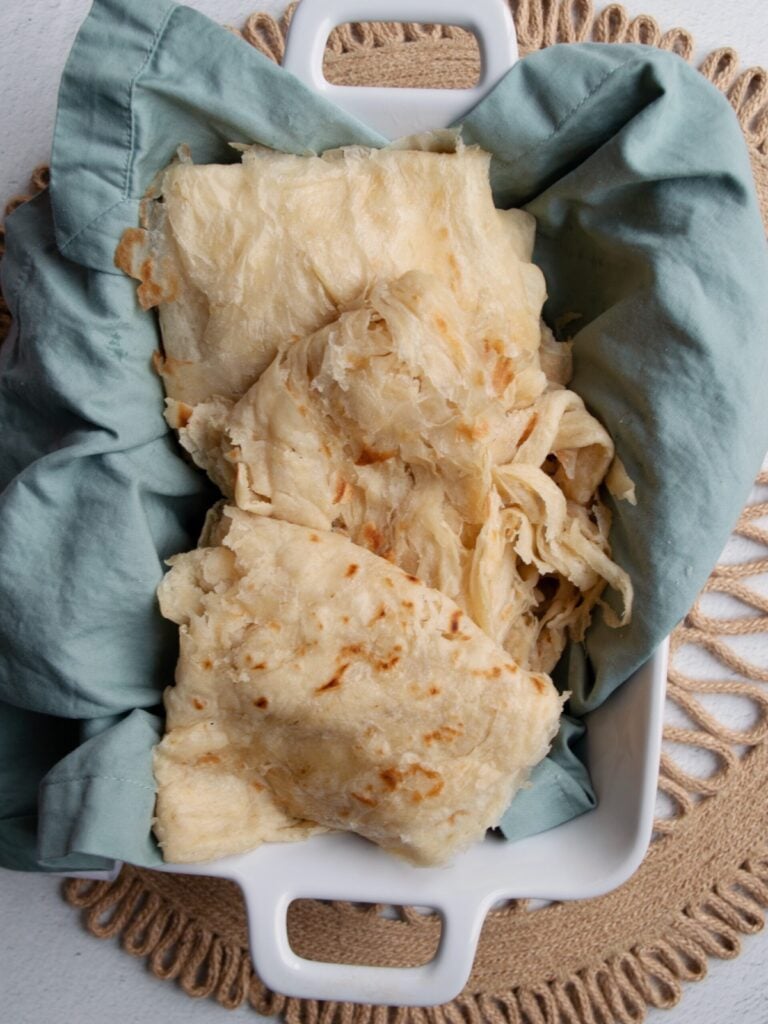
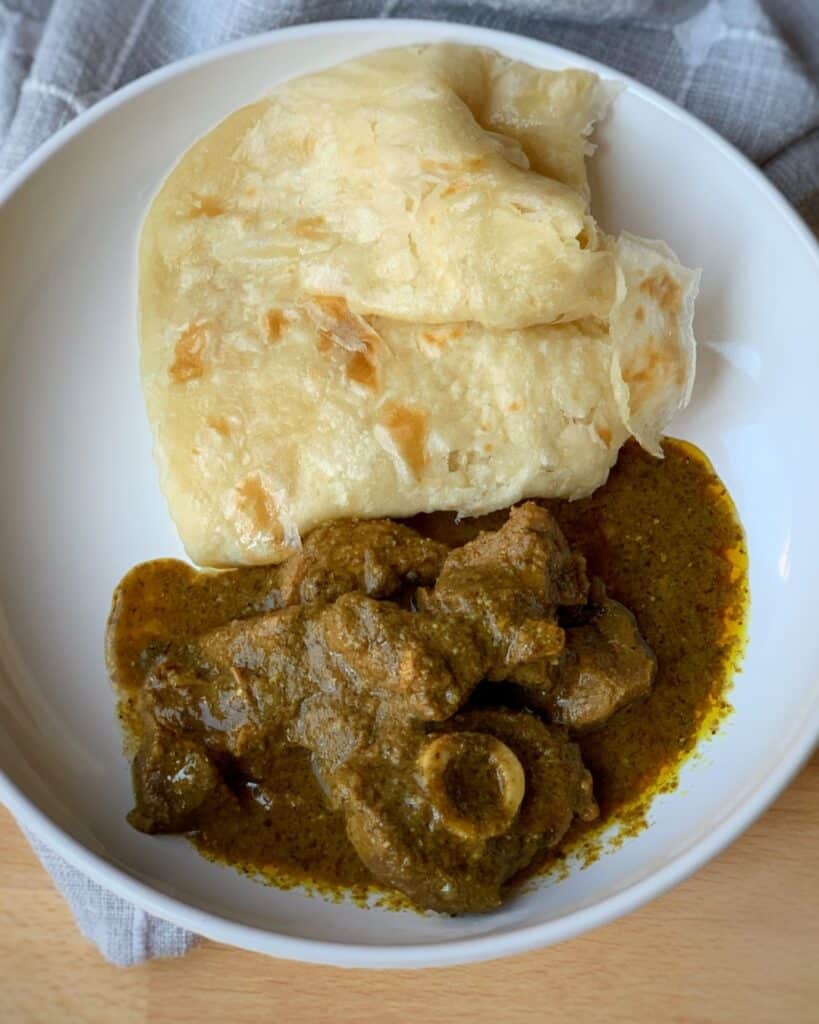
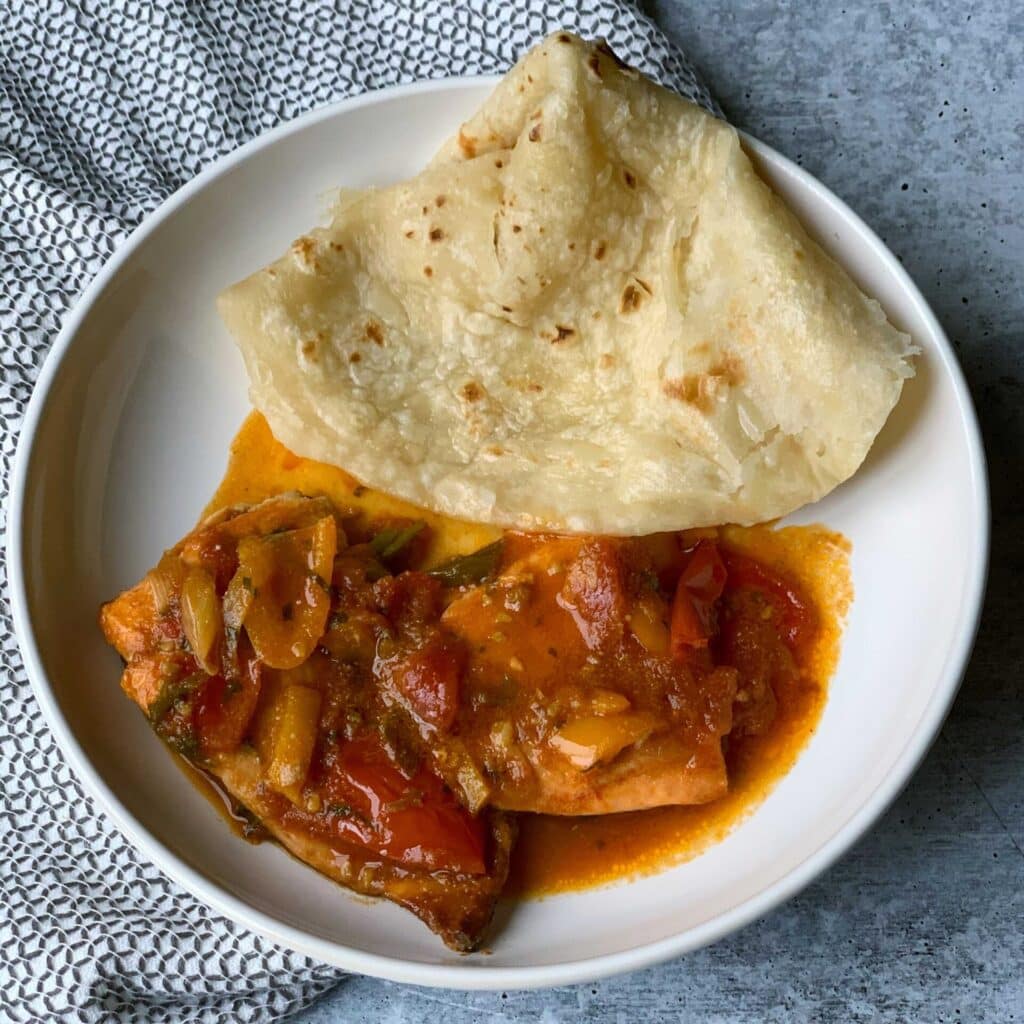
Alternatively you can place the roti in a covered bowl and shake to separate the layers and release the air pockets. Serve your warm and delicious roti with your favorite curry.
Substitutions & Variations
- Yeast or No Yeast? Adding a pinch of instant yeast to the dough saves time and effort. Instead of waiting hours for the dough to rest. I’ve made roti in 15 minutes, because I added a pinch of instant yeast and a tiny bit of (sugar) to feed the yeast.
- Flour: You can also use whole wheat flour with this recipe. Use 2 cups of whole wheat flour and 1 cup of all purpose flour for a more nutrient dense roti with a bit of a nutty flavor.
- Gluten Free: Substituting all purpose gluten free flour for the all purpose flour in this recipe will not deliver the same results. For a gluten free Guyanese roti with the authentic roti flavor you know and love, try my Grain Free / Gluten Free Roti recipe.
Equipment
- Large Bowl: This will be great for making the dough. Use it to combine the wet ingredients and dry ingredients. This also contains the dough while it rests in between kneading.
- Whisk: Using a whisk instead of your hand to bring the ingredients together is less messy and easy to work with.
- Rubber /Silicone Spatula: I highly recommend using a spatula to bring the dough together for an easy no knead roti dough making process.
- Rolling Pin: Perfect for rolling out the roti dough. Don’t have a rolling pin? Try a wine bottle.
Best pan for Guyanese roti
The best pan for Guyanese oil roti is a tawah. If you have a glass top cooker this may not work for you. I use a flat cast iron skillet on my glass cooker and it is perfect.
- A tawah: Here’s a link to a cast iron tawah online. I haven’t tried it but heard great things about it from friends.
- A flat cast iron skillet: You can find these at stores like target and Walmart for under $20. You can also find similar ones on amazon.com, like this one.
- Cast iron skillet or heavy bottom frying pan: If you have a regular cast iron skillet or heavy bottom frying pan this also works.
Tips for the Best Roti Dough for Beginners
I used these tips when teaching my eldest son how to make roti at 7 years old. These tips made the process seamless and the results were unbelievable for a first attempt.
1. Measure your ingredients properly.
As a beginner roti maker it is important to measure your ingredients properly, especially the flour. Here is a link with a quick how-to on measuring flour and dry ingredients.
2. Use a whisk and a rubber spatula.
Until you get comfortable with roti making, use a whisk to bring the dry ingredients together and a rubber spatula to mix the dough. Yes, I said a rubber spatula! Using a rubber spatula really helped my son to navigate the ingredients in the bowl and mix it into a soft dough. With the rubber spatula no tedious kneading was needed and the roti was perfect (see video for more details on using a rubber spatula for the roti dough).
3. Use a little bit of instant yeast for your Easy Guyanese oil roti dough.
Adding a little bit of instant (rapid rising) yeast to the roti dough, guarantees a perfect dough every time. A soft dough is important for a flaky and soft roti. This is a non-traditional ingredient. Yeast is not used in traditional roti making, but if you are a beginner it will make a huge difference for you. Trust me on this one!
4. Use warm water to bring the dough together.
Warm water (about 110°F) is best for this recipe. It will help to activate the yeast and ensure you have the best Guyanese oil roti possible.
Storage
At room temperature: Store leftover oil roti in an airtight container at room temperature for up to 2 days. Store them in the fridge for up to one week.
Freeze: For longer storage, freeze them for up to 3 months. If you decide to freeze them, wrap your roti individually with plastic wrap, then store in a zip top bag.
To reheat, thaw frozen roti by leaving it at room temperature for about 15 minutes. Then wrap the roti in a few sheets of damp paper towel. Microwave in 30 second increments until the roti is warm.
Frequently Asked Questions
Guyanese roti is traditionally made with all purpose flour, baking powder, salt and butter or oil.
Roti clapping is a Guyanese term used to describe the process of releasing the air pockets from the roti. It is typically done by tossing freshly cooked, hot roti in the air and between your palms. Then applying force in a clapping motion, to compress the roti and release the layers.
In Guyana we clap roti hot off the tawah to free up the air pockets and release the layers. This gives that flaky texture we know and love. In Trinidad, they use a dabla (long wooden spatula) to beat the roti on the tawah, at the end of the cooking process to create the same results. This also shreds the roti into pieces and locally is called buss up shut/shot by Trinidadians.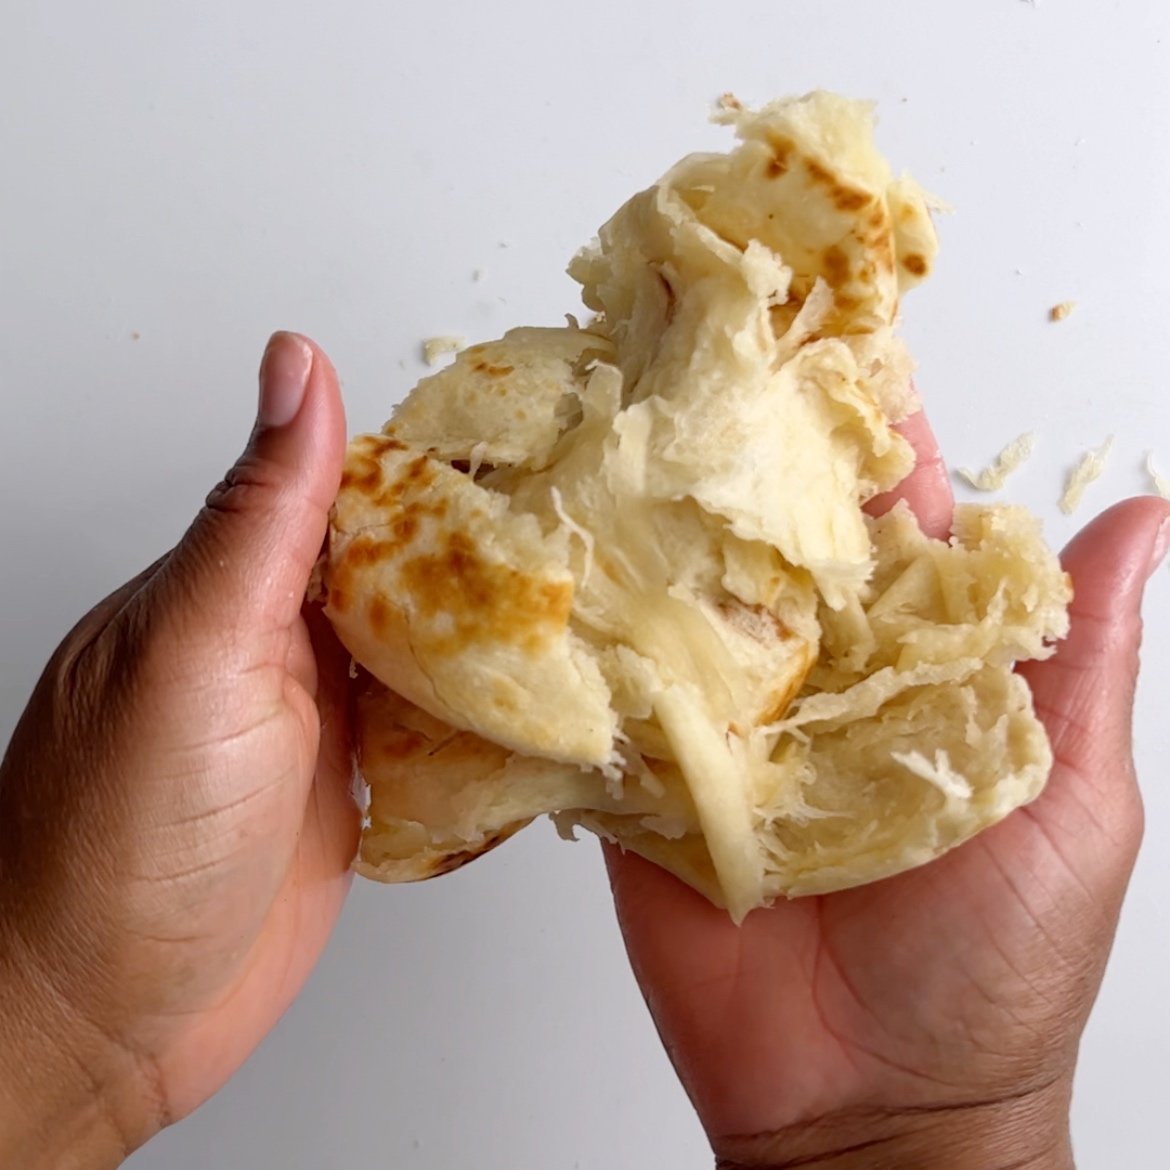
The 1/4 teaspoon of yeast to 3 cups of flour proportion is so small that you will not taste the yeast. I’ve made this recipe countless times with yeast and no one knew I used yeast unless I told them. These Guyanese oil roti with yeast taste exactly like the ones without the yeast.
I keep my tawah on middle heat and if it starts to get too hot, I reduce the heat to medium low. You will know that your tawah is too hot, when your roti becomes brown after a few seconds on the tawah. You want to give your roti time to cook and develop the brown spots. If your roti gets too brown too soon, it will become hard, crusty, and dry.
Easy Guyanese Oil Roti (Paratha)

Ingredients
- 3 cups All purpose flour (plus 1 cup for dusting)
- 1 teaspoon baking powder
- 1/2 teaspoon sugar (to activate the yeast)
- 1/4 teaspoon rapid rising yeast
- 1/4 teaspoon salt
- 1 1/4 cup warm water (about 110°F)
- 1/4 cup room temperature fat (like vegan butter, ghee or oil)
- 1/2 cup oil (like sunflower, avocado or vegetable oil)
Instructions
- In a large mixing bowl add the flour, baking powder, salt, sugar and rapid rising yeast, then whisk together until fully combined.
- Make a well in the center of the flour mixture and add the warm water. Then Use a spatula to mix the water and flour together to form a soft dough ball.
- Cover the dough and it let rest for 20-30 minutes. After the dough has rested for at least 20 minutes, divide the dough into 5 equal pieces.
- On a floured surface roll each piece of dough out until it is a thin (about 1/8 inch) flat disk. Next, add about 1 tablespoon of fat to the rolled out dough and rub it over the entire surface of the rolled out dough.
- Roll dough into a log. Next, swirl the dough log around your finger to form a circular dough ball that looks like a cinnamon roll. Tuck the loose end of the log into the bottom of the rolled up dough. Repeat for the other 4 pieces of dough.
- Cover and let sit for 5 to 10 minutes before moving to the next step.
- When ready to cook, preheat a large skillet / tawah (traditional cast iron skillet for roti) on medium heat. Roll out one of the buttered roti doughs (oiled off roti) into a large thin disk, about ⅛ inch thickness (like a large tortilla).
- Place the roti on the warm skillet or tawah. Cook until tiny bubbles / air pockets appear on the top of the roti (for about 30 seconds to 1 minute). Flip and brush with cooking oil. Cook for another 30 seconds (or for as long as it will take to apply the oil).
- Flip again and apply oil to the other side. Cook for an additional 30 seconds to 1 minute, then remove from heat.
- Clap the roti by placing the cooked roti on a flat surface. Fold the roti in half then push the roti into itself with your palms. Similar to compressing an accordion. Repeat the clapping motion to separate the layers and release the air pockets.
- Serve your roti warm and with your favorite curry!
Video
Notes
- This is a non-traditional recipe that uses yeast.
- You can also make the loi into a square. Start by folding one end of your buttered and floured flatted roti dough up to the center. Then fold the other end over to meet the edge of previous fold. Next, the right edge over to meet and the center. Then fold the left edge to meet the right fold.
- Clapping roti may be daunting but it is a great step to conquer over time. Feel free to place the hot roti in a tea towel for easy clapping. You can also place the roti in a cover container and shake it to separate the layers.
- See the post above for some easier options for rolling out the roti dough.
Nutrition
The information listed in the recipe card is an estimate provided by an online nutrition tool. The tool evaluates ingredient names and amounts then makes calculations based on the number of servings listed for the recipe. It is provided as a general guideline and not as a precise calculation. For precise nutrition information please feel free to add the ingredients to your preferred nutrition calculator or consult a doctor or licensed nutritionist.
 Mango Avocado Salad with Maple Lime Vinaigrette
 Instant Pot Cook-Up Rice
 Slow Cooker Pepperpot
 Brown Sugar Green Beans
Antoinette Browne Says
Girl I made the Easy Roti recipe and it was spot on, it was so easy to follow and it was delicious, I made it three times now with my curry meat and potato, can’t go wrong with this one. Thank You for sharing this, I feel like part of your family because I am always trying a new recipe from this sight or testing out one of your version, cooking happy during this pandemic
Antoinette Browne
Althea Brown Says
That’s awesome. So glad you enjoyed it. And thanks for the love.
Anh Says
Hello Althea, thank you so much for the best roti recipe. Very tasty and super easy compared to one I used before. LOL…I gave up on that recipe after one try.
I need to perfect my clap. It’s better than shaking in a container but it is a good substitute. Next time I will add a little salt and just enjoy them plain.
Althea Brown Says
Thank you so much for sharing. Glad it worked for you. A little bit of salt and a pinch of sugar is good to add next time. Makes the flavor so much better.
Mary Quarles Says
I don know what Ii am doing wrong but the roti is not soft and flaky it seem tought and flaky am i rolling it to thin or What . I folowed the recipe directly and I am a seasoned cook. Help? Mary
Althea Brown Says
Hi Mary. And you used regular all purpose flour? You may be rolling it out too thin. Do you have a large tawa?
Alecia Says
This is my new favourite website! I tried this recipe yesterday and it turned out extremely well. I clapped the roti with a handtowel between my hands and that worked just fine too. I was second guessing myself through some of the steps but then I watched your video which was so easy to follow and I love that you showed the different ways of oiling the roti. Thank you, I made my parents so proud when i showed them the pics!
Althea Brown Says
Awesome! Yay! You did it! I would love to see pics too. If you have Facebook or instagram please share pics with me there. Facebook.com/metemgee or @metemgee on Instagram.
Mari Says
Hi : I tried the oil roti but didn’t get it . The finished texture was soft more or less but with a stretchy stiff chewing gum kind of softness . Not soft and pliable . The dough when finished mixing looked as if there was an inner part and an outer protection shell . Please guide if possible. Thank you for sharing.
Althea Brown Says
Hi there, couple of things. I always have to ask first if you followed the recipe directly as written. Second did you cover the dough while it was resting. Sounds like it formed a crust which will affect the final product. Additionally a stiff crest texture sounds like it wasn’t cooked enough. Let’s chat some more and I’ll help you figure it out.
Kendra MILNER Says
Can you use self rising flour instead of all purpose
Althea Brown Says
I don’t recommend it. The ratio of leaving agent will be too much.
Kares Clarke Says
I tried this recipe and it came out great! Thanks for sharing.
Althea Brown Says
So glad it worked for you. Thanks for sharing.
Althea Brown Says
Thanks for trying it.
Lollie Says
I was just wondering “why” you have to CLAP the Roti? Does it help make it more fluffy or something????
aLEX Says
I love the BOWL TECHNIQUE TO CLAP THE HOT SUCKER ..
thanks
Desiree Says
can you use. Active yeast can get rapid yeast right now sorry for the caps but that is how its typing.
Althea Brown Says
It’s ok. It types in caps but comes through fine. Skip the yeast. You don’t need it. I promise!
mauriceia Says
Hello , Thank you for this recipe. It is perfect . I never thought i would ever make roti because it seemed really difficult. But because of covid 19 i am trying out various meals. My friend’s mother sent me to your sit and it resulted in tasty soft amazing paratha . Thank you. will definitely be trying the dhalpuri recipe also . Have a great day . you have a new subscriber for sure . Stay safe.
Althea Brown Says
Thank you so much for this comment and for subscribing. Yay to a great roti!!
Tandieka Says
This was a simple and helpful recipe. its been a while since ive made Roti so this was a Great reminder of the process.
Margue Says
Hello i don’t have that type of cup can i WEIGh the flour ?of yes how many grams ?sorry for my english i speak french or can i use a another type of cup?
Althea Brown Says
Hi. It’s 1 lb of flour or 453g
Margue Says
Thank you
Raulene Says
I have attempted roti making a few times. I finally got it right thanks to this recipe. So easy even impatient me could do it. I call it roti making for dummies. Thanks so much. I will try to make often till they are perfected.
Althea Brown Says
Thank you so much for trying the recipe and sharing.
Angelicque Says
Hi I have never made Roti before until today using your recipe. It was delicious. Thank you.
Althea Brown Says
Thank you for trying my recipe and for sharing.
Asha Says
Sis, ThanKs so, so much for taking the time to perfect this recipe. I used it today to make roti for the first time in over a decade ( i typically buy or wait for Family to make), and this recipe produced some Soft and Delicious roti. I will definitely be trying this again.
Althea Brown Says
Thanks so much for trying my recipe and trying it.
Vis Says
Hi Althea,
Sorry but i CANNOT understand why i can ONL write with caps. So please excuse this.
I find that adding yeast makes PARAThAS have the texture of BREADMACHINE BLEACED FLOur texture which i do not like. The ROTIS made in the Trinidadian Roti shops in NYC taste like this too.
And just to add one last point…PARATHAS and ROTIS ARe real Hindi WORDS and PARATHAS are INDian breads not Indian influenced Bread. ALMost all the indian foods from ROTIS , CHOKHA to CURRIES are Indian, period.This is just to make sure that tribute is paid to our ancestors.
THANK you for sharing your recipes.
Althea Brown Says
Hi thanks for reaching out. I don’t find that the texture of these rotis are different than when I don’t at yeast. I’m guessing it’s because of the tiny amount of yeast that’s added but we all have different taste buds and react differently to different ingredients. Also thanks for the note about Paratha and rotis. Sometimes when writing blog posts we choose words that maybe should have been omitted in the second edit. This may be one such occasion. I say this only to assure you that I’m well aware of the origins and absolutely want to honor our ancestors. No ill-intent was meant this was simply a case of over thinking while writing.
Haz Says
She’s corr, its influenced . Indian pe dont make roti this way. If you think You think your ancestors should get credit for inFluencing a changed dish , then you can go back to india and give it to them. Obviously you have some issues which need Phycological influence. Its a recipe being sHared, you should not Be on here sharing you racial issues. Get a whole of yourself woman and grow up. One life to live, stop hating on humans.
Richard Rampersad Says
THIS WAS WONDERFUL… LIGHT FLAKY AND DELICIOUS…. IM A TRINIDADIAN AND PROUD US CITIZEN…. I MADE THIS WITH CURRY SHRIMP
Althea Brown Says
Thank you so much for sharing.
Patricia Says
Easy fool proof Roti. Taste like my mom’s. The best I’ve ever made. Soft, flaky & perfect! Thank you,
Chandra persaud Says
Can i ask why You include yeast in this second version of roti? So which one is better? The old one or this new version?
Althea Brown Says
Hi. I wouldn’t say that either is better than the other. They are different but both produce a good roti. I included the yeast to help those still struggling with perfecting roti dough (even after trying my original recipe). This recipe was actually born when I was making dhal puri one day and ran out of peas and decided to make the remaining dough into rotis. Then when I was trying to teach my son how to make the dough I thought how can I make it easy for him so he doesn’t have to knead it and wait for it to rise, etc. If you’ve had luck with my previous recipe. Keep using it. It’s a great roti recipe. If you are still struggling and want a non-traditional advantage, use the yeast! Hope this helps.
Chandra persauD Says
Ok thanks. BY the way i made your fruit cake for christMas and it was Really good. Very soft and moist. I sent you a mail and a pic of it cause i tried to upload a pic on the blog but i couldN’t.
Althea Brown Says
That’s awesome and sorry about that. I don’t think the comment sections allows pics but if you are on social media please share it with me there so I can repost!
Kelly Says
Could you make this in advance and half cook the roti? How would this turn out?
Althea Brown Says
Hi Kelly, you can make the dough ahead and freeze it or you can fully cook the roti ahead and freeze or store in the refrigerator (see above for reheating instructions). However I have never made roti and half cook it so I am not sure how that would turn out.
Naz Says
Hi i made your dholl puri recipe it came reallt nice i cant believe it really yummy am going to try your roti now
Althea Brown Says
That’s so great. Thanks for sharing. You’ll nail the roti!
Bev Says
Hi: i made the oil roti with the yeast trick and it worked so well!! Thank you!! I now have a roti recipe that makes me look like i can make roti!! LOL!! Delicious, soft and easy to make.
Althea Brown Says
That was quick. Awesome. Thank you for trying it and isn’t it so surprising how perfect it is with little effort!
Richard Rampersad Says
THIS WAS WONDERFUL… LIGHT FLAKY AND DELICIOUS…. IM A TRINIDADIAN AND PROUD US CITIZEN…. I MADE THIS WITH CURRY SHRIMP
Master Chef Says
The continuous talking & cook’s voice isq annoying…mute if you’re struggling & focus on the technique….the type of roti one yields, is down to the technique used.
I am me Says
and you really needed to say that? How about thanks?
Kerry Says
I know right. Ppl rell outa place.
JM Hanes Says
I especially appreciated the continuous commentary in the video! Not only did the chef offer useful tips, she kept me from getting bored. I was not even tempted to fast forward through any repetitive parts as I often do elsewhere.
Many thanks to Althea! I am so pleased to find a recipe & technique that doesn’t require thinking way ahead to allow enough time for all the resting!
MossyMozart Says
In contrast, I enjoyed the quality of the chef’s voice. She was calm, engaging, and spoke like she was smiling the whole time. I needed the hand-holding throughout the video, too.
Clare Rama Says
Your rudeness shows a lack of class.
Jenny Says
I have never even made bread and tried this recipe for roti.Oh my gosh it came out perfect..I always thought its hard work but it was so easy Thanks a lot
Althea Brown Says
You’re so welcome. Enjoy!
Venecia Says
Wow! I was always afraid to make this. Last time I tried with a different recipe, it was terrible! Your recipe is so great…I managed to make 9 mini rotis with this recipe and they’re perfect! This is going in my recipe book. Thank you so much! ❤