
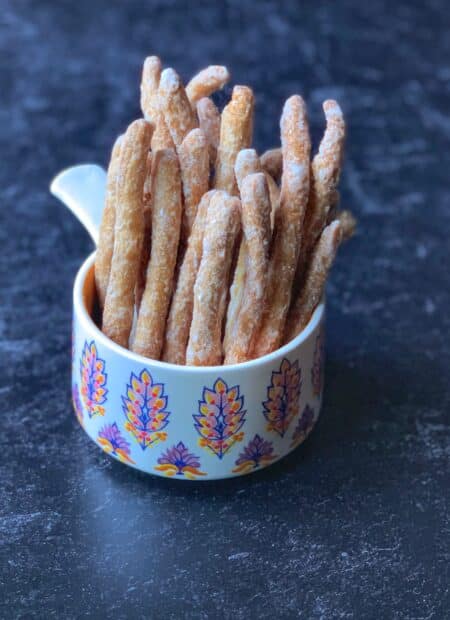
This Guyanese crunchy mithai recipe has a great crisp bite but still melts in your mouth. This sweet snack is deep-fried until golden brown, and then it’s coated with a homemade sugar syrup that makes it delicious.

Aunty Cheryl’s Crunchy Mithai
Mithai was one of my favorite sweet snacks when I was a child and remains so to this day. On trips to Guyana, I brought back Aunt Cheryl’s crunchy mithai, a snack that gets better with age. After trying my best to replicate her recipe for years, I have finally secured her mithai recipe to share with you all (with her blessing, of course).
Why You’ll Love This Guyanese Mithai Recipe
- Made with Simple Ingredients: This recipe for crunchy mithai is no-frills, just like the kind that street vendors in Guyana sell. Street vendors are trying to make a living and don’t want to spend more on ingredients than what they can sell the finished product for, so they keep their recipes basic. That philosophy works for this snack!
- Great for Parties: This snack is super shareable. Make a batch for family and guests and everyone can munch on these before or after dinner while playing games or watching a show.
- Tasty: It’s deep-fried and coated in sugar. What’s not to love? Make this recipe once, and it’s bound to become a top-requested snack.

Ingredients for Mithai
I love recipes that I can make using just pantry staples and this is definitely one of those recipes.
- All Purpose flour: The base of your dough.
- Butter: The buttery flavor shines through in this recipe.
- Ground Spices: I use ground cinnamon, ground nutmeg, and ground cloves.
- Salt: Add this so the flavors really pop.
- Granulated sugar: This is an optional ingredient that adds sweetness. This treat also coated in sugar so it’s not absolutely necessary.
- Water: Ensure it is warm.
- Oil: Use whatever oil you prefer for frying.
Sugar Syrup
- Granulated sugar
- Water
- Vanilla extract
See recipe card for quantities.
How to Make Mithai

Making the Crunchy Mithai Dough
The secret to the best mithai is in the dough. After the dough has rested for at least 30 minutes, knead the spiced buttery dough into a stiff, smooth ball.


Rolling Out the Dough

After the dough rests for at least 30 minutes, I cut the dough into 4 pieces, then worked each piece, rolling out until it is about 1/4 inch thick and cut into strips. This makes the entire process of cutting, rolling and frying the mithai a bit more manageable.

Cutting and Shaping the Mithai
I like to roll my dough strips for that rounded look. This is the typical shape of crunchy Mithai in Guyana. So I cut my Guyanese mithai strips a little thicker and shorter, then gently roll with my hands until it is the length and shape I like.
However, some people don’t mind the rectangular strips. In that case, just cut and fry, no rolling is necessary.

To roll the dough, simply place one of the cut strips on a board and gently apply pressure. Using a back-and-forth motion to roll them until the cut edges become smooth and rounded. This also stretches the mithai out into a longer, skinny, strip, exactly the way I like it.


How to Fry Mithai to Golden Perfection
After frying for about 3-5 minutes, I remove one of the mithais and test it for crunch and doneness before removing the entire batch from the oil. To try the mithai I let it cool slightly, then break it in half.
If it snaps in half with a crunch, then I know it is ready. If it doesn’t snap easily and is not crunchy then it needs to be fried some more.

Adding the sugar syrup and getting it to crystalize
A Guyanese mithai is not a mithai if it is not coated in a light dusting of crystalized sugar. I’ve had many failed sugar syrup moments when the sugar didn’t get to the right stage (softball stage) and just sat on the mithai making it limp and soggy. All of my hard work was wasted.
I’ve since become an expert at identifying the softball stage. Click here to learn how. I’ve also invested in an instant read food thermometer and I think you should have one too. It is an essential kitchen tool. No guessing if the syrup is at softball or not. Just stick the thermometer in and record the temperature and you’ll be sure if it is ready or not.

After pouring the syrup over the mithai, toss vigorously to crystalize the sugar, forming a light coating over the crunchy mithais. I think that Aunty Cheryl would be proud of this batch!
Tips for the Best Mithai
- It is important to let the dough rest for a minimum of 30 minutes.
- This recipe involves a lot of kneading. Kneading the dough into a stiff ball takes time, effort, and arm muscle. If you have a stand mixer with a dough hook, use it because it makes this recipe so much easier. The goal is to have as stiff a dough as possible, so not a lot of water or milk is added. Therefore it requires a bit more kneading to bring the dry and wet ingredients together into a dough ball.
- It is best to fry this mithai on medium or medium-low heat. I keep my oil on medium heat and monitor how fast they brown. If they brown too quickly they will not cook all the way through.
- When coating the mithais with sugar, you may need to do so in portions. This leads to a light coating of sugar. Sometimes when working with large batches the sugar gets poured unevenly and clumps of sugar cover some mithai while others don’t have any sugar at all. I hate having to dust off sugar while eating them.
- Make your syrup AFTER you’ve fried all of the mithai. Cold syrup will not spread evenly. Instead, it will form larger sugar crystals and make it too sugary to enjoy.
Recipe Variations
- Soft Mithai: Prefer soft over the crunchy version? Then try my Gluten Free Soft Mithai recipe. If you’re not gluten-free just substitute the combined gluten-free flour for 3 cups of all-purpose flour!
- Gluten-Free Crunchy Mithai: If you love crunchy mithai but need a gluten-free version, I’ve got you covered! Check out this recipe.

Frequently Asked Questions
Mithai means ‘sweets’ in Hindi. Although the term references Indian desserts, in Guyana it is specifically a dough cut into thin strips, that is then deep-fried and coated with sugar.
This treat is made with flour, butter, spices, salt, and water. You can add some sugar to taste.
If this happens, your dough was not stiff enough. Remember to knead until the dough has a stiff texture.
Aunty Cheryl’s Crunchy Mithai

Equipment
- Mixing Bowl
- Large Saucepan
- Hand Mixer optional
Ingredients
- 1 pound of All Purpose flour
- 1/4 pound of butter
- 1 teaspoon of ground cinnamon
- 1/2 teaspoon of ground nutmeg
- 1/4 teaspoon of ground cloves
- 1/4 teaspoon salt
- 2 tablespoons of granulated sugar optional
- 3/4 cup of warm water
- 4 cups of oil for frying
For the sugar syrup
- 2 cups of granulated sugar and 2 cups of water
- 1 teaspoon of vanilla extract
Instructions
- Combine all of the dry ingredients (flour, ground cinnamon, ground nutmeg, ground cloves, salt and granulated sugar, if using) in a mixing bowl and mix together well. I love using a whisk for this step
- Then using a fork or your fingers, cut or rub the butter into the combined dry ingredients until a crumbly texture forms
- Next add the warm water and knead into a stiff ball. It may look like you don’t have enough water for this step. Don’t be tempted to use more that what is listed for this recipe. Just keep kneading until all the dry ingredients are folding into the dough
- Then cover the dough ball with a damp paper towel and let rest for at least 30 minutes
- After 30 minutes divide the dough ball into 4 pieces
- Then working a piece of dough at a time roll until the dough is about 1/4 inch thick
- Next cut the dough into 1/2 inch thick strips. I like to cut my strips in half so that they are about 4-5 inches in length but you can make your strips how long or short you like
- If you like your mithai to have a rounded look, gently roll each strip between your hand and the work surface until the edges become slightly rounded (see pictures above)
Frying the crunchy mithai
- Add 4 cups of oil to a large saucepan, then place on medium heat
- When the oil comes up to temperature and is hot but not smoking, add the mithai strips. Try not to add them in clumps as they may stick together
- Fry on medium-medium low heat until the mithai is golden brown then remove from the oil and place in a bowl lined with a few sheets of paper towel. The paper towels will “soak up” any excess oil from frying
- Repeat until all of the dough has been rolled out and fried
Making the sugar syrup
- Combine the sugar and water in a small saucepan then mix together until the sugar dissolves
- Then place saucepan on medium heat and bring to a boil
- Continue to boil until the syrup reduces and is at the soft ball stage or 235 °F (see notes for testing soft ball)
Coating the mithai
- When the syrup reaches the soft ball stage, pour the syrup over the fried mithai and toss until the sugar crystalizes. I do this in small batches to ensure that all of the mithai are evenly coated with sugar
Notes
Nutrition
The information listed in the recipe card is an estimate provided by an online nutrition tool. The tool evaluates ingredient names and amounts then makes calculations based on the number of servings listed for the recipe. It is provided as a general guideline and not as a precise calculation. For precise nutrition information please feel free to add the ingredients to your preferred nutrition calculator or consult a doctor or licensed nutritionist.
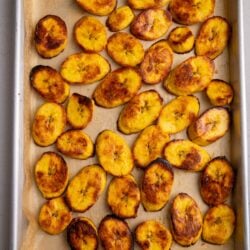 Roasted Sweet Plantains (Easy Oven Method)
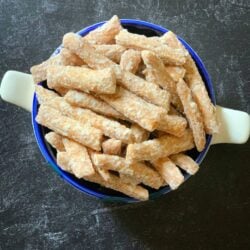 Gluten Free Crunchy Mithai
 Guyanese Pholourie (Split Peas Fritters)
 Cassava Egg Ball
Michelle🇨🇦 Says
The easiest and best Crunchy Mithai on the internet right now.
It is super easy to follow along and although some measurements are pounds and some are Cups/TBSP/Tsp. Just do a conversion on google, don’t panic. It still works out to be the best darn crunch mithai recipe.
Thanks for sharing this recipe with the world, your aunty would be super proud of it and of you!
Mell Says
This is my first time making mithai. This recipe was easy to follow. My mithai came out crunchy and the syrup came out great. I used brown sugar for the syrup. Thank you so much for this simple and delicious recipe. All of your recipes are amazing ????.
Althea Brown Says
Thank you for trying my recipe and sharing.
Shanna Says
is coconut suppose to be in this
Althea Brown Says
Not in this one. Coconut usually goes into the soft one.
Sandy Says
Thanks for the recipe, but mine wasn’t crunchy. Nor much flavour. Any ideas how to improve?
Althea Brown Says
If it weren’t crunchy the dough was too soft. It’s a really stiff dough when kneading. It may seem like it’s not enough water but don’t increase it. Not sure why the flavor was lacking. If you followed the recipe as directed it should have been very flavorful. My only suggestion is to maybe increase the spices next time to your liking.