
Guyanese plait bread is a soft, fluffy loaf of bread that is as beautiful as it is delicious. Serve it during the holidays with pepperpot or indulge as often as you’d like!
Guyanese Plait Bread
This post is dedicated to my late grandmother Inez Glen, from West Ruimveldt Housing Scheme, Georgetown, Guyana. She baked homemade Guyanese bread every Saturday and it was the softest, tastiest bread. She passed down her cooking genes to all generations of our family and I am forever grateful that she gave us these traditions!
Although many Guyanese people reserve this plait bread recipe for Christmas, I make it for my family whenever it is requested. And despite my own gluten-free diet, I often risk it all for a piece of this bread because it is that irresistible!
- Guyanese Plait Bread
- Why You’ll Love This Guyanese Plait Bread Recipe
- What is Plait Bread?
- Ingredients for Guyanese Plait Bread
- How to Make Plait Bread
- Proof the Dough for Plait Bread
- How to braid Plait Bread
- Baking Plait Bread
- The Step by Step Video Tutorial
- Substitutions & Variations
- Guyanese Aniseed (Anise seed) Bread
- Equipment
- Storage
- Tips for the Best Plait Bread
- FAQ
- Plait Bread
You’ll smell it before you even see it. The mouthwatering aroma of freshly baked bread makes my entire home smell like a bakery when this is in the oven. Get ready for the best plait braid recipe!
Why You’ll Love This Guyanese Plait Bread Recipe
- No Fancy Equipment Needed: Yes, making your dough in a stand mixer with a dough hook makes life a bit easier, but it is not necessary for this plait bread recipe.
- Great for Holidays: Some foods are the marker for special occasions and this is definitely one. There is nothing better to me than freshly baked bread, especially when paired with Pepperpot on Christmas morning. It’s comfort food at its finest!
- So Simple: You don’t need a special occasion to make bread when it is this easy! I’m sure you have the ingredients in your pantry right now. Mix it up and let it rise, you could have plait bread in about 2 hours.
What is Plait Bread?
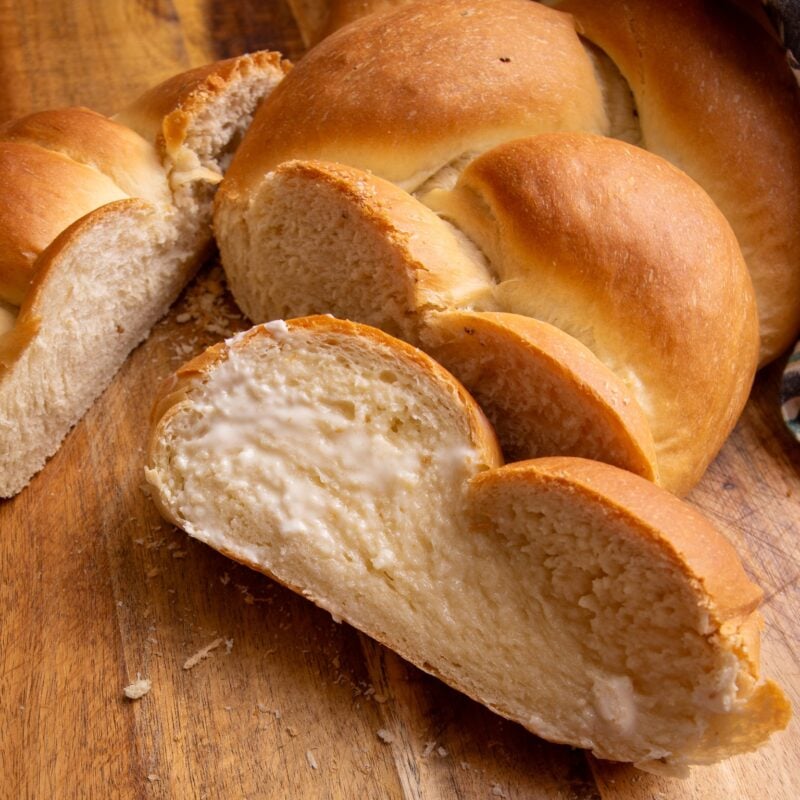
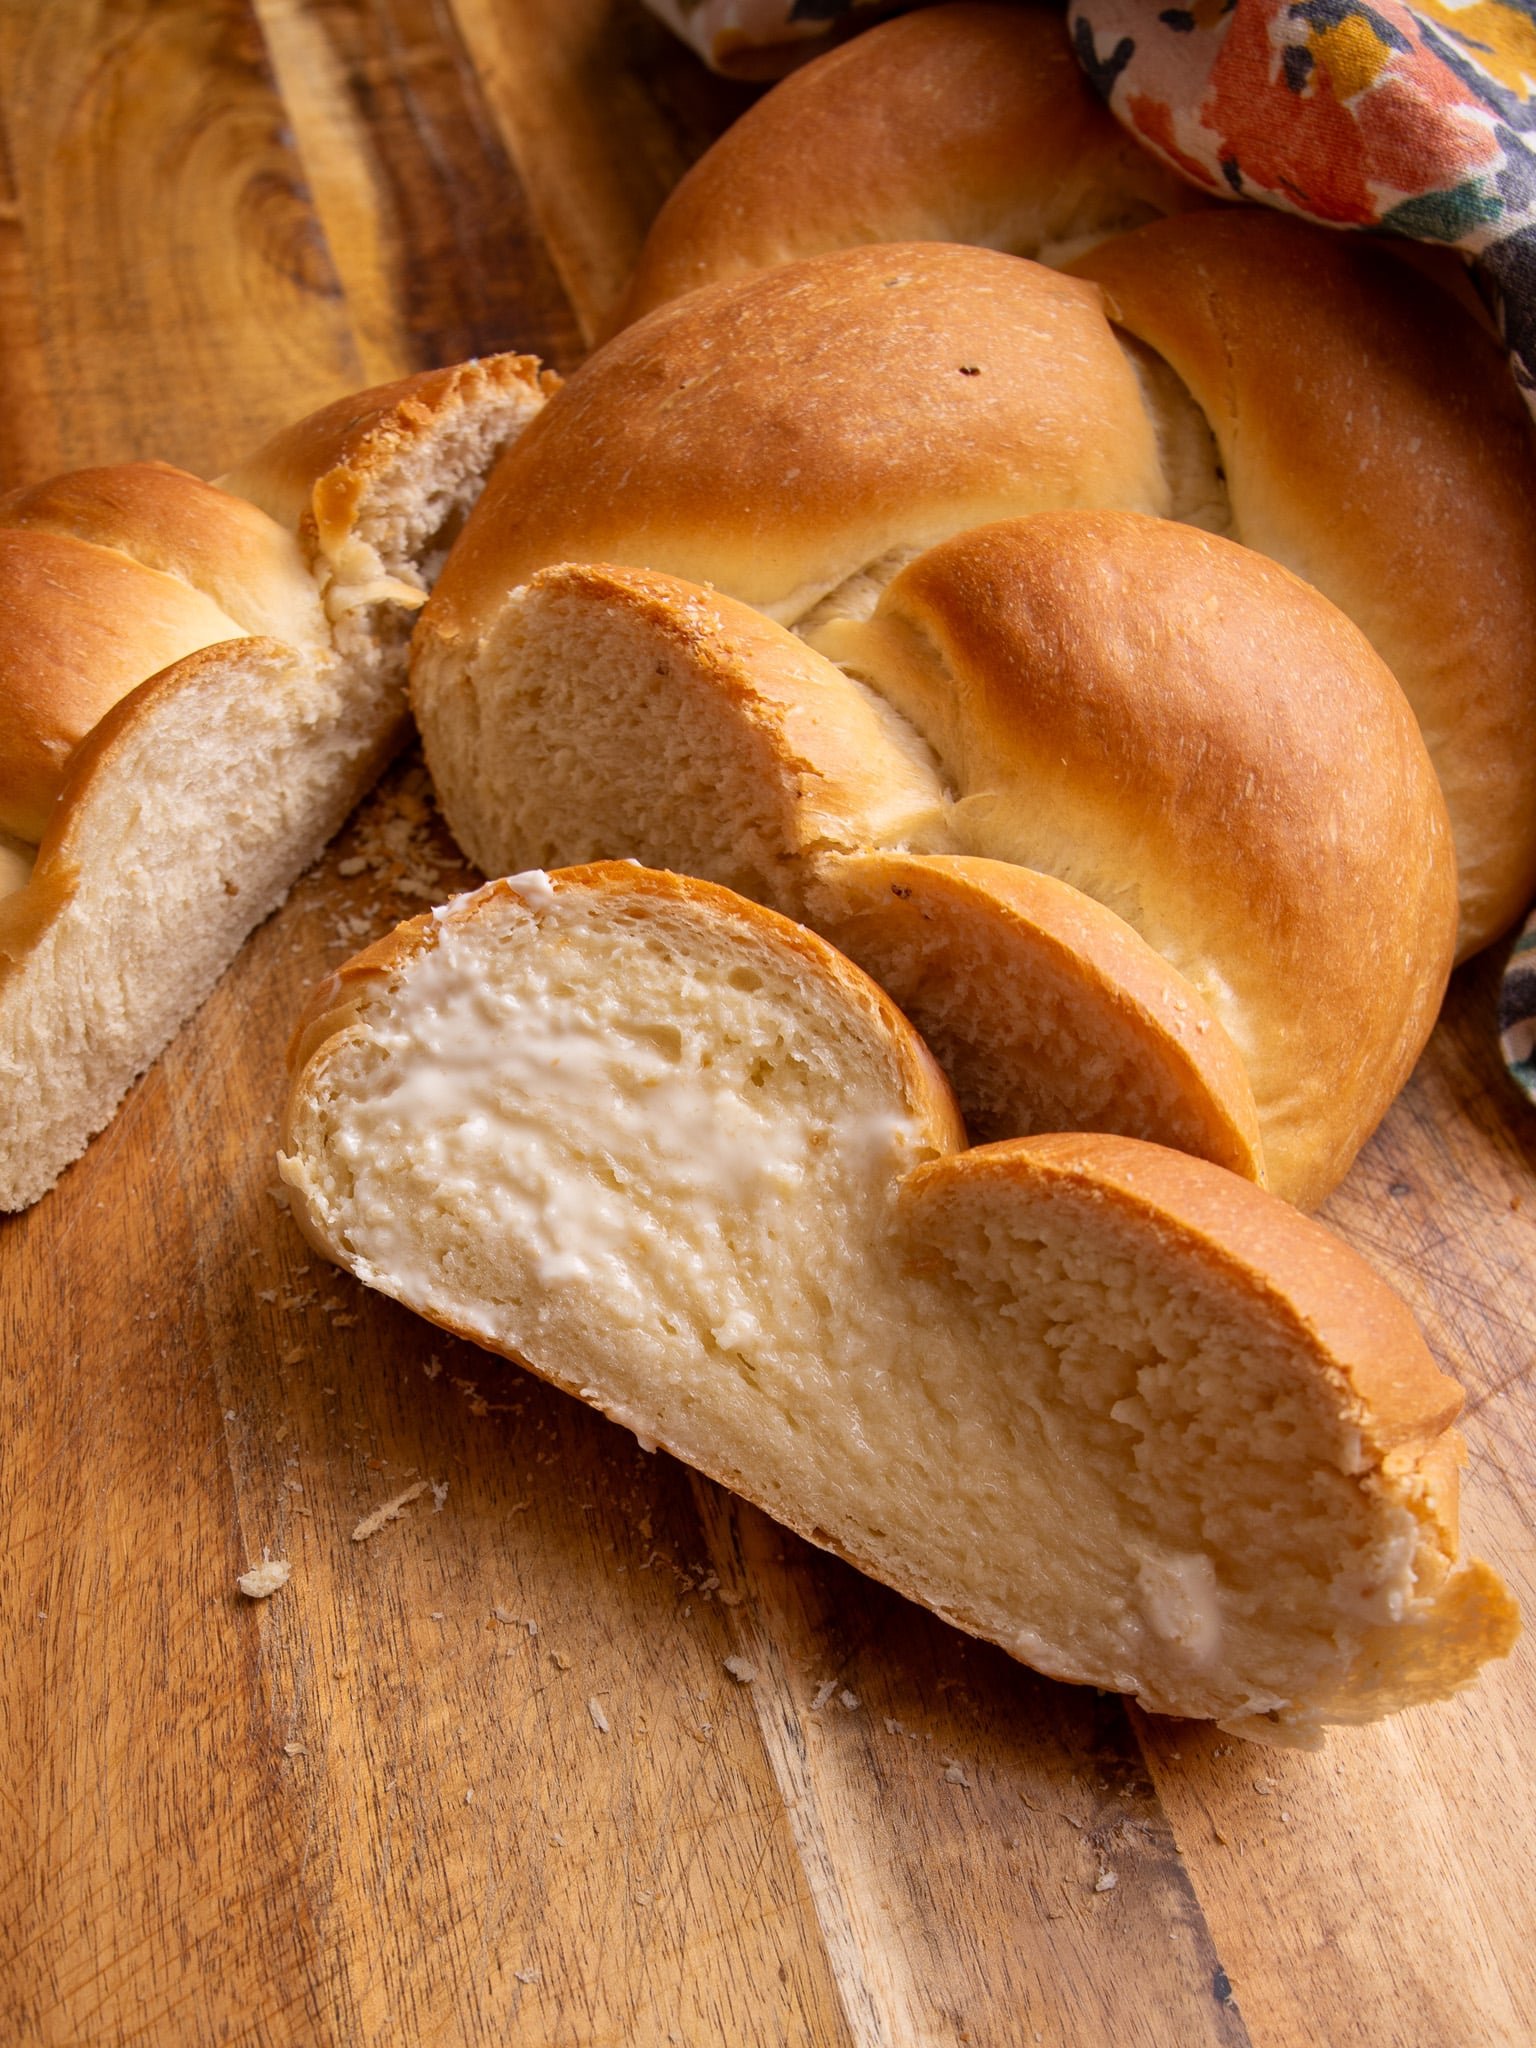
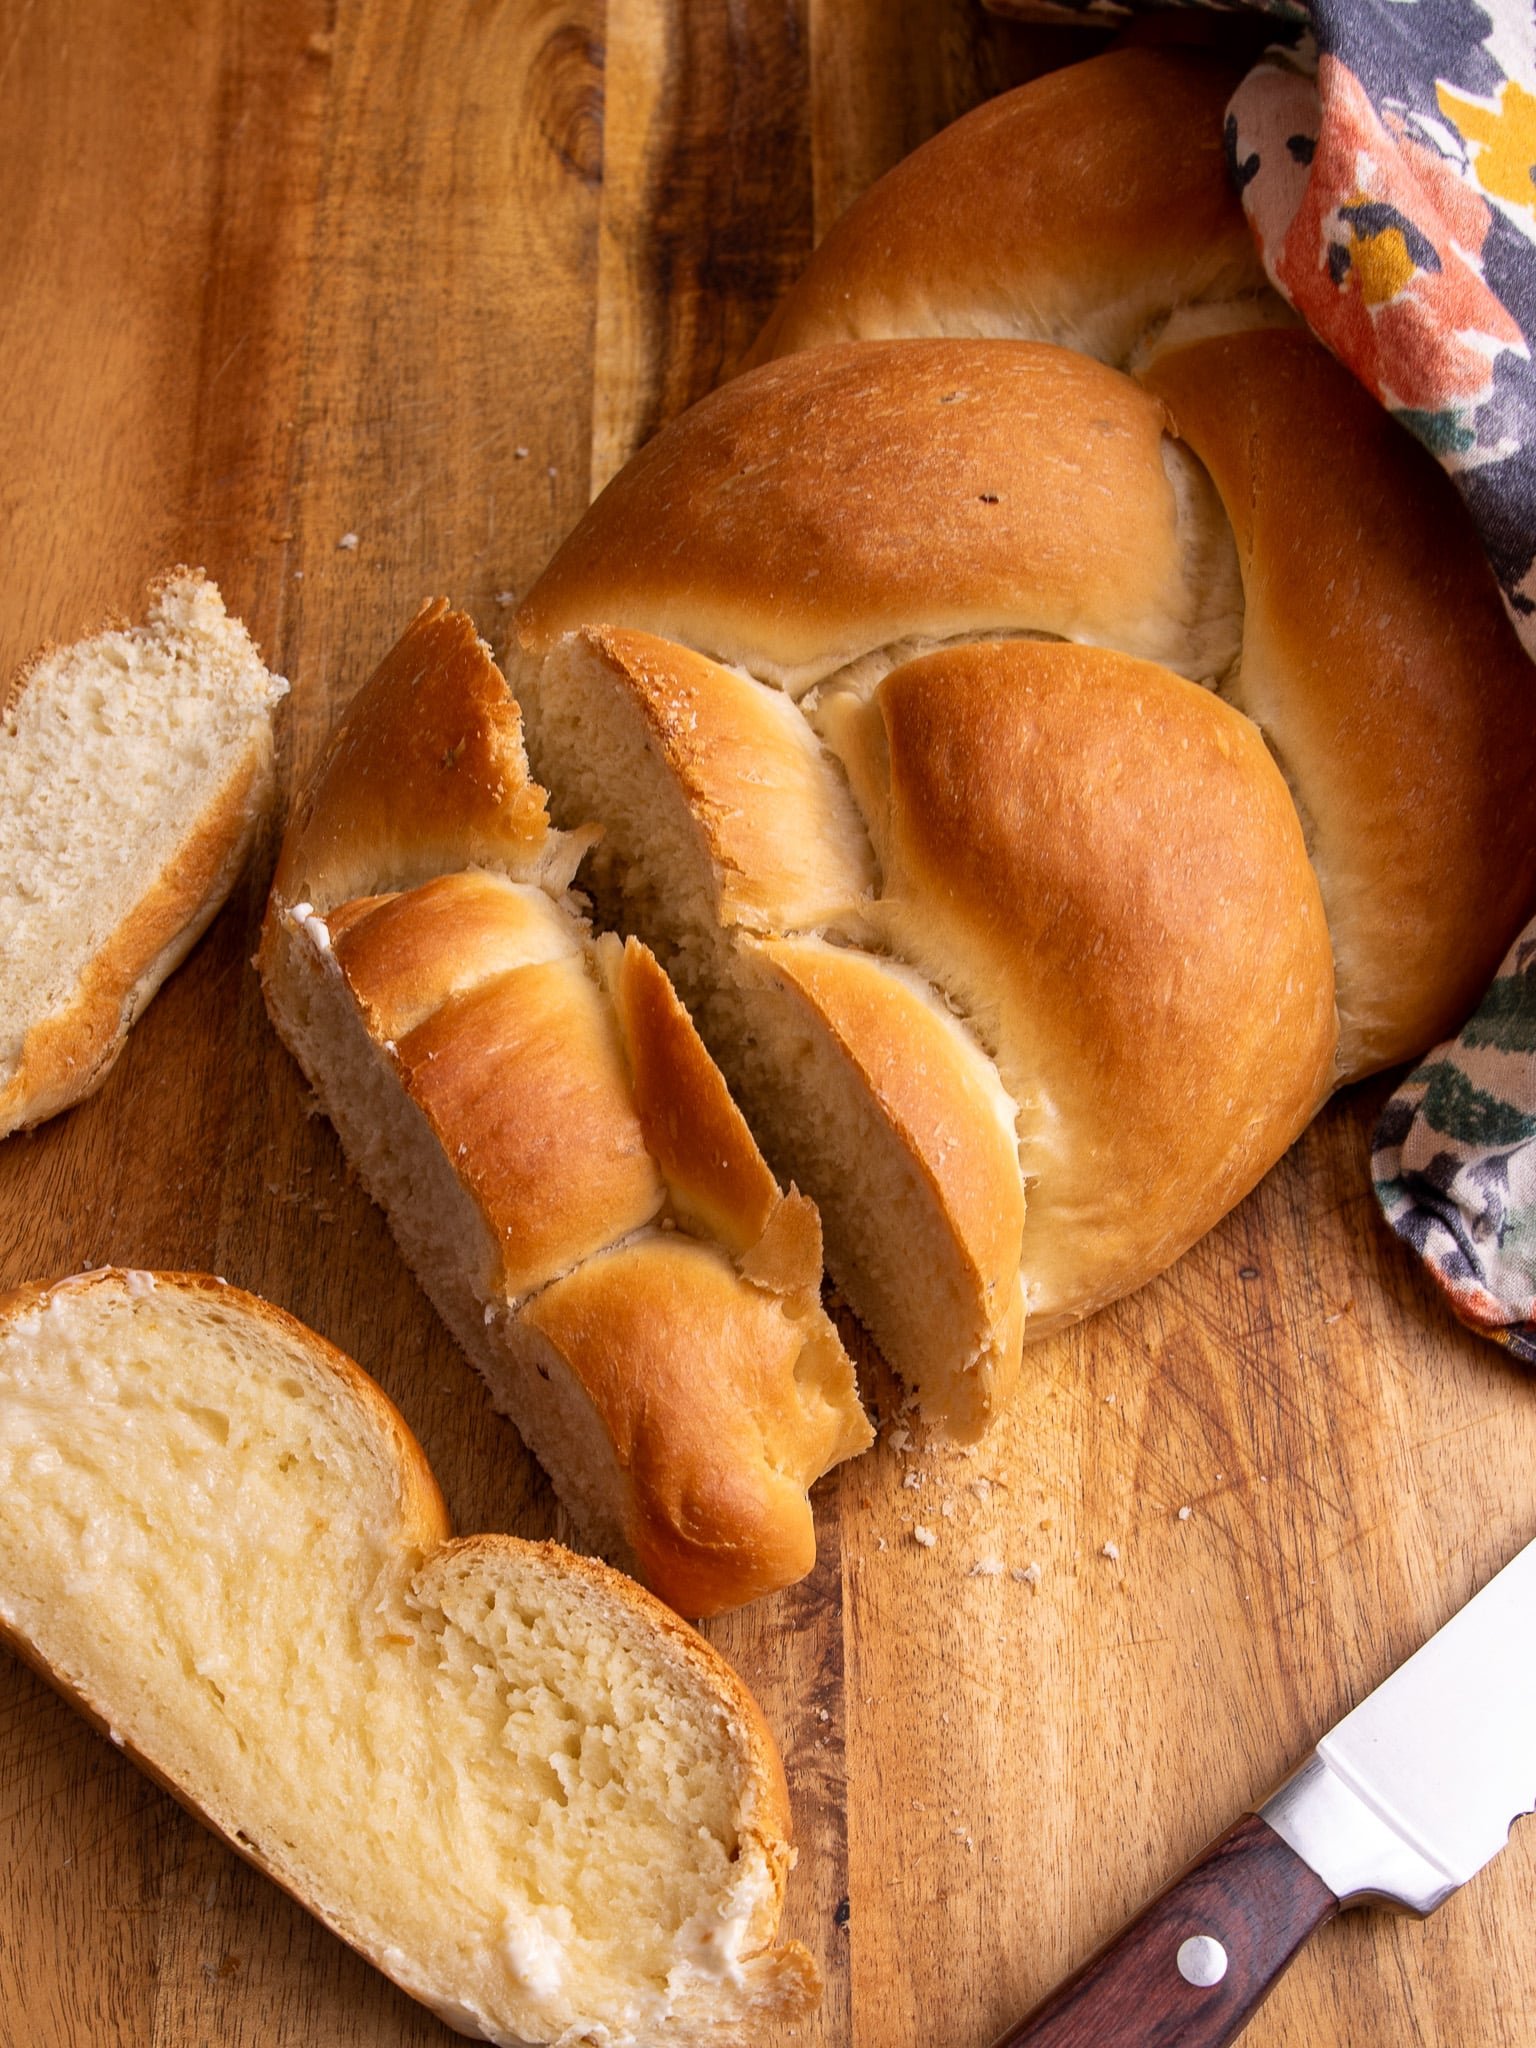
Plait Bread (Guyanese Style) is a hand-kneaded white bread that is soft and buttery. It is perfect for stews and pairs nicely with Pepperpot!
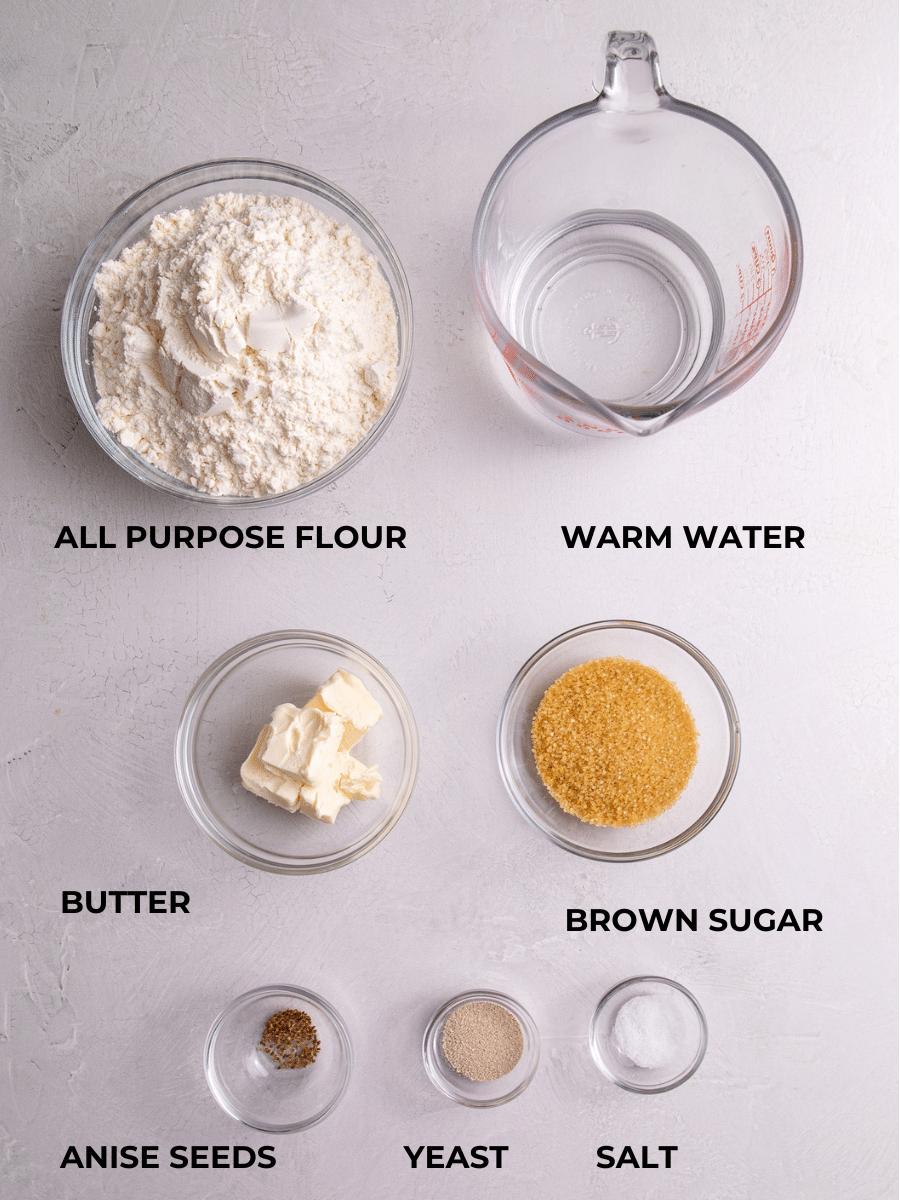
Ingredients for Guyanese Plait Bread
The ingredients for plait bread are very simple and you probably have them in your pantry right now!
In the video below I accidentally added 1/2 cup of butter to my dough for this plait bread instead of 1/4 cup (what I typically use) but it made the bread the softest bread I’ve ever made.
- Dry active yeast: This is for texture, rise, and flavor.
- Warm water: It should be approximately 110°F.
- Brown sugar: This activates the yeast. I prefer Demarara sugar or sugar in the raw.
- All-purpose flour: For the structure of the bread, plus more for dusting.
- Salt: We use just a little to taste because too much salt will affect the rise.
- Butter: Room temperature butter is best for this recipe. It is added to the dough but also used to baste the bread once it’s done baking.
- Anise Seeds (optional): This gives the bread a sweet and slightly licorice taste.
See recipe card for quantities.
How to Make Plait Bread
Bloom the yeast
You don’t need a mixer for this simple bread. It is easy to pull together in a mixing bowl, using your hands.
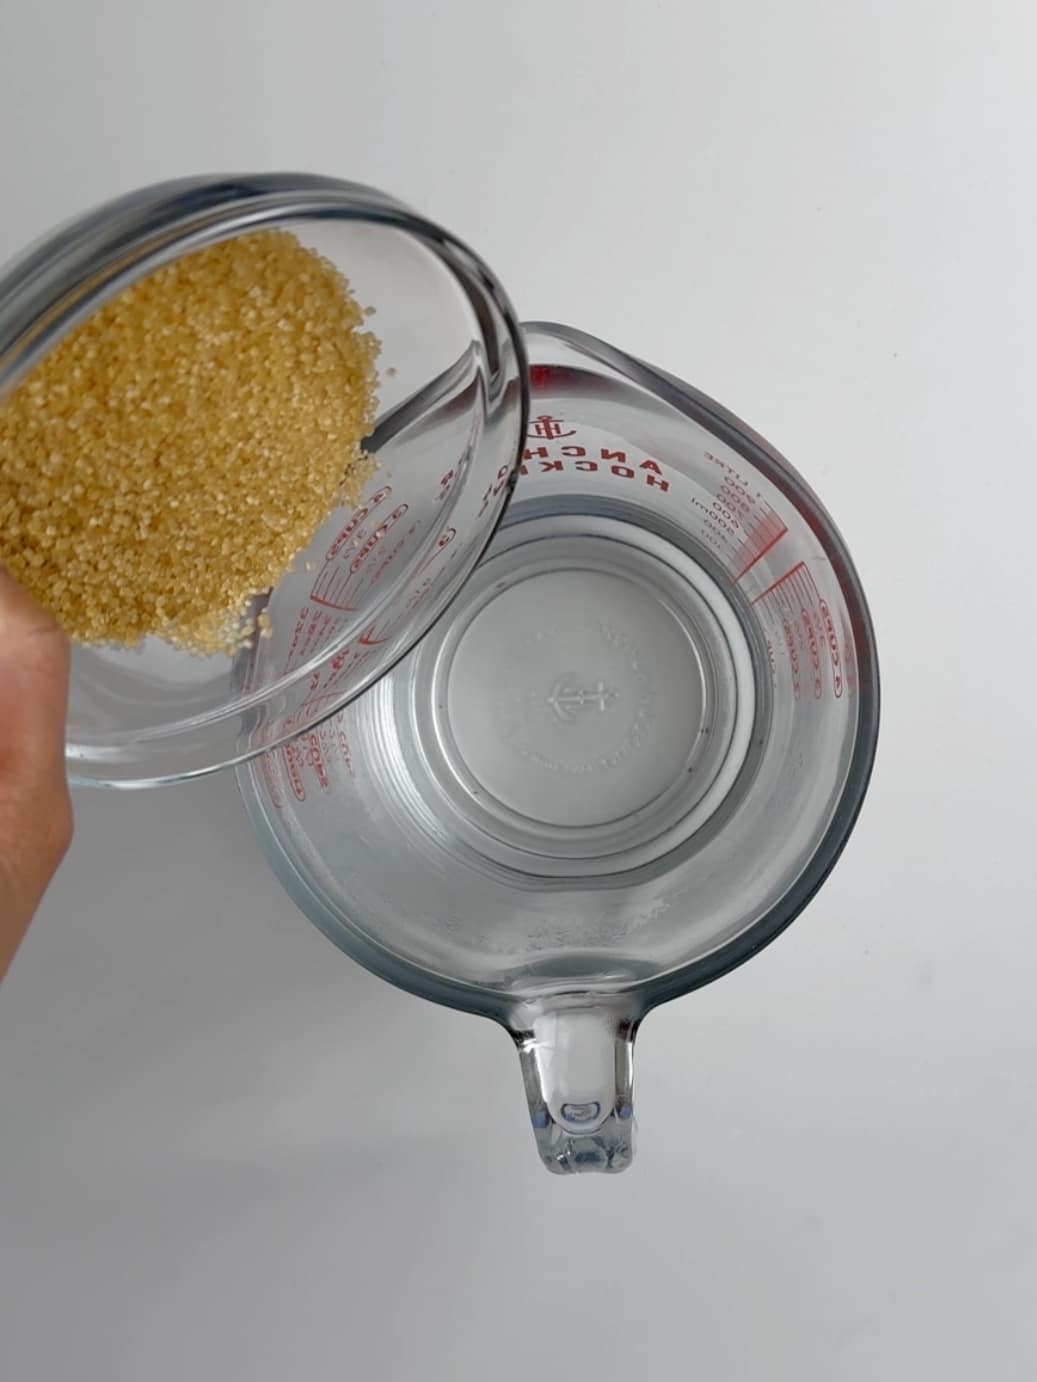
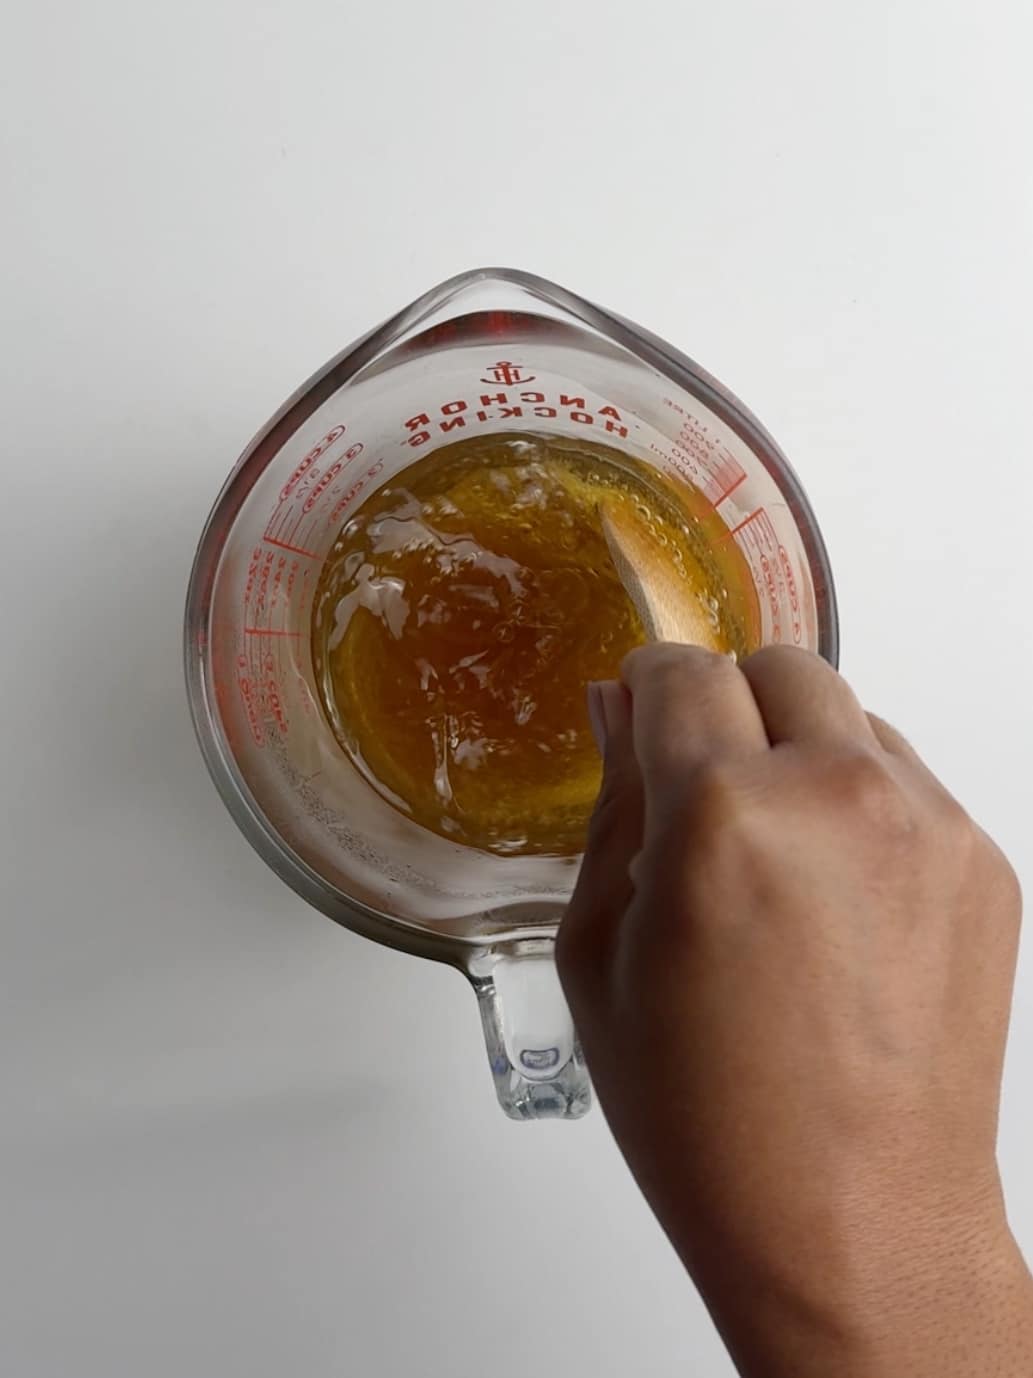
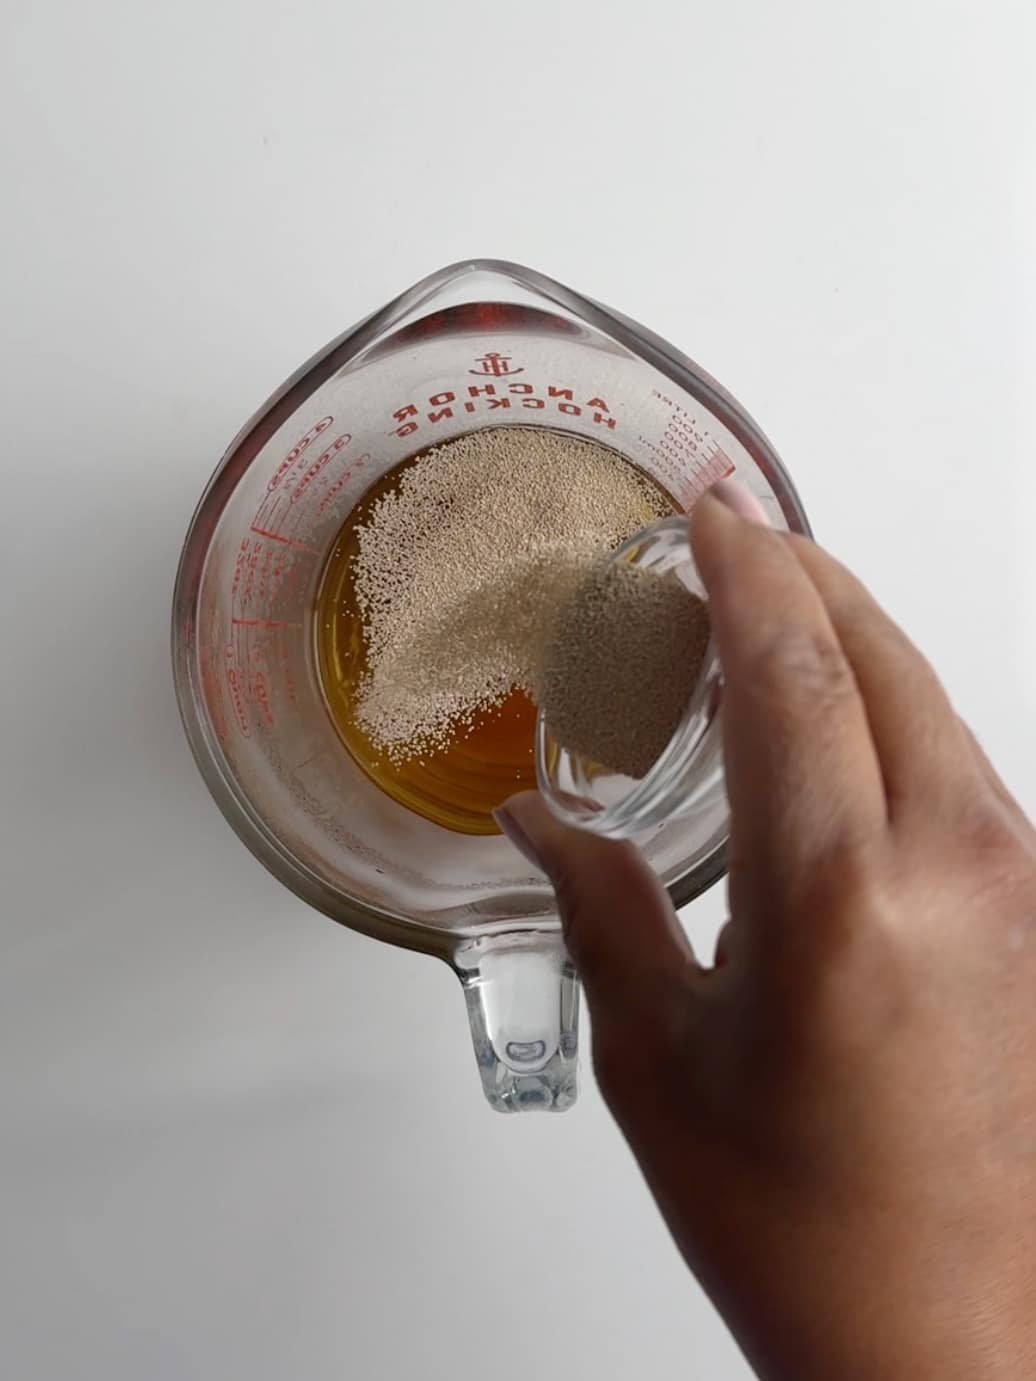
Start by blooming the yeast. Dissolve the brown sugar into warm water, then add the yeast. Cover and leave in a warm place for about 10 minutes or until the mixture has a 1 to 2 inches thick frothy top.
Make the dough
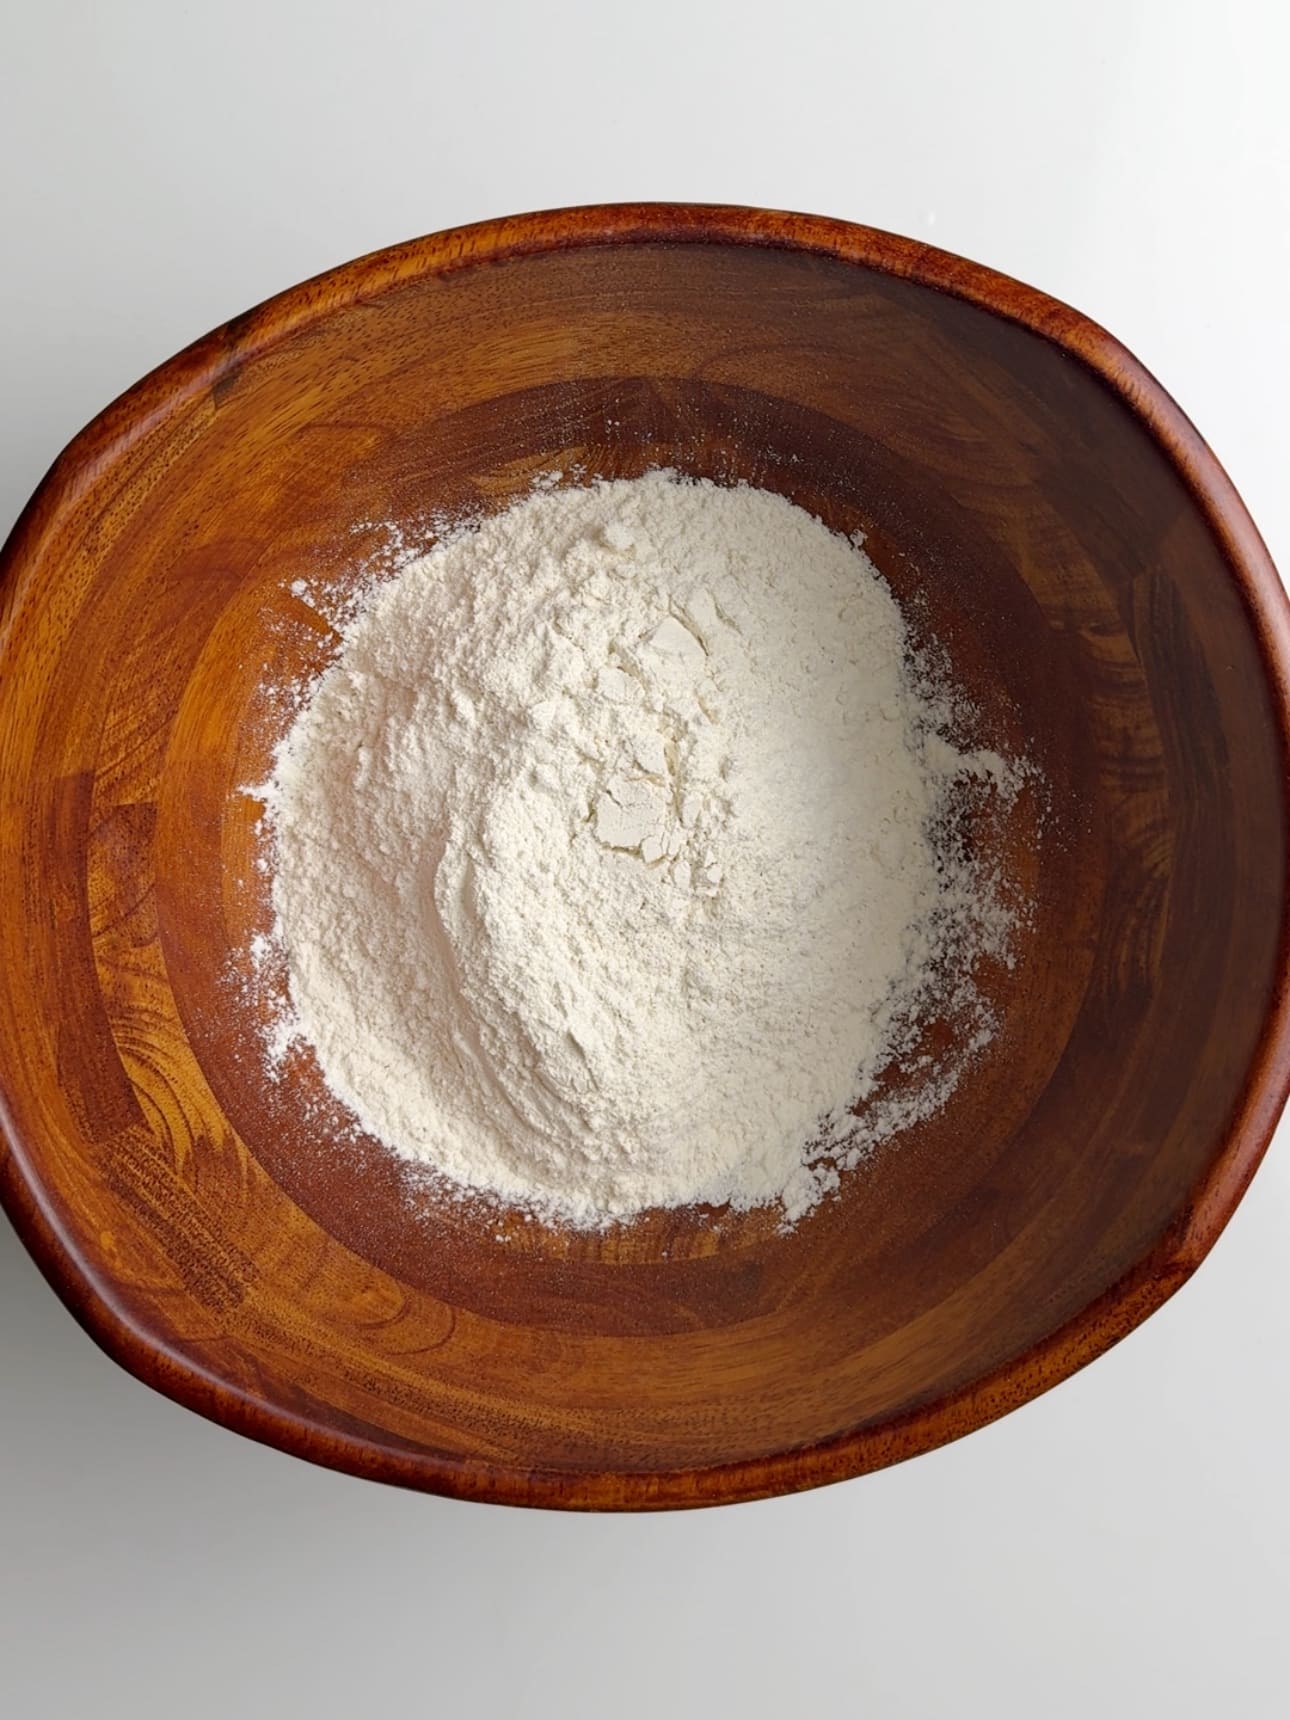
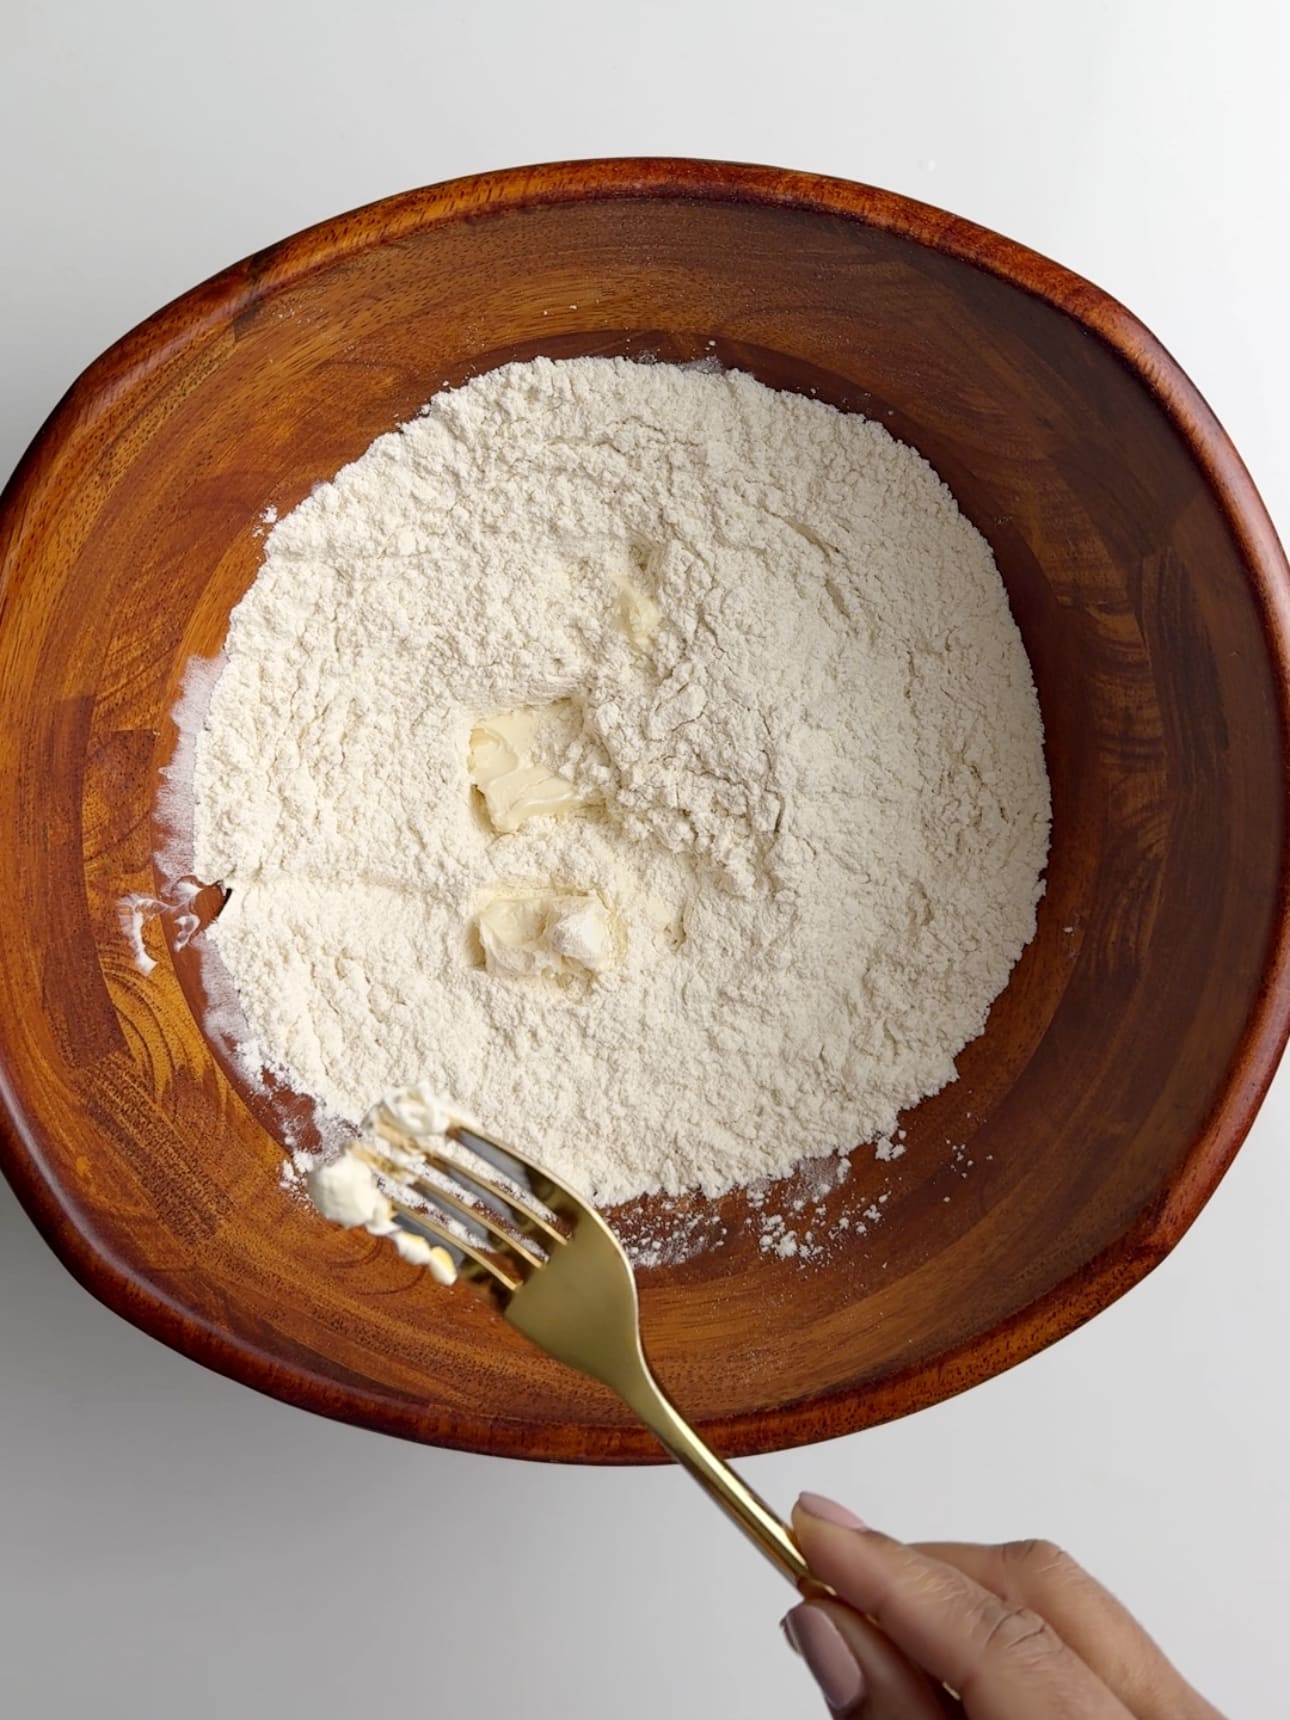
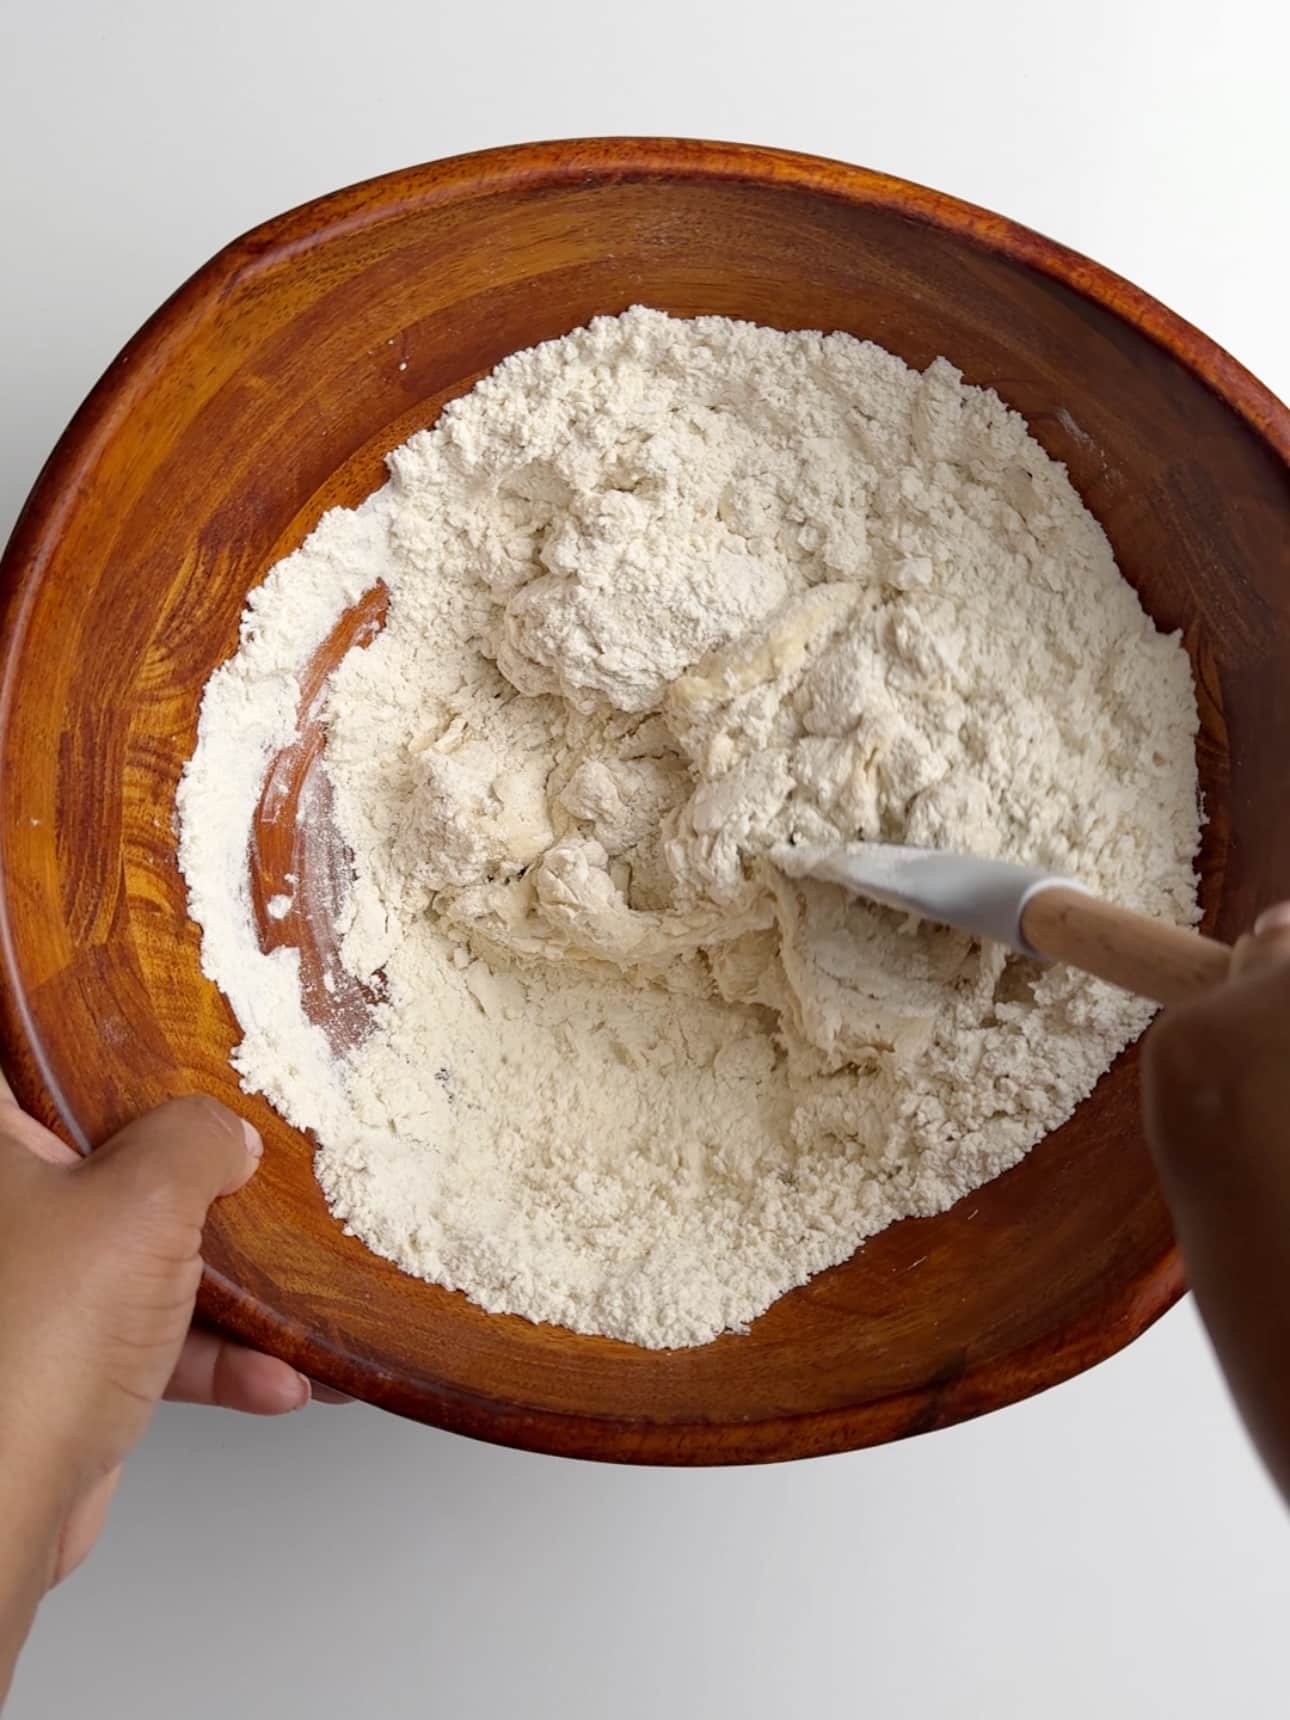
While the yeast is blooming, add the flour and salt to a large mixing bowl and mix to combine. Using a fork or your finger tips cut the room temperature butter into the flour.
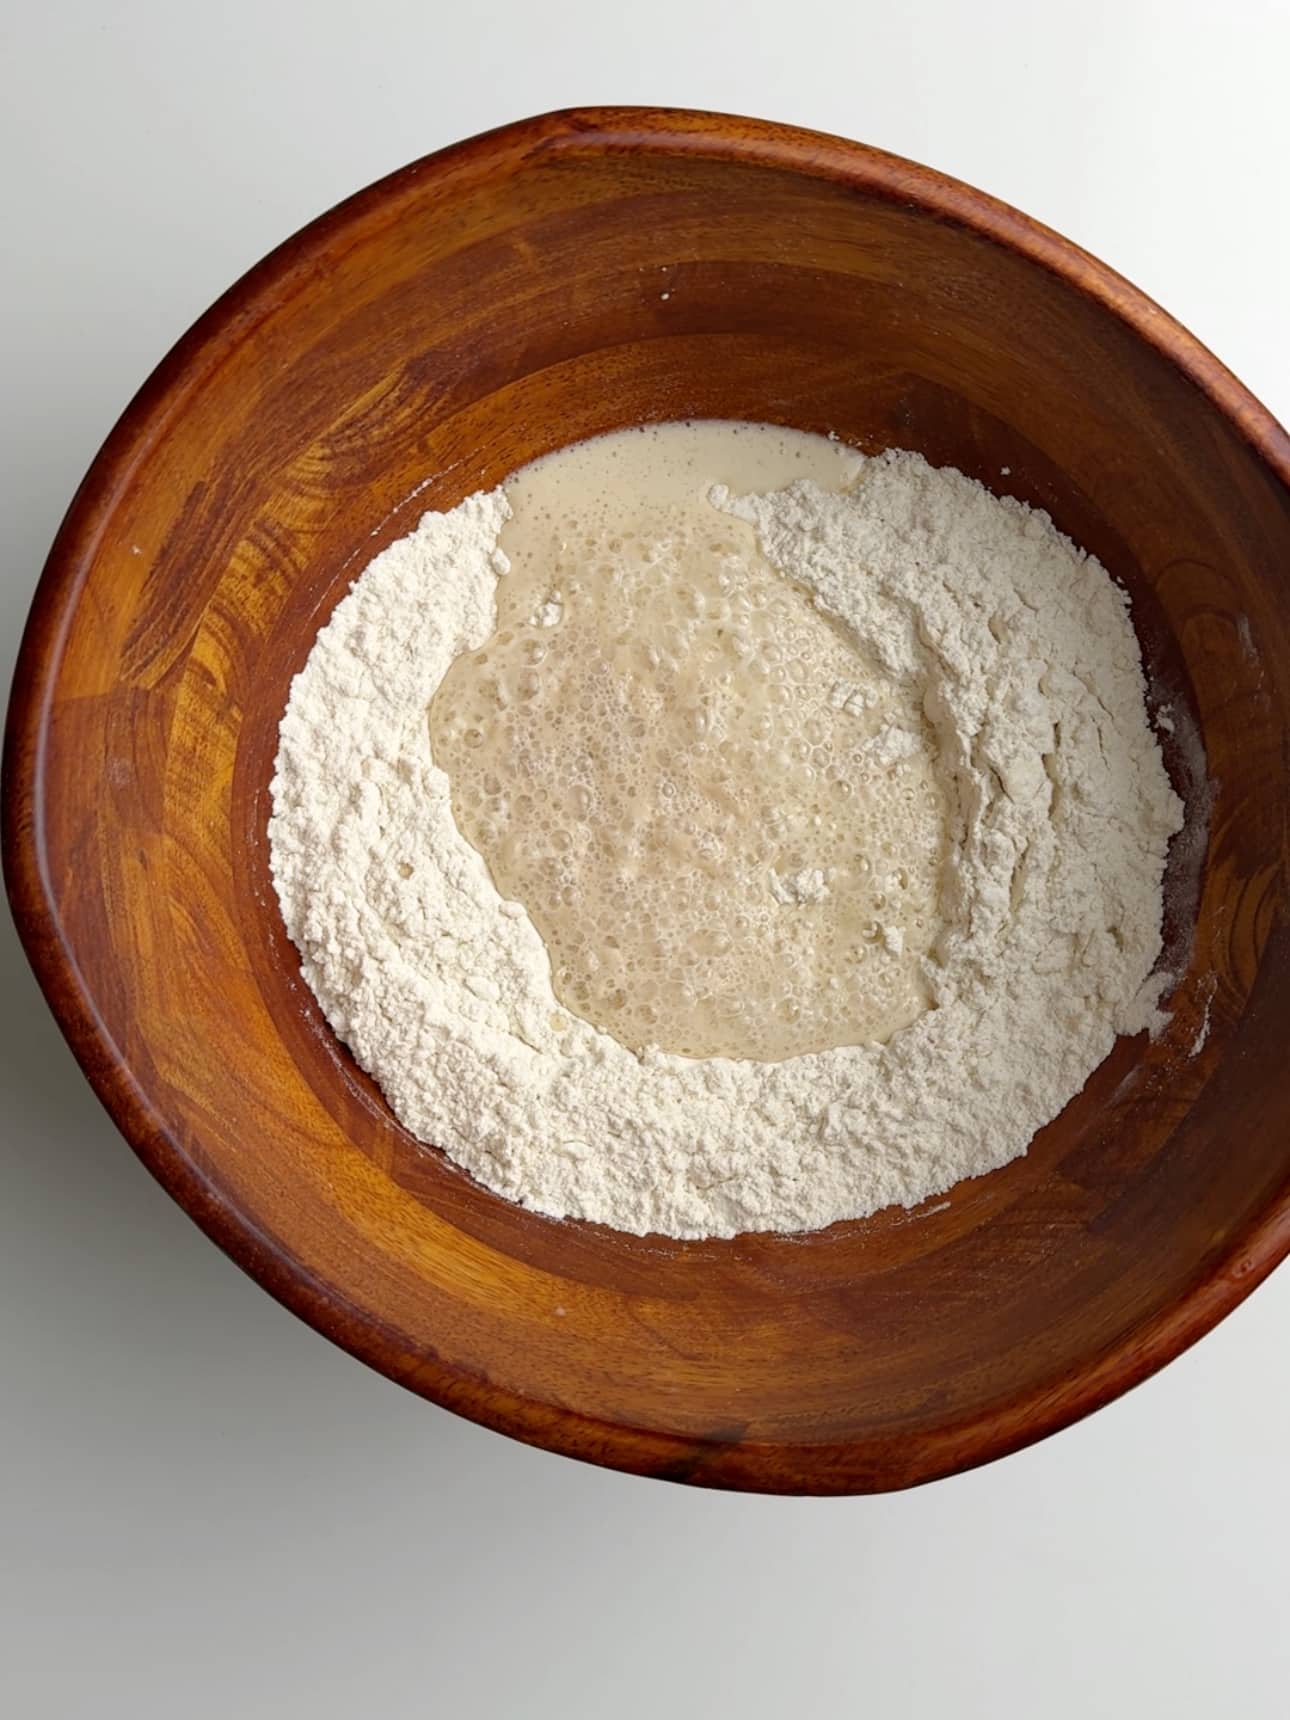
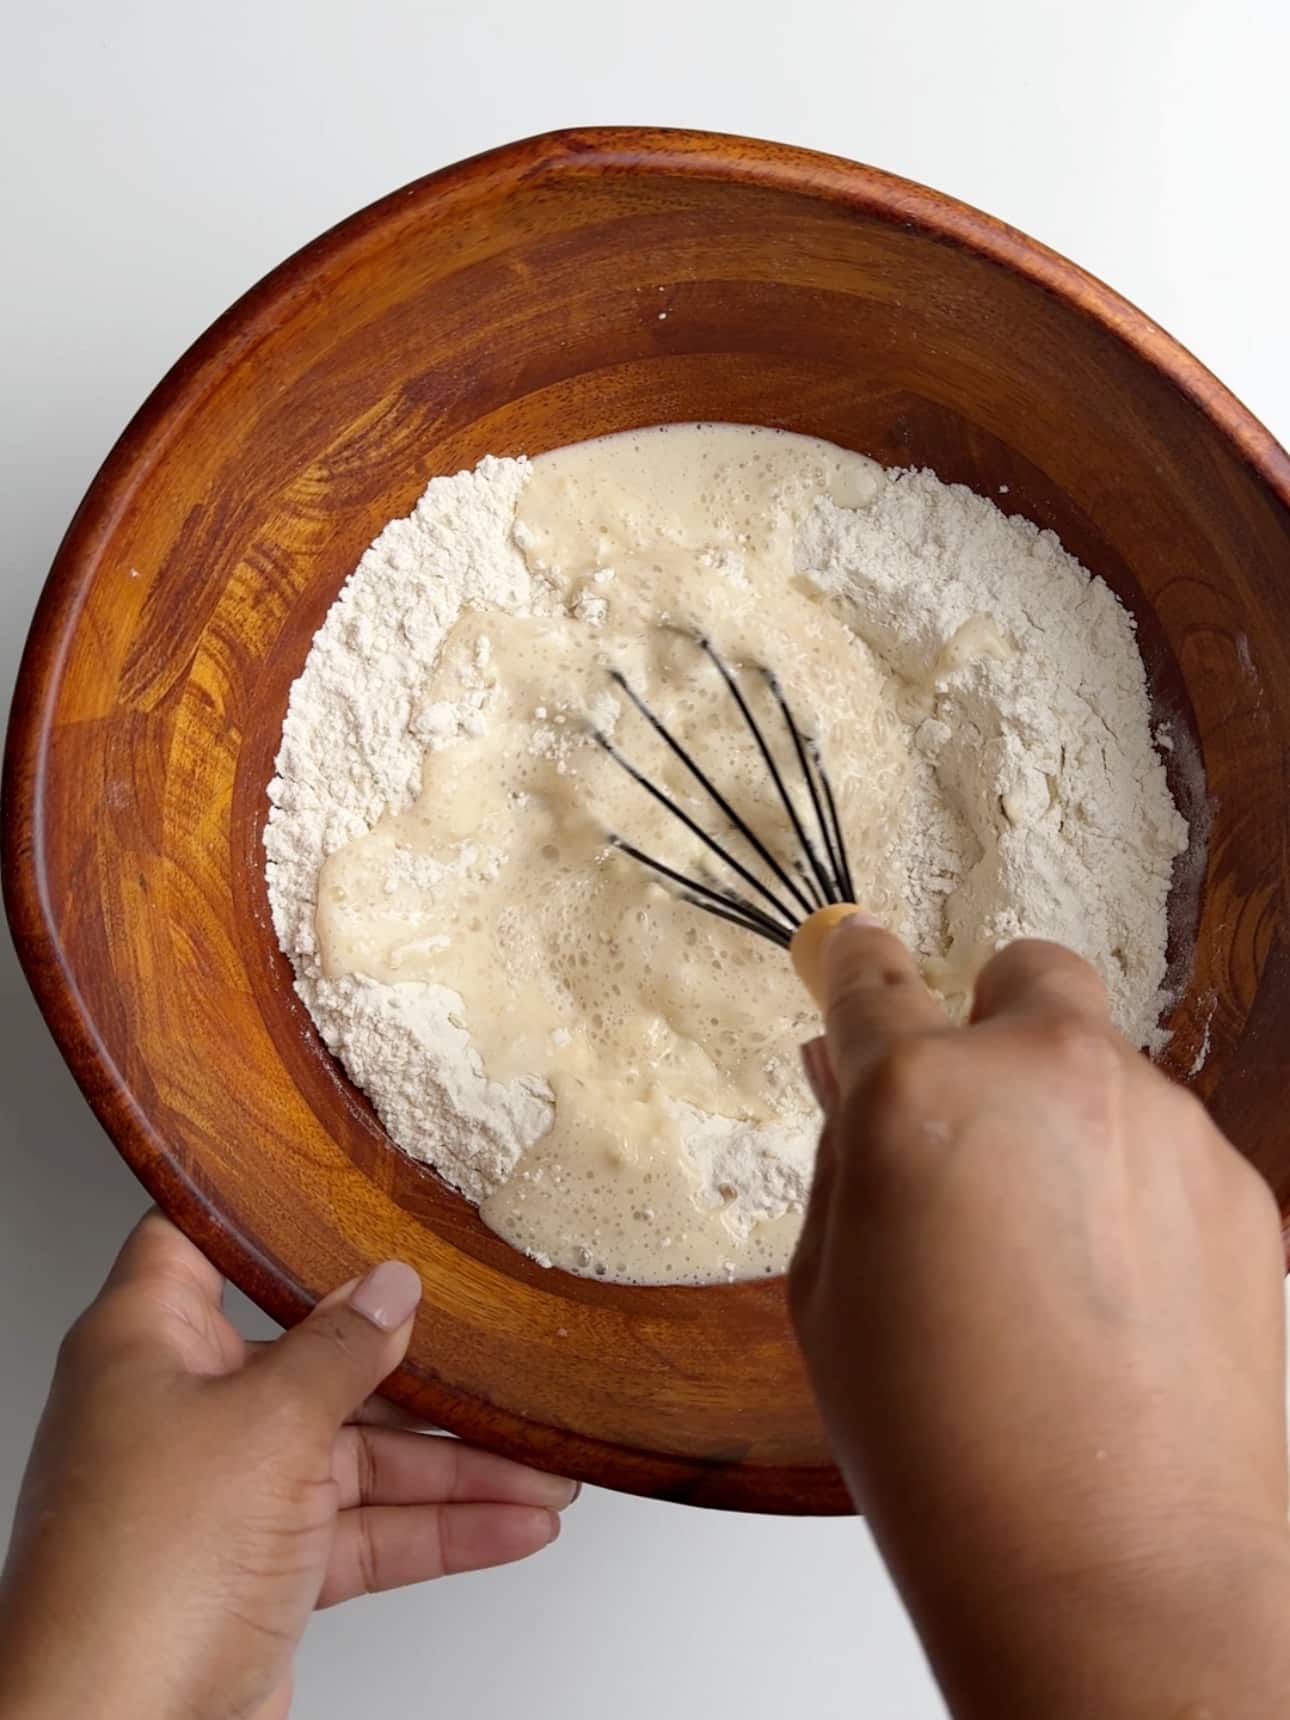
Then make a well in the center of the flour and add the bloomed yeast. Using a whisk, mix until there is a pancake like consistency.
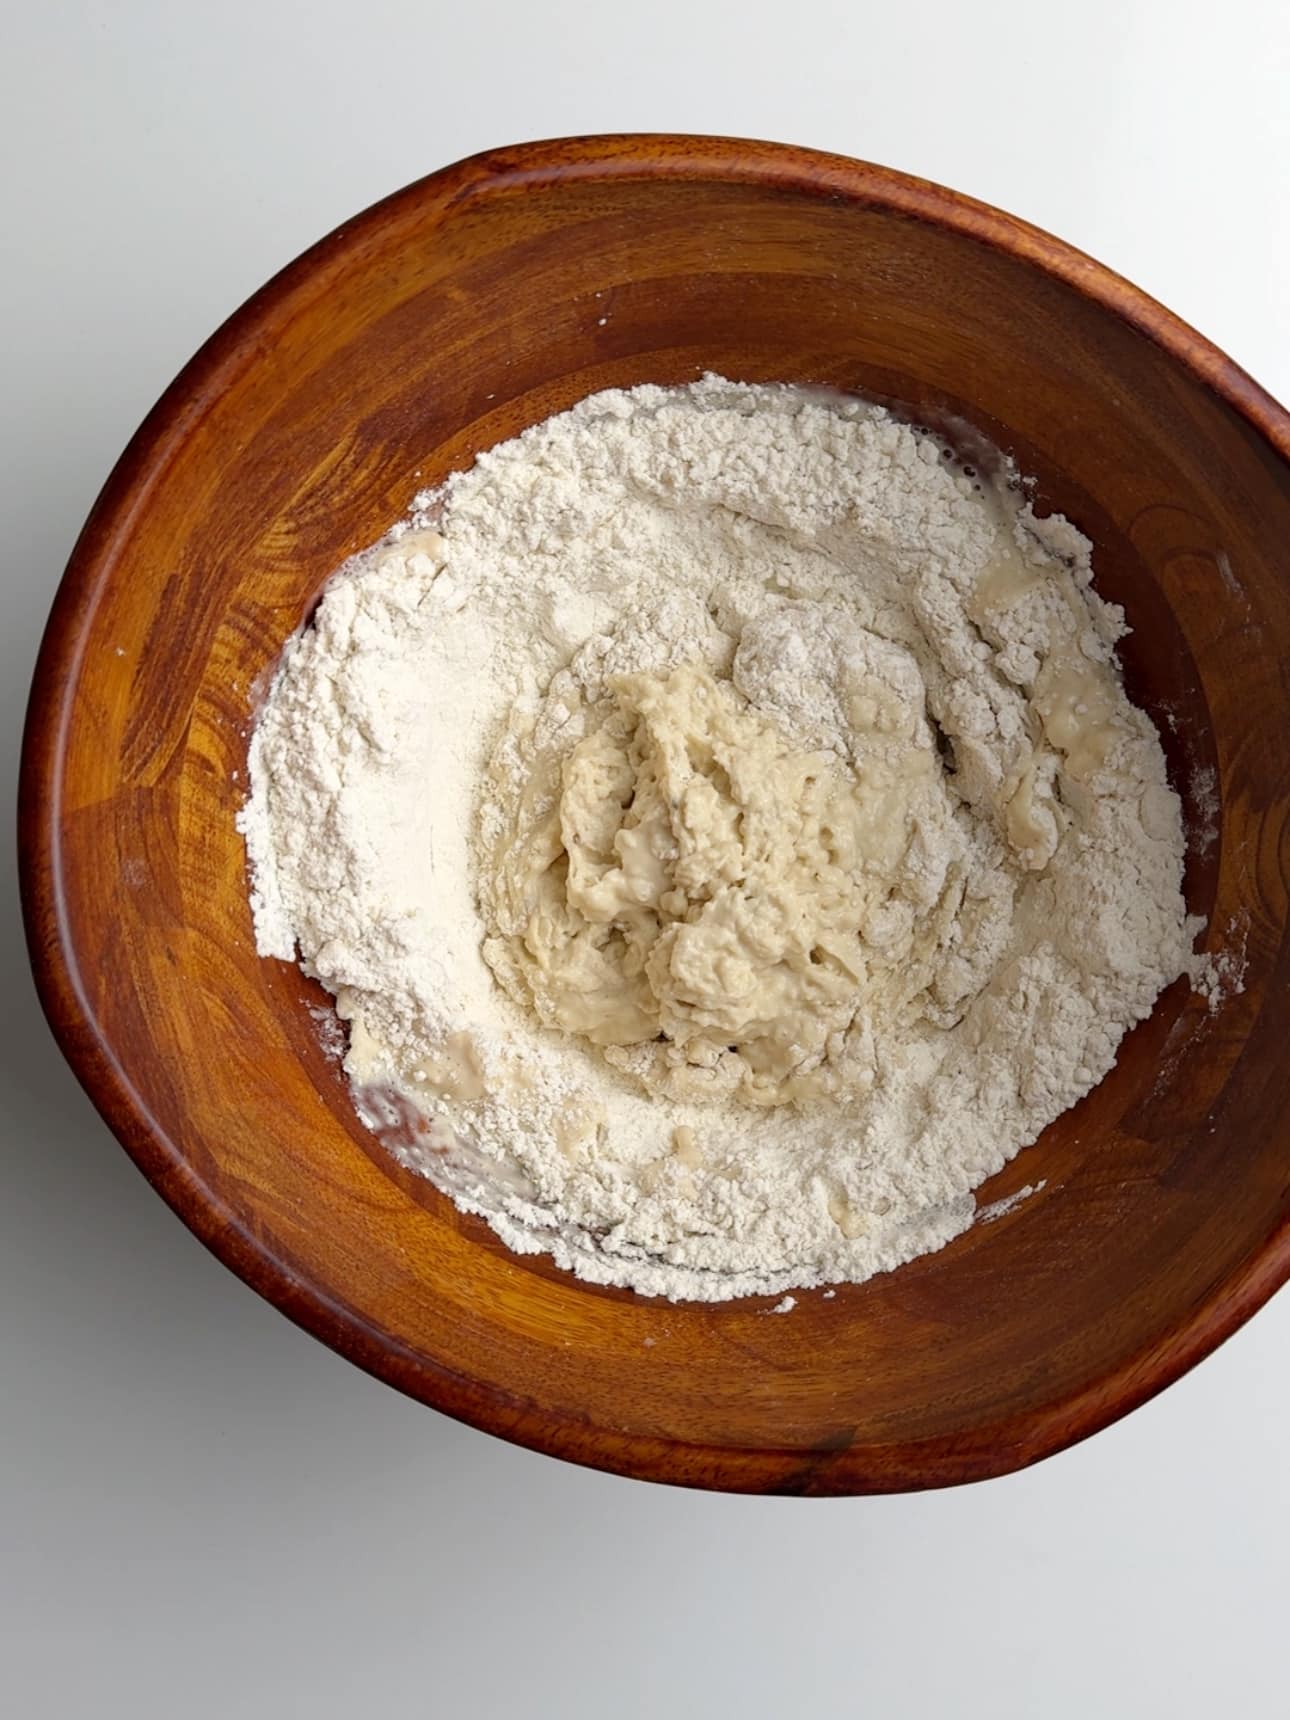
Switch to a rubber spatula or your hands and pulling flour from the edges, mix in to make a soft dough.
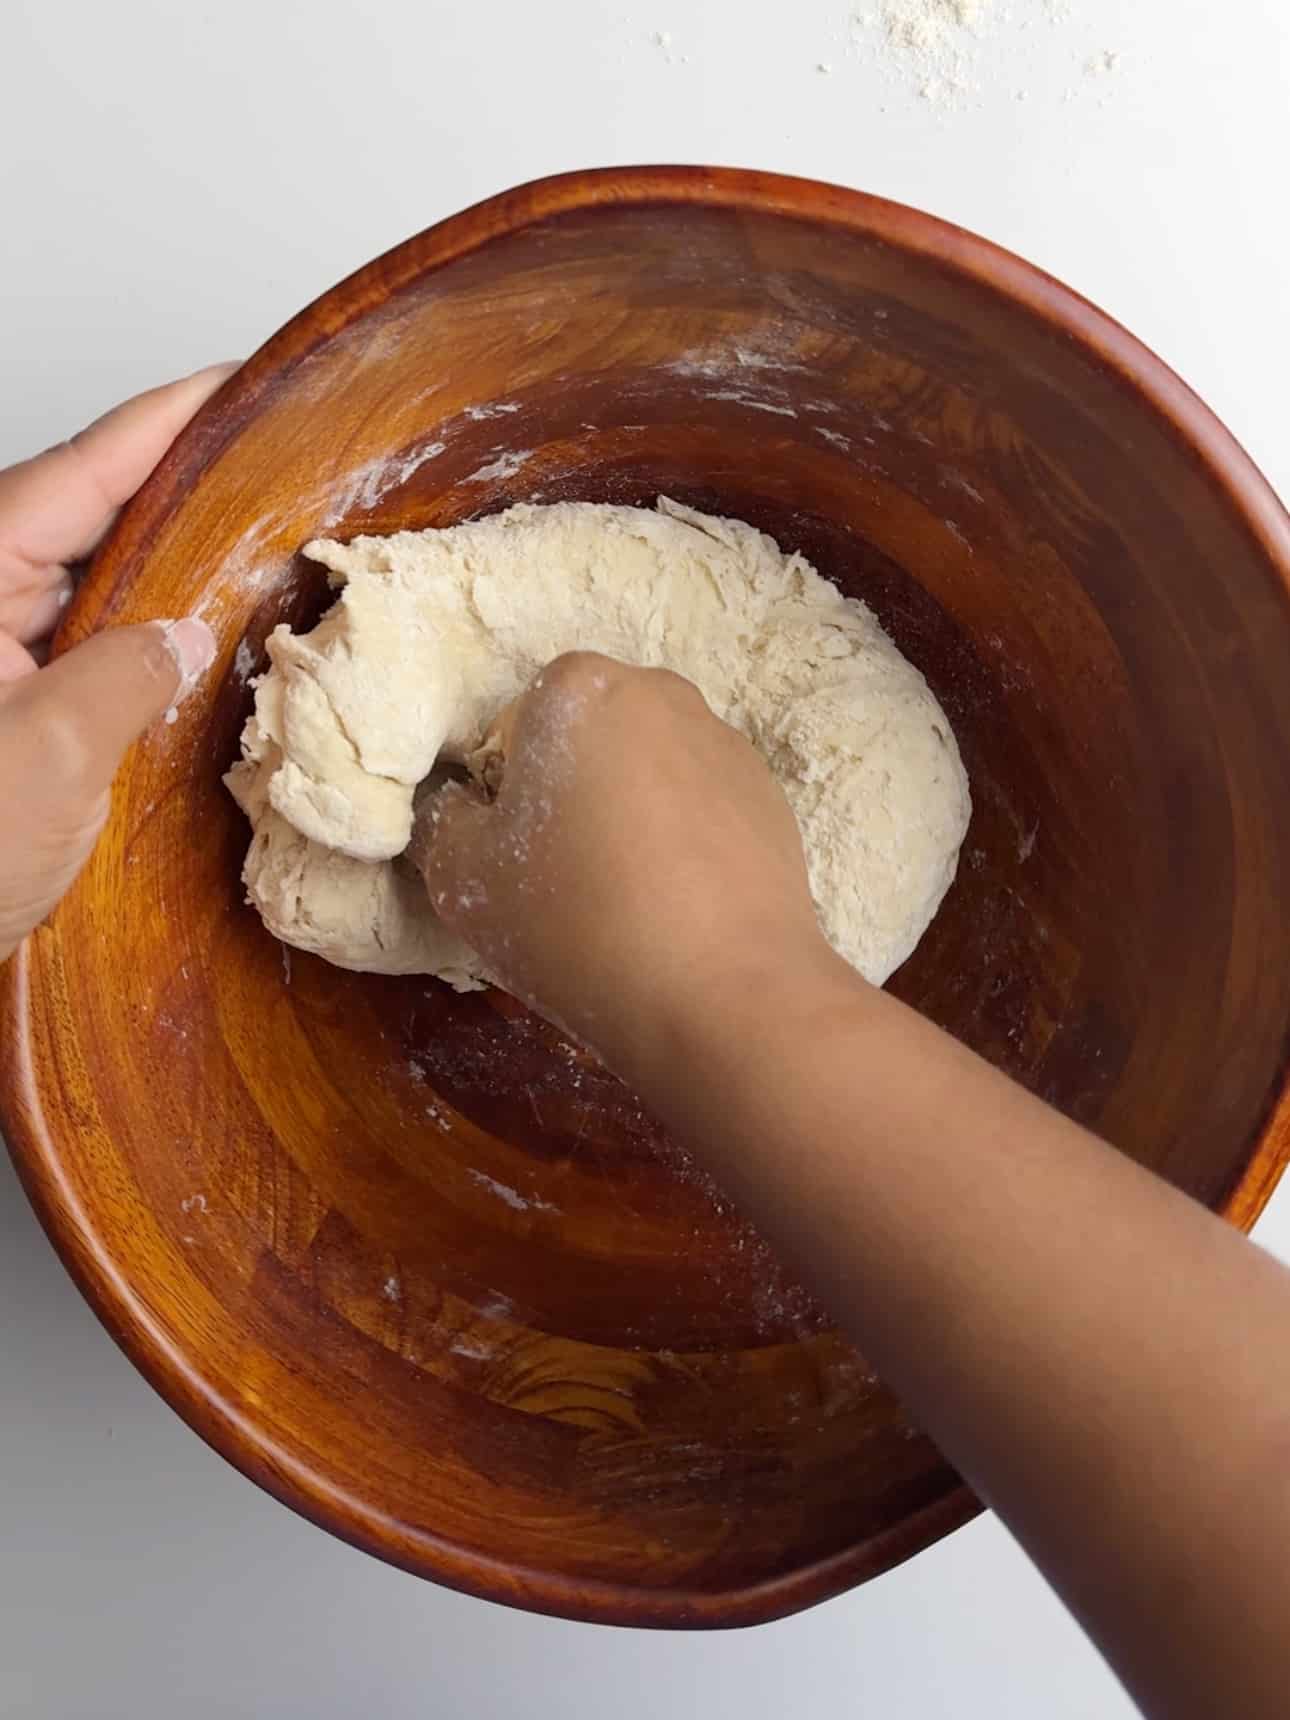
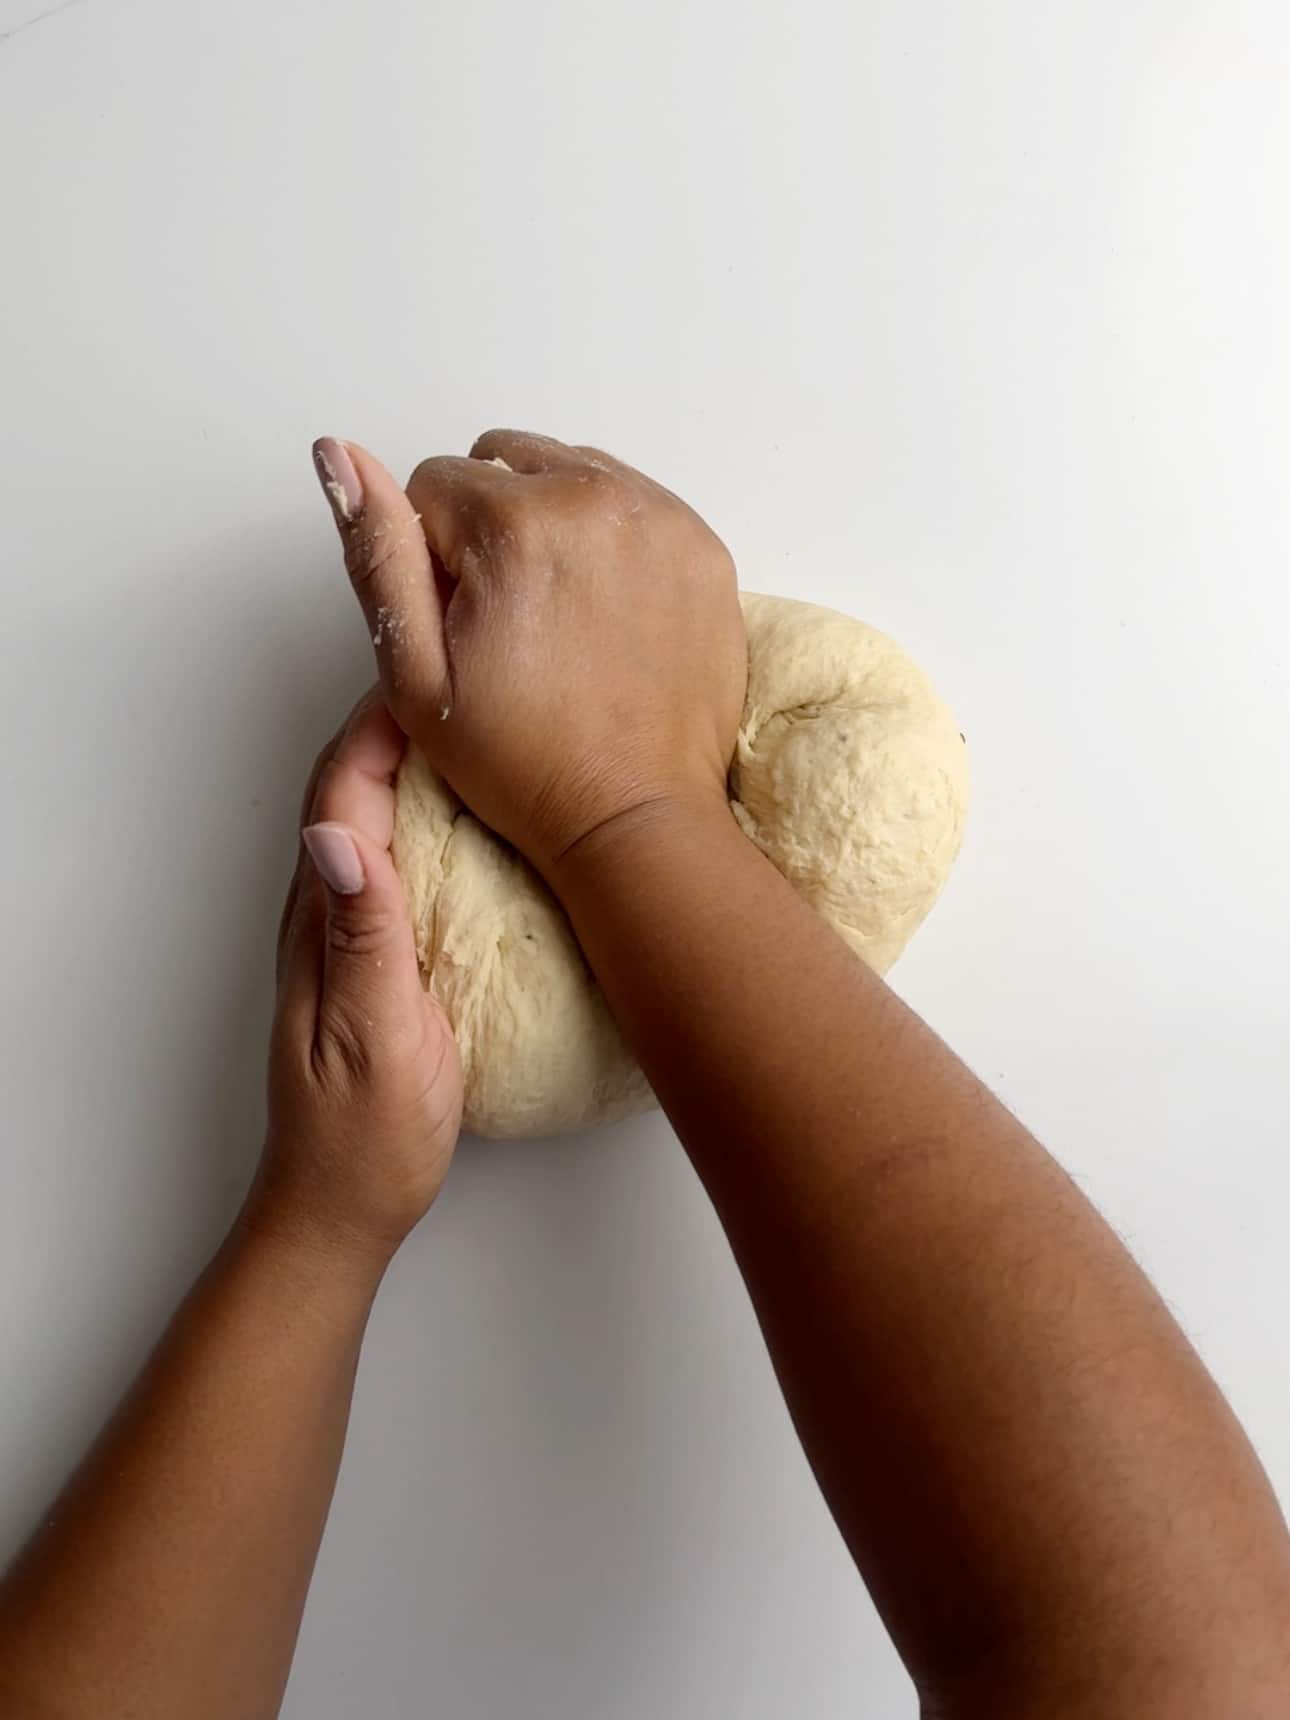
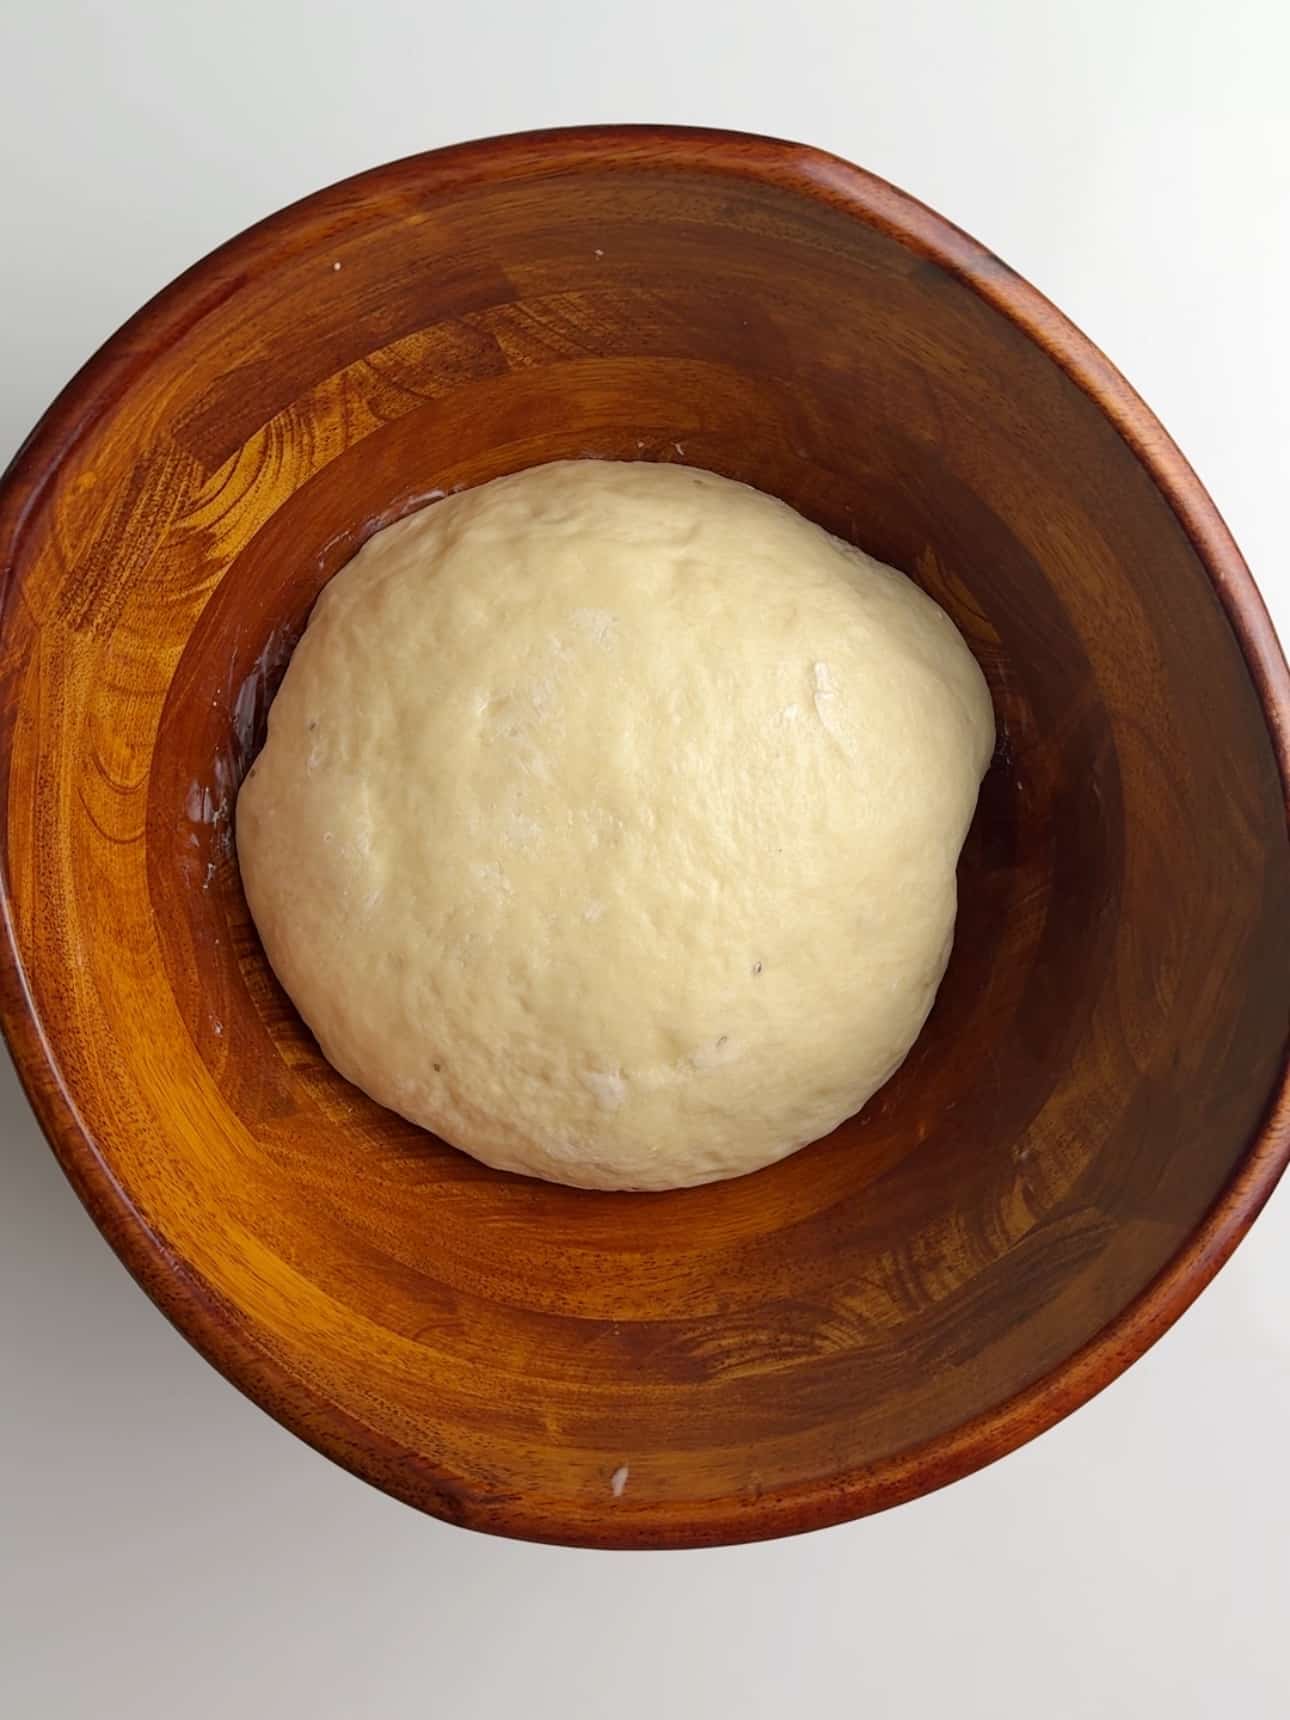
Turn the dough onto a floured surface and knead into a smooth ball or until it bounces back when touched.

Proof the Dough for Plait Bread
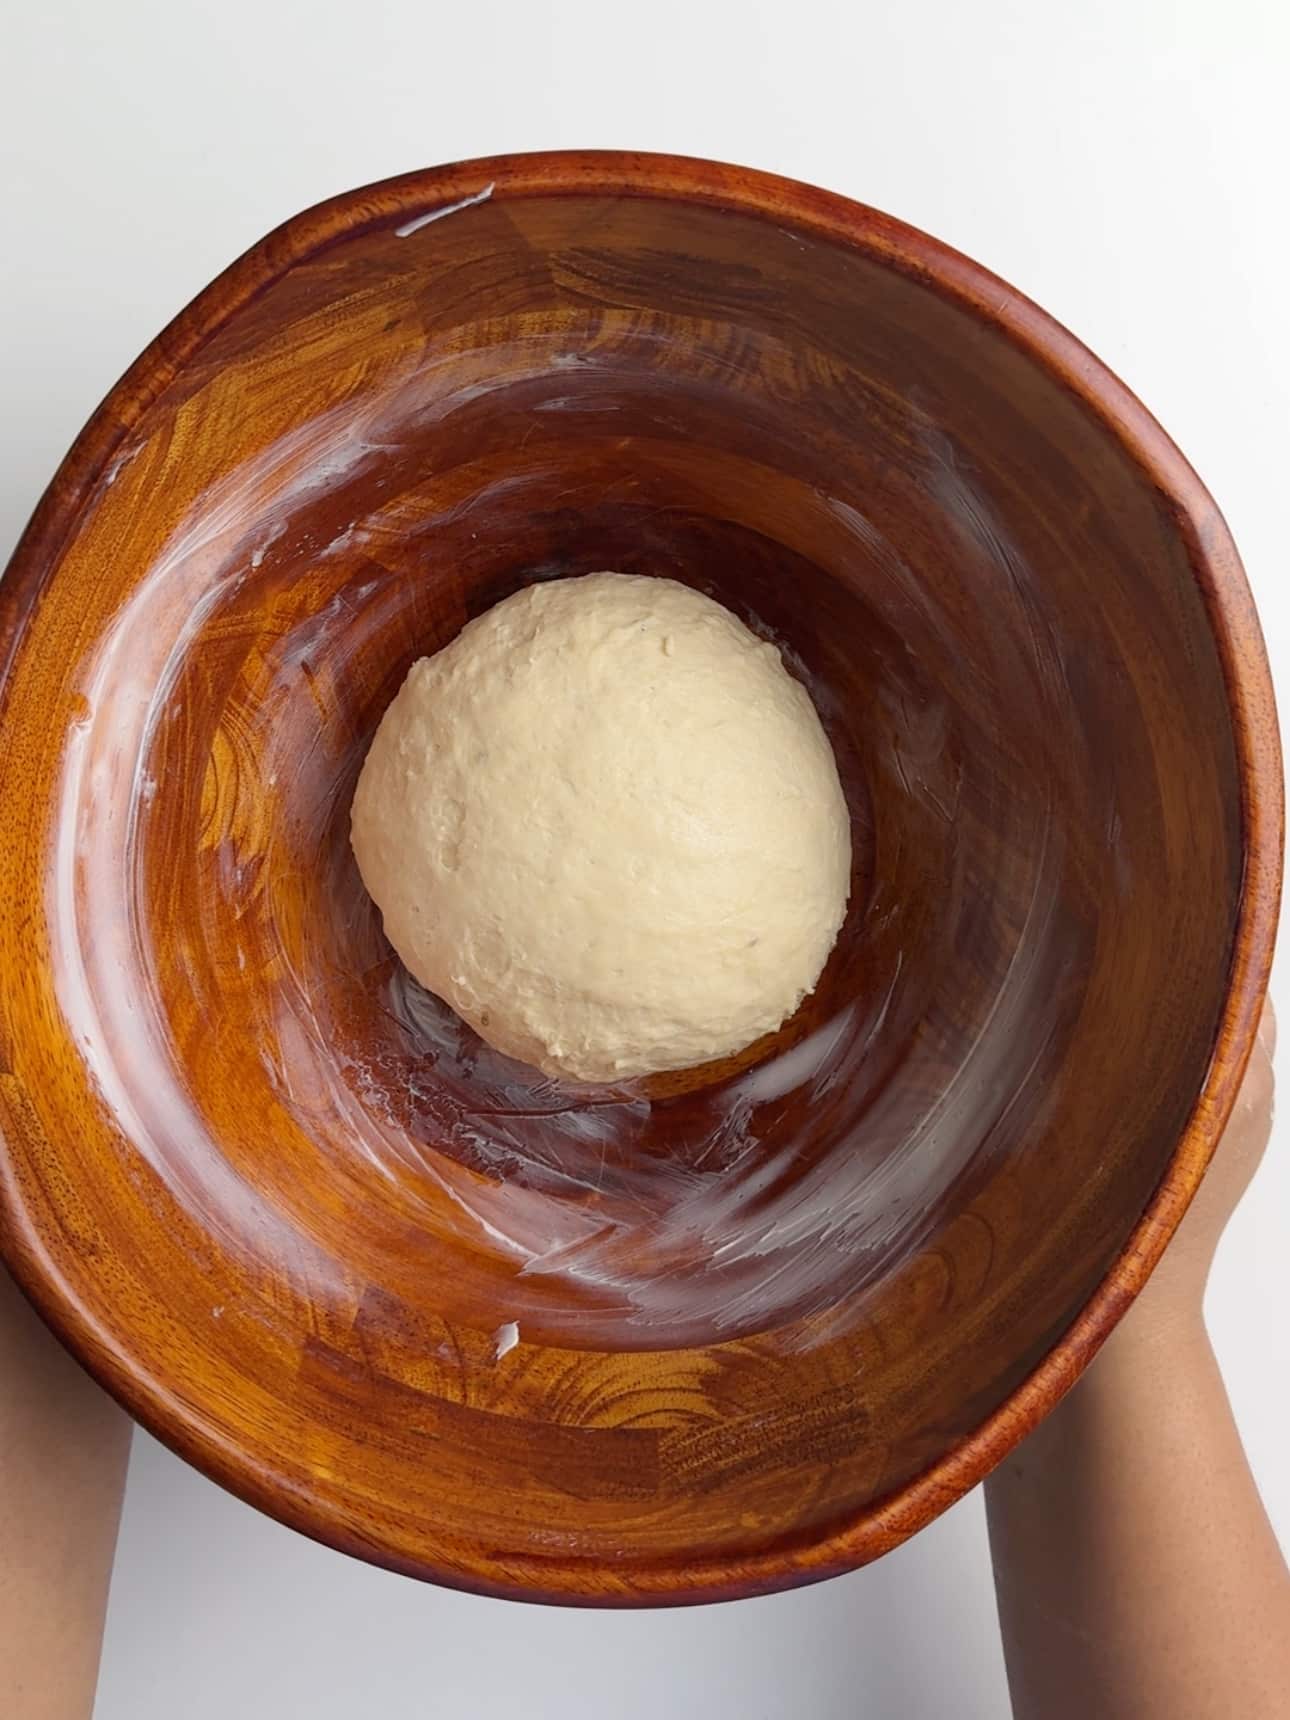
For great plait bread, proof twice. During the first proof, I sometimes put my plait bread dough in a warm oven. Warm the oven up to 200 °F then turn it off. Place your kneaded dough in a greased bowl, cover and let it rest in the warm oven for 45 minutes. This gives the bread a really good rise.
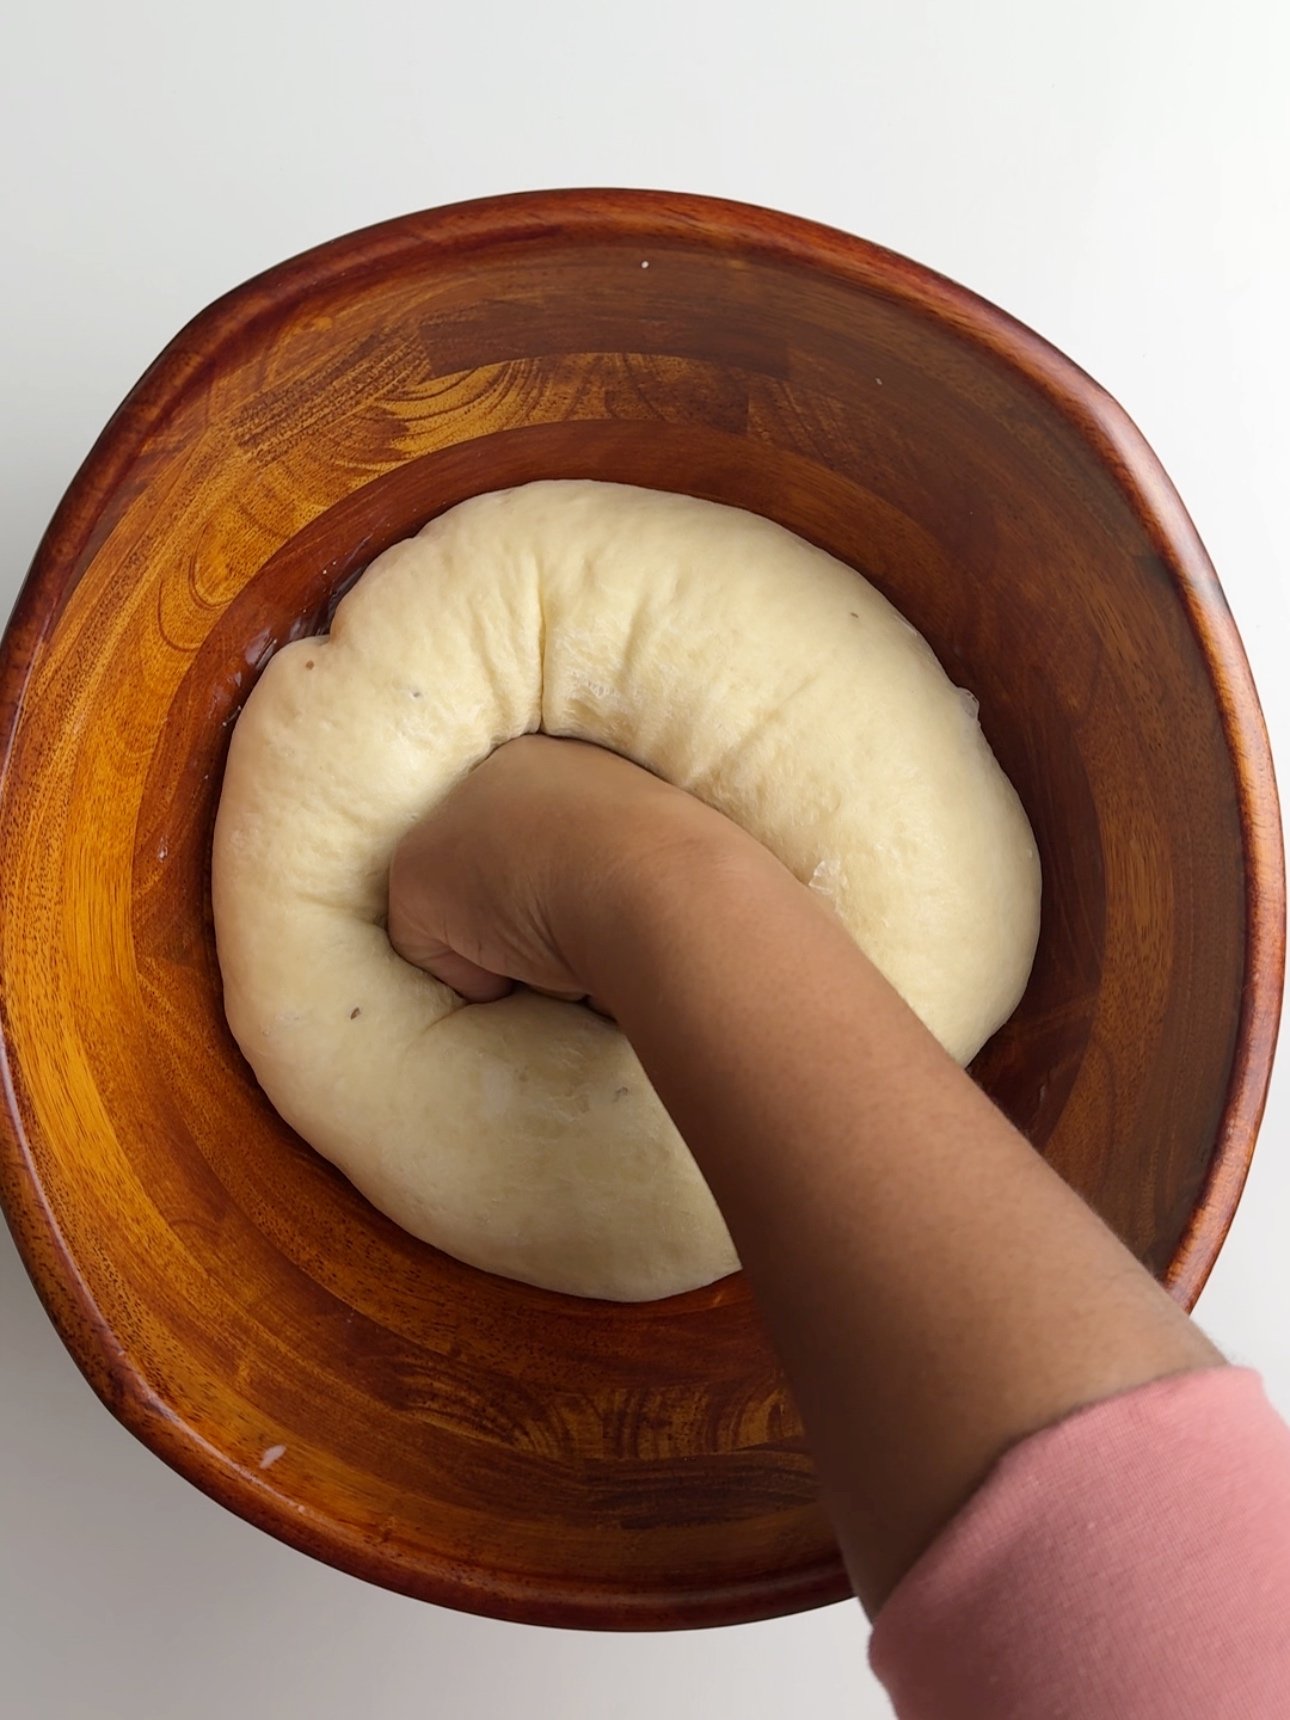
Leave the bread at room temperature for the second proof and let it proof for a full hour. This is a braided bread and any forced proofing will cause the bread to rip.
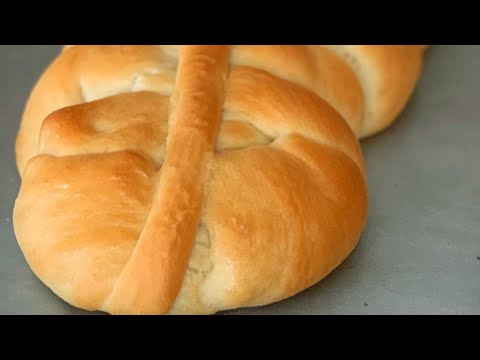
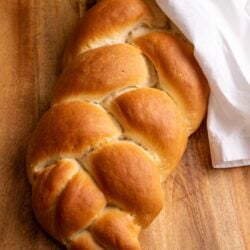
How to braid Plait Bread
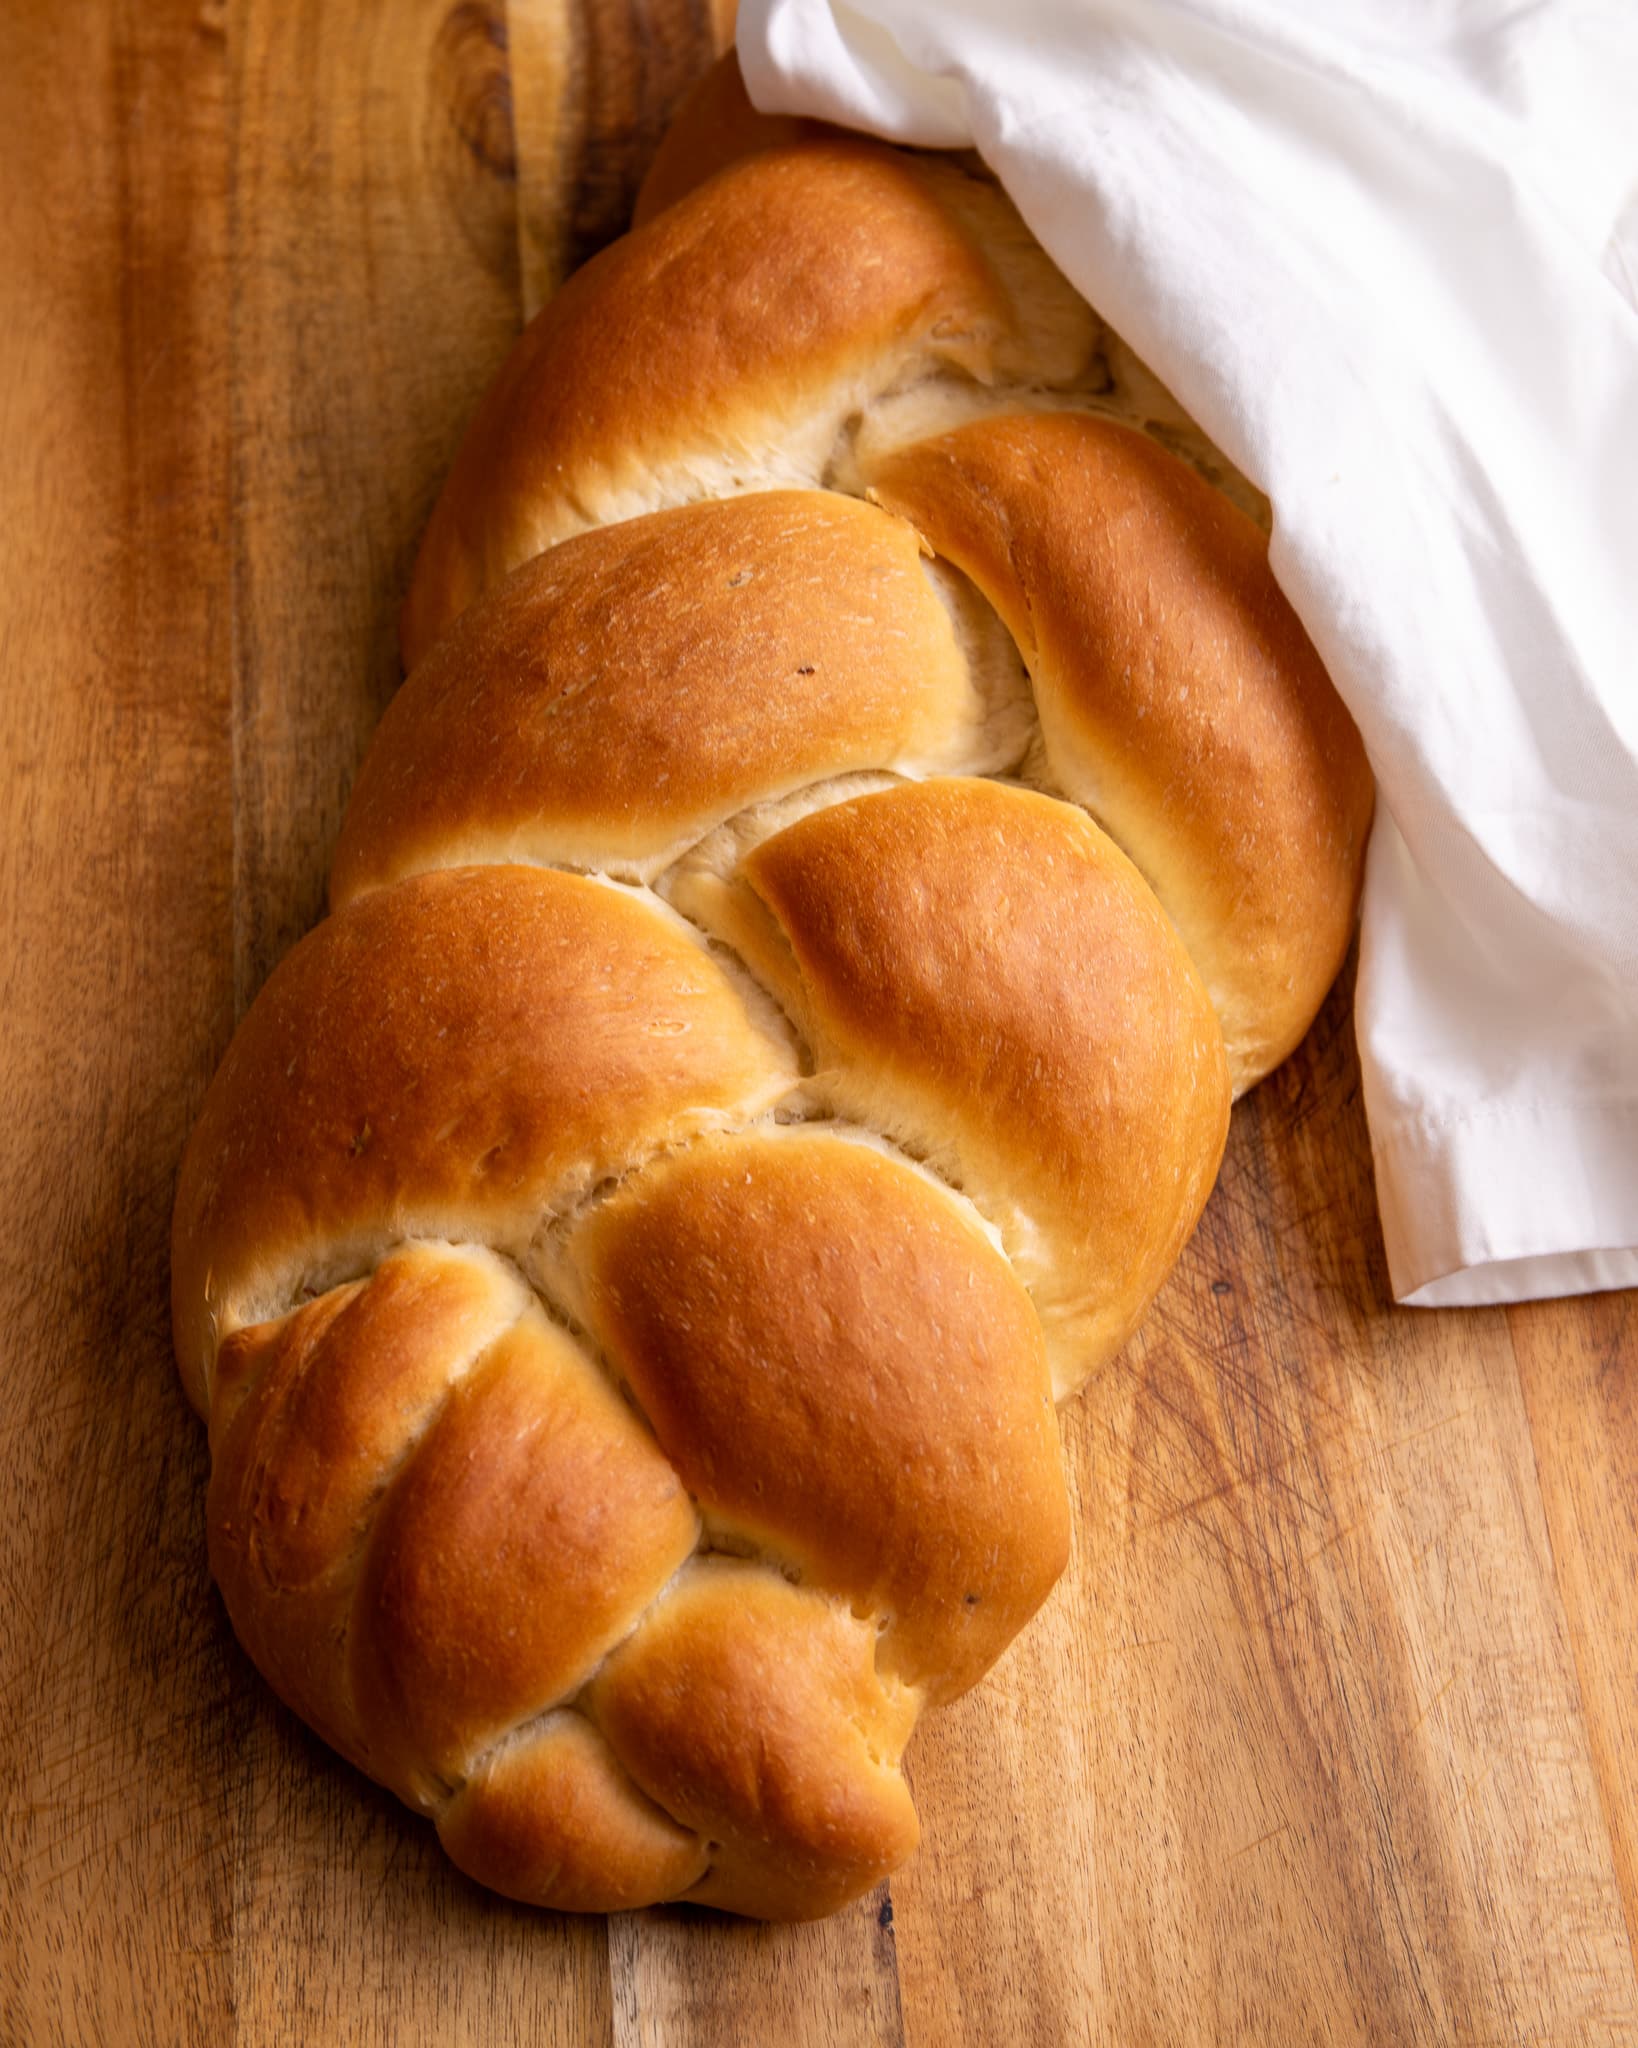
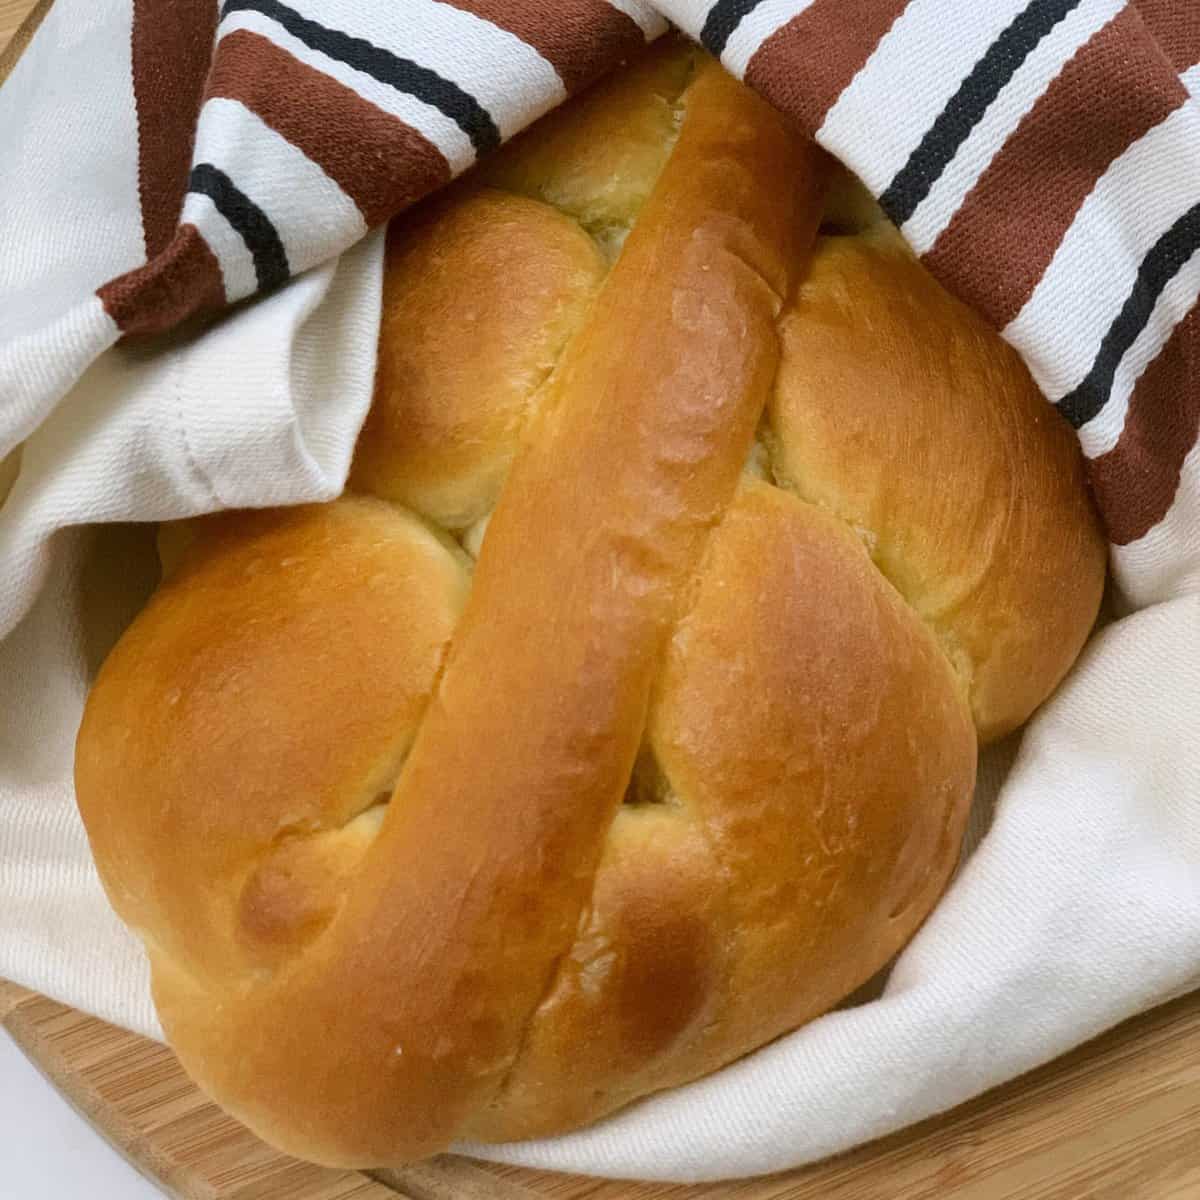
Plait bread has a signature three strand braid, also called a plait in Guyana. Some people top that with a single strand, and some people leave it without. There is no right or wrong way, just depends on how your family does it.

Three strand braiding
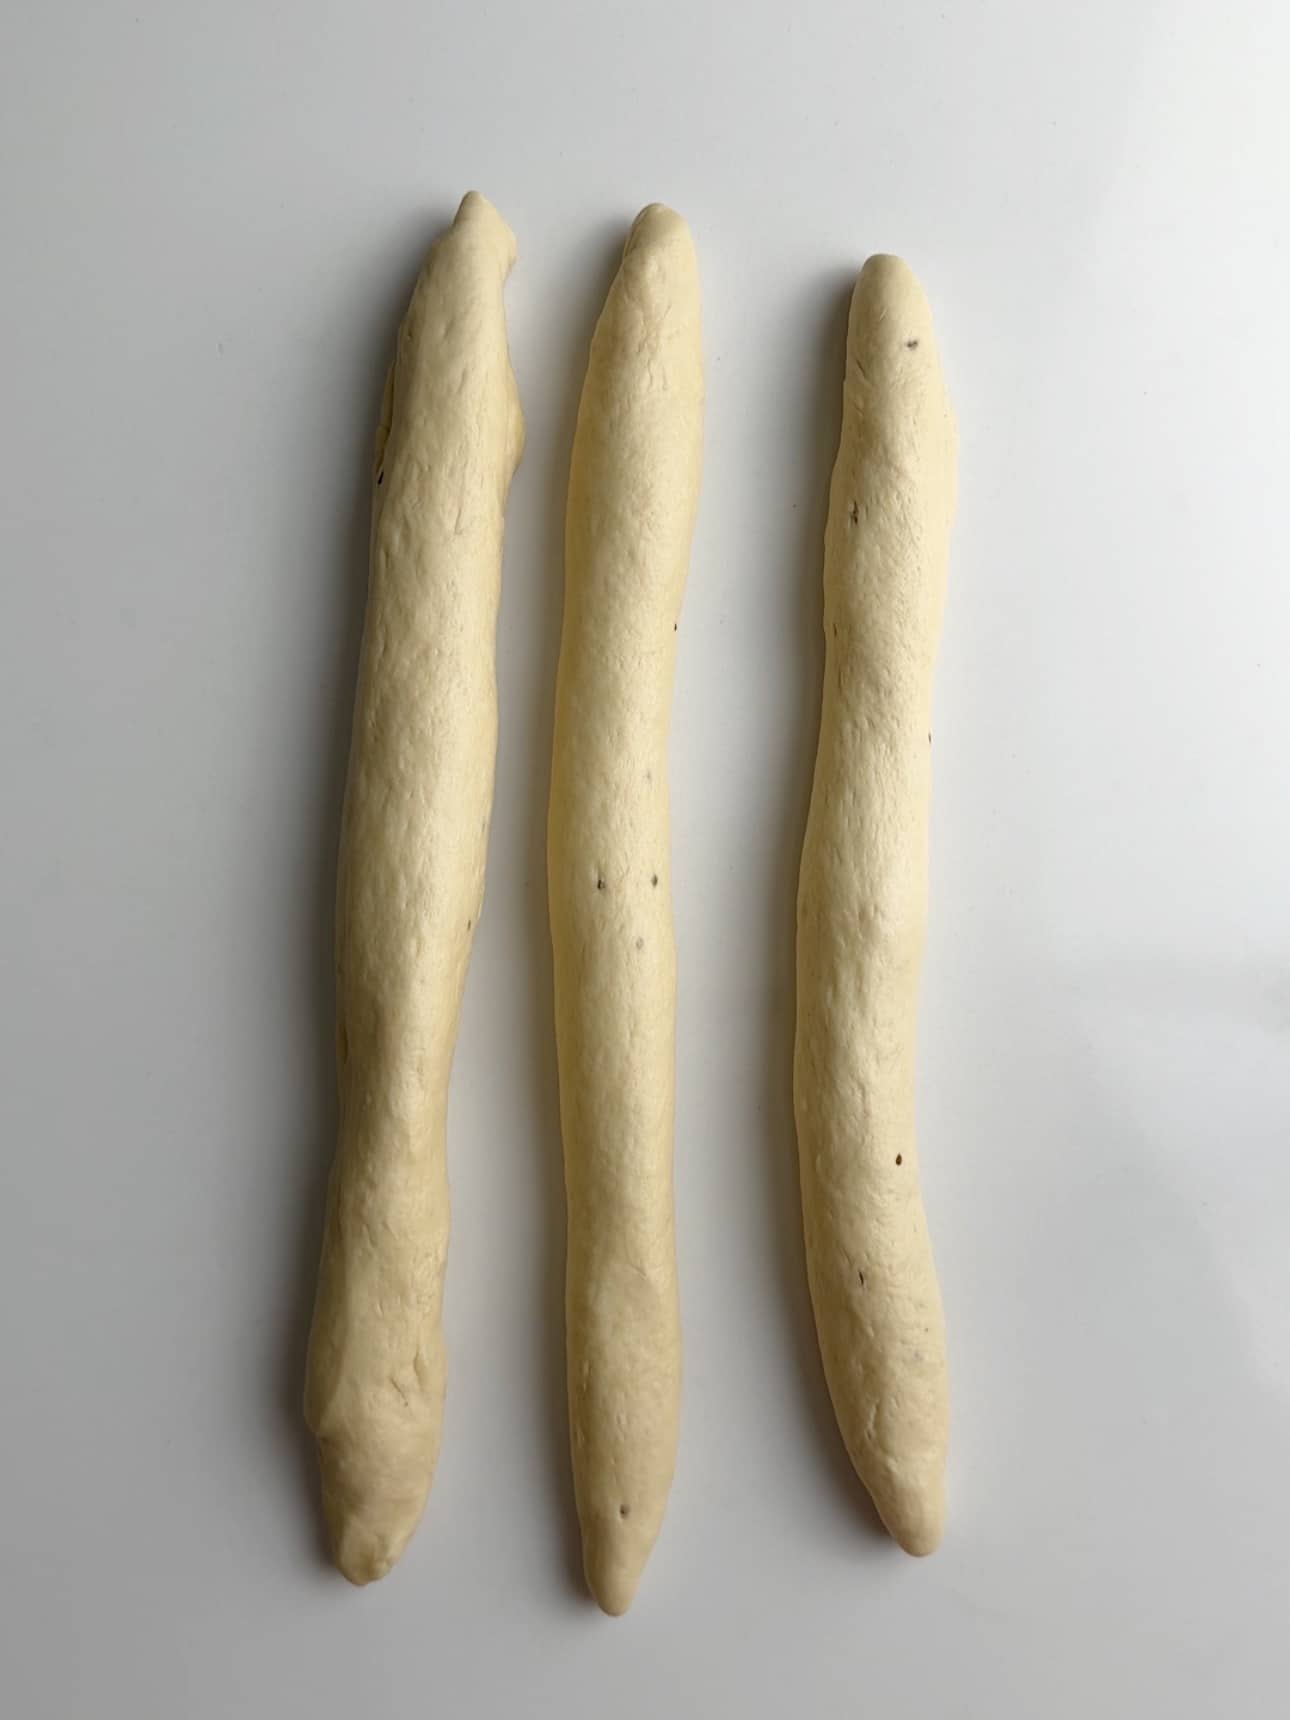
Braiding the bread takes practice but once you get the hang of it, it’s quite simple. After proofing the dough, punch down then knead into a dough ball.
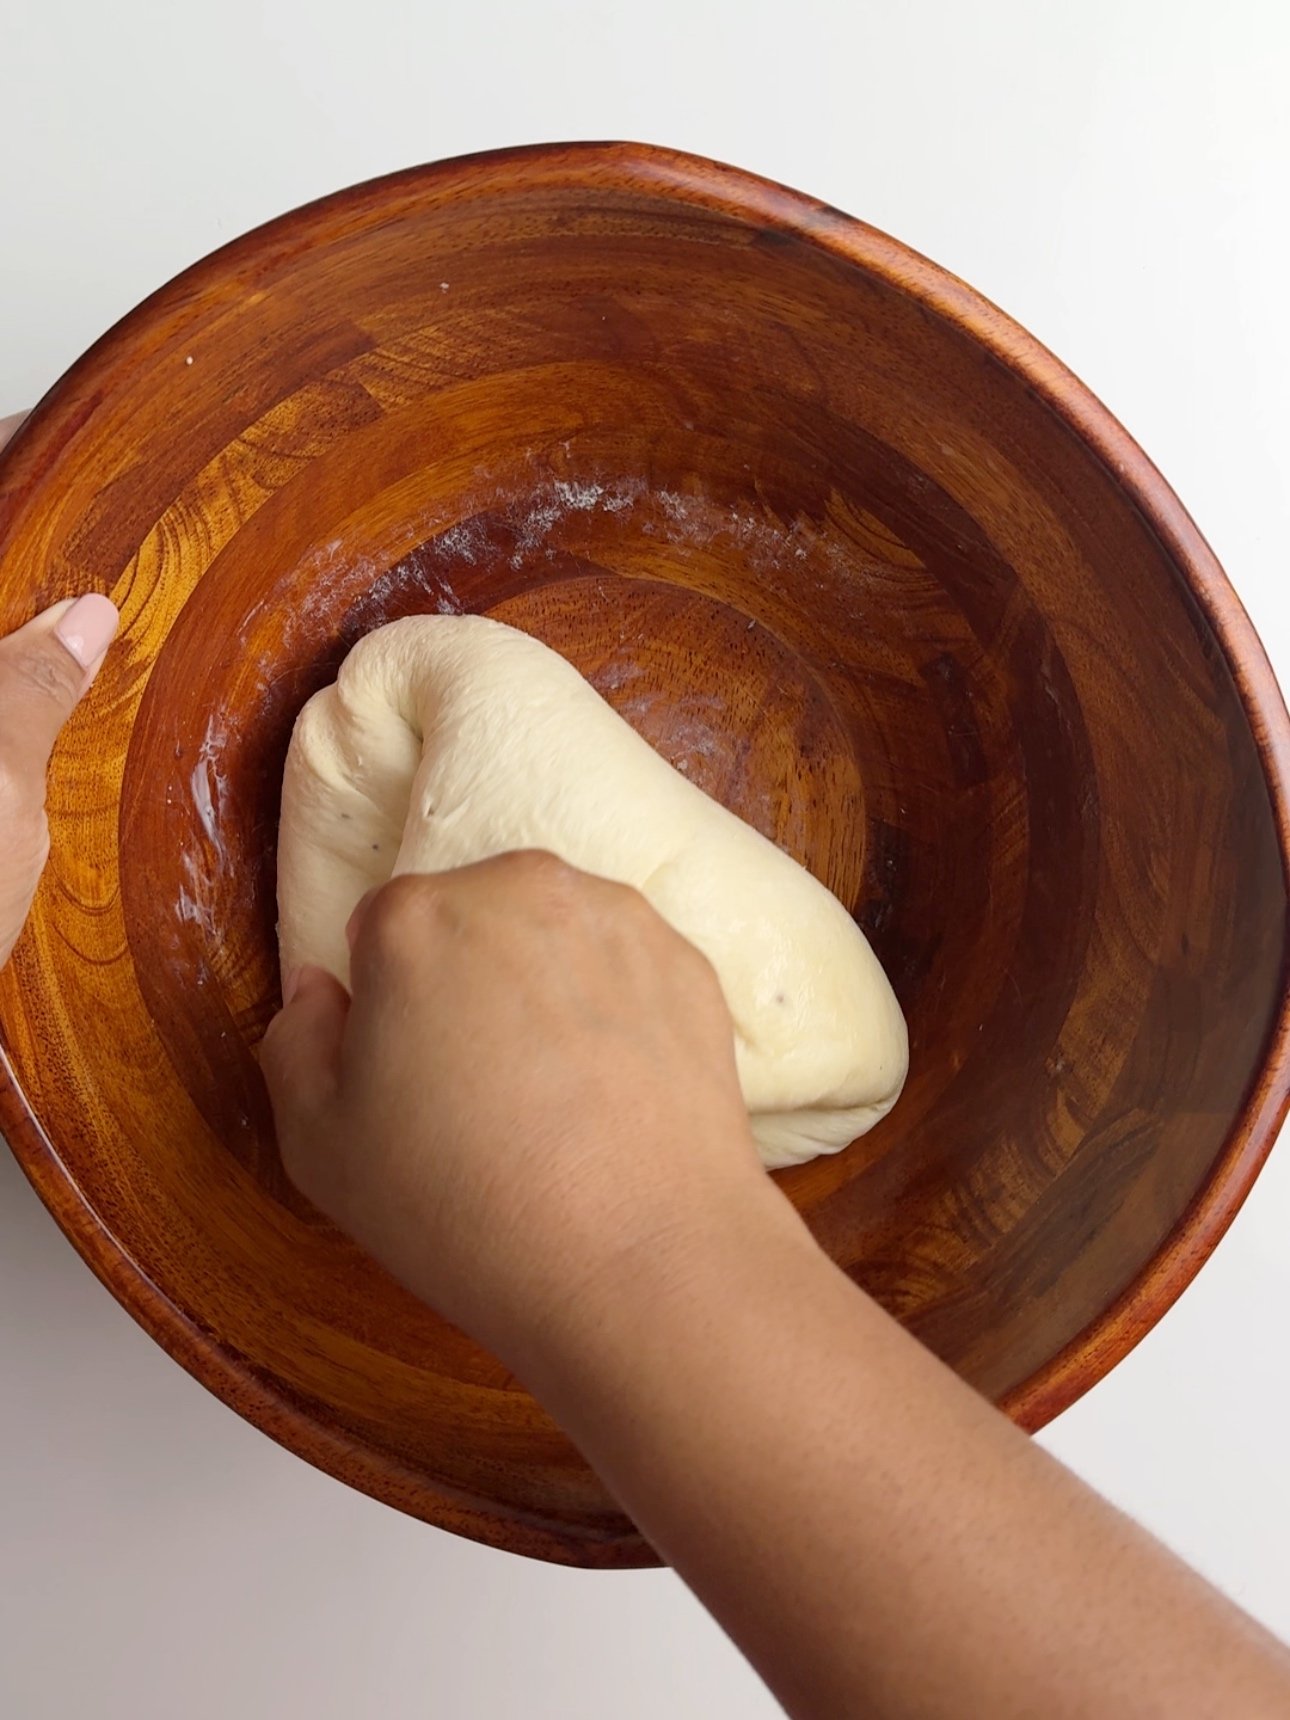
Divide the dough into three or four if you are adding a strand on the top.

Then take each of the large strands and tuck the cut ends into the back to seal it (see below). This helps to create a smooth strand.
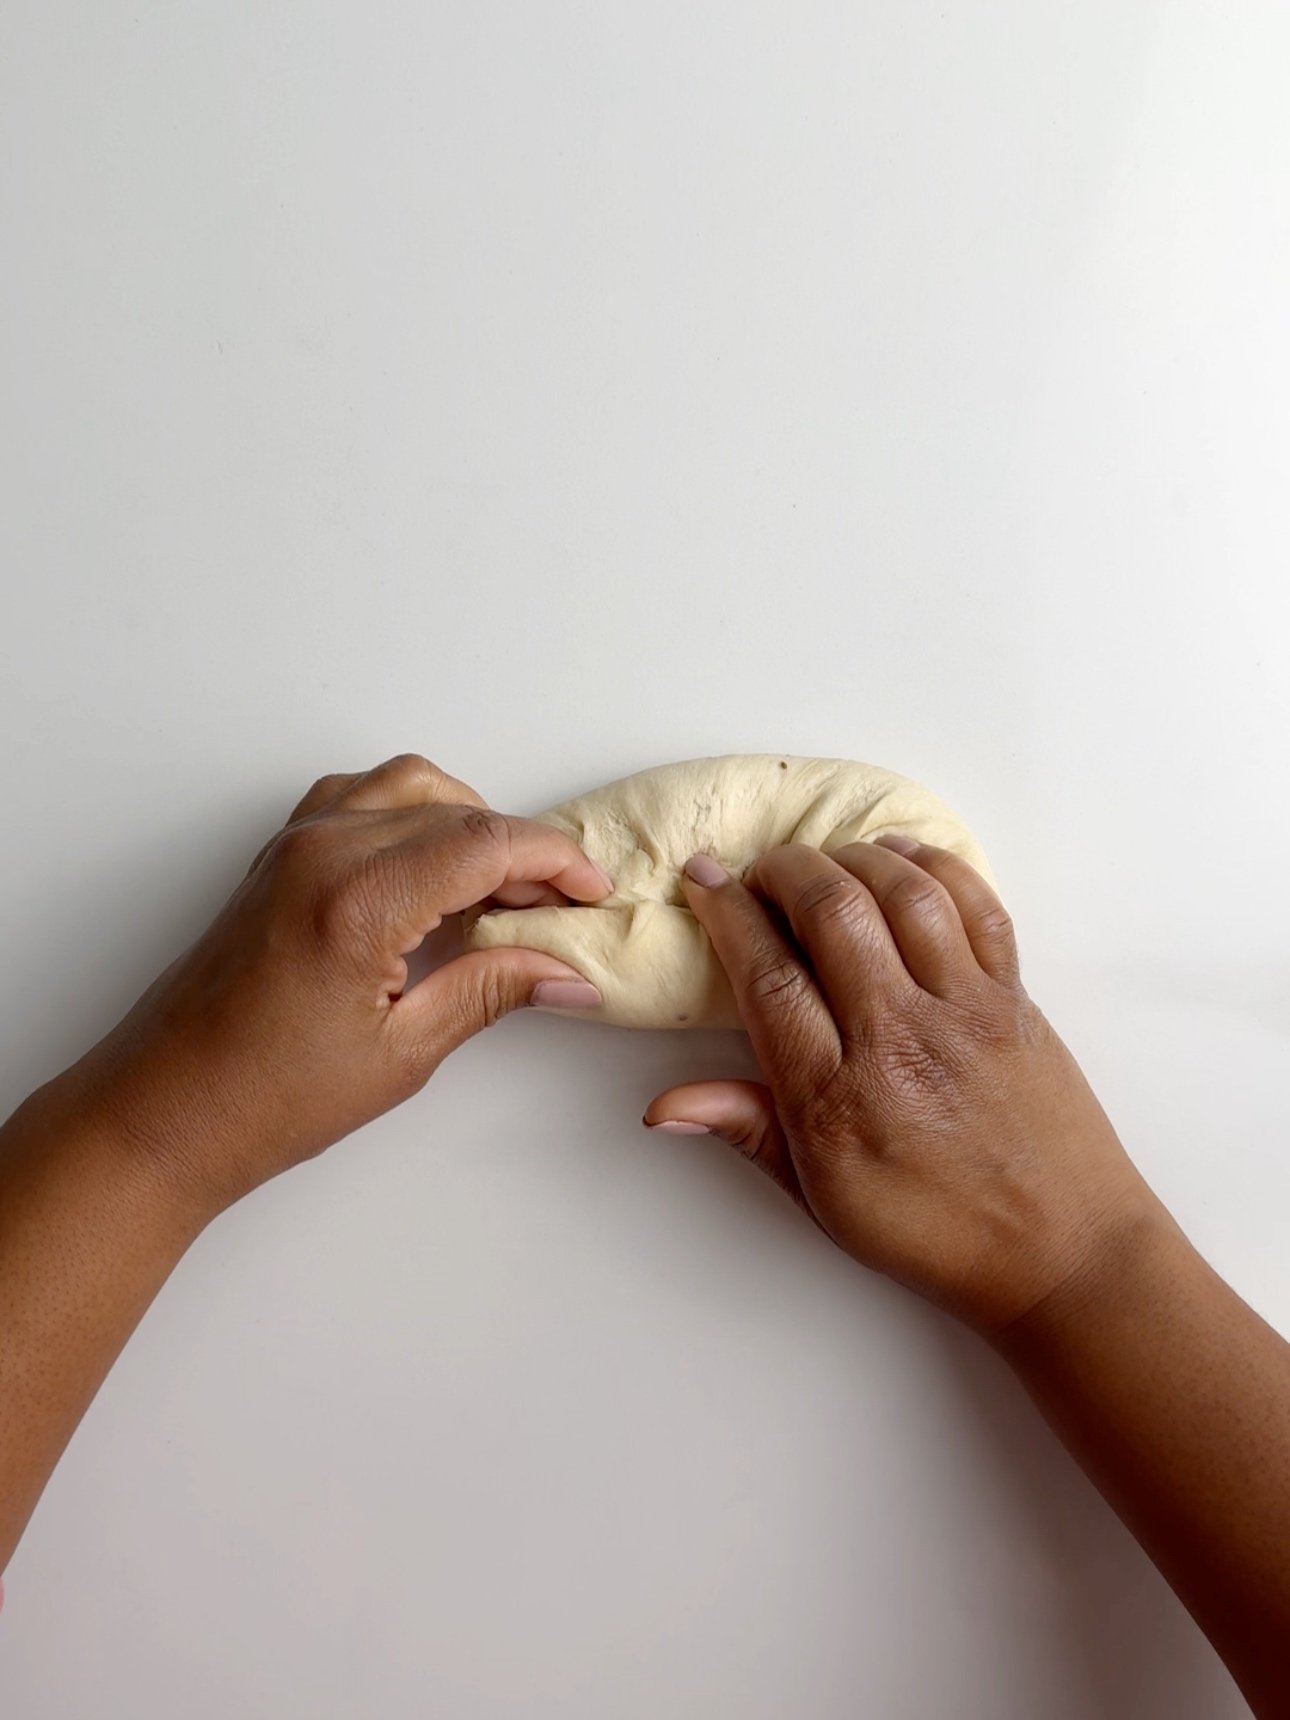
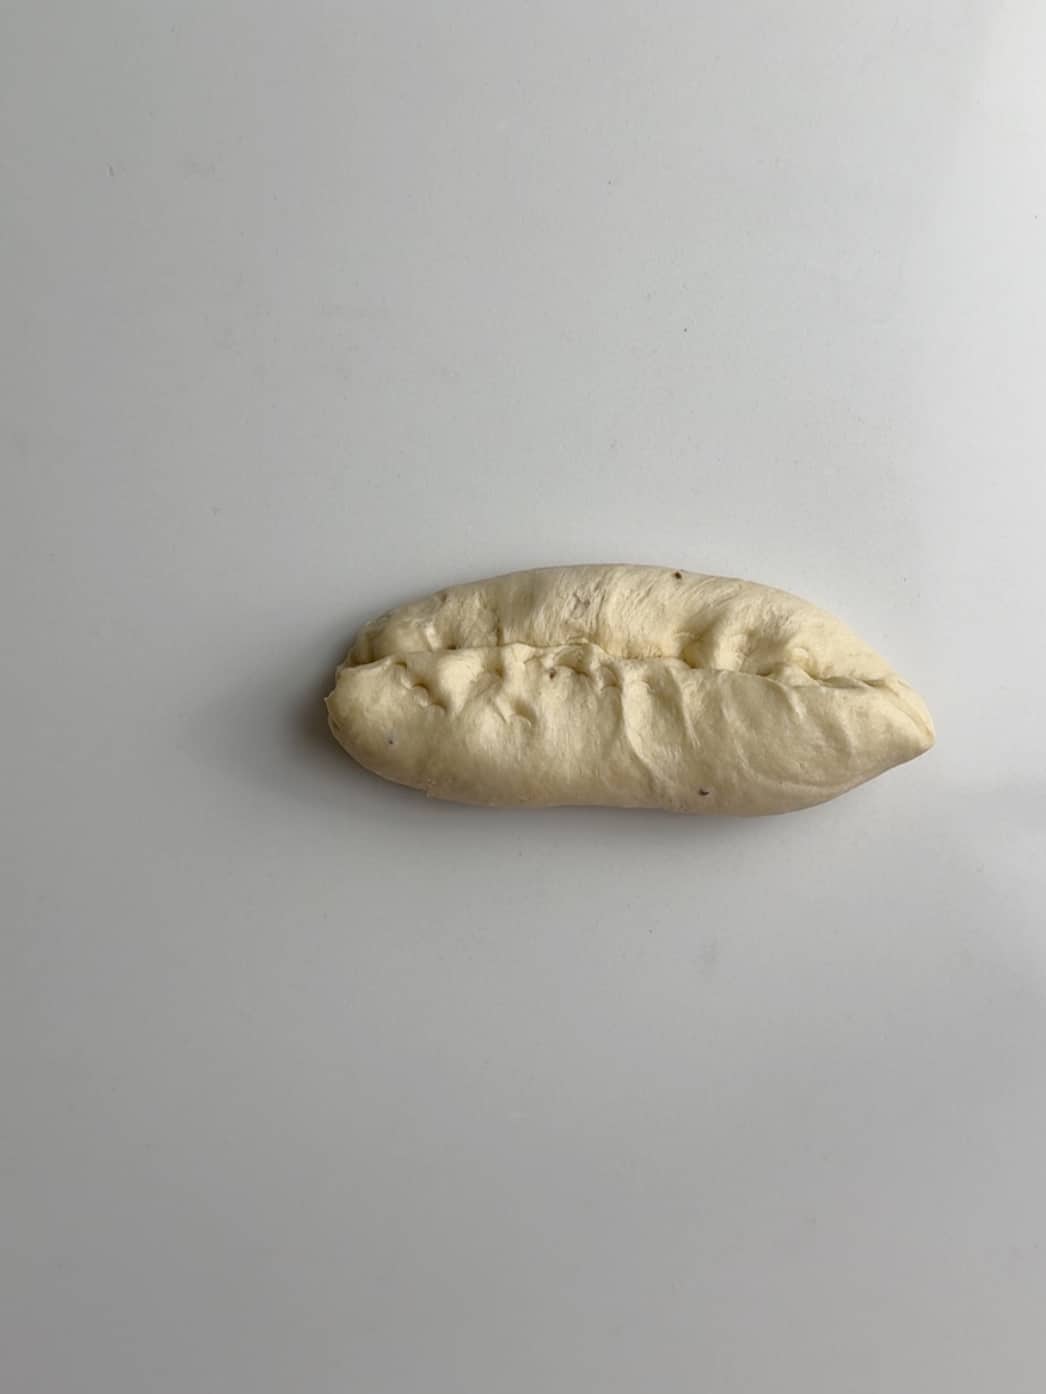
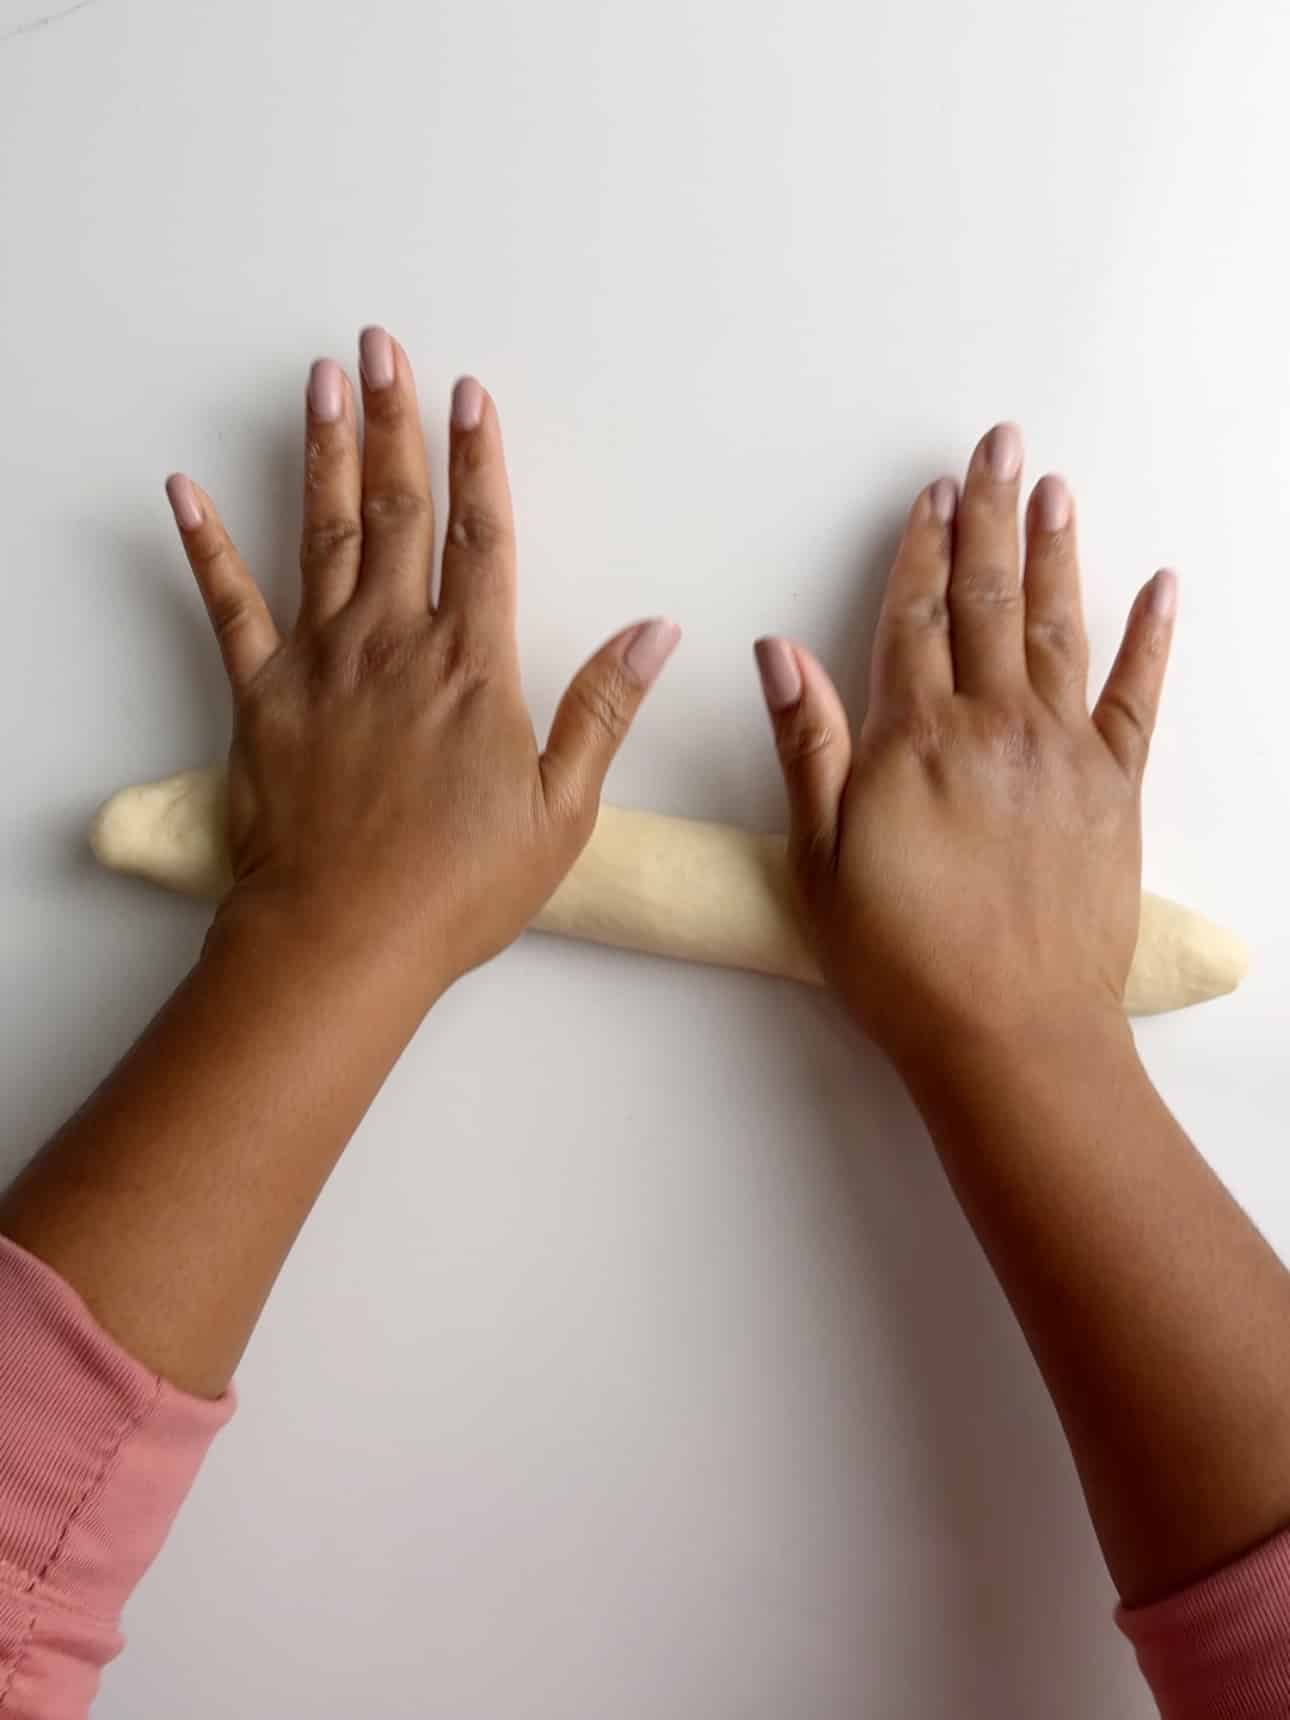
Then roll the dough into a long. Keeping the tucked in ends at the bottom and taking care to smooth out any lines or wrinkles.
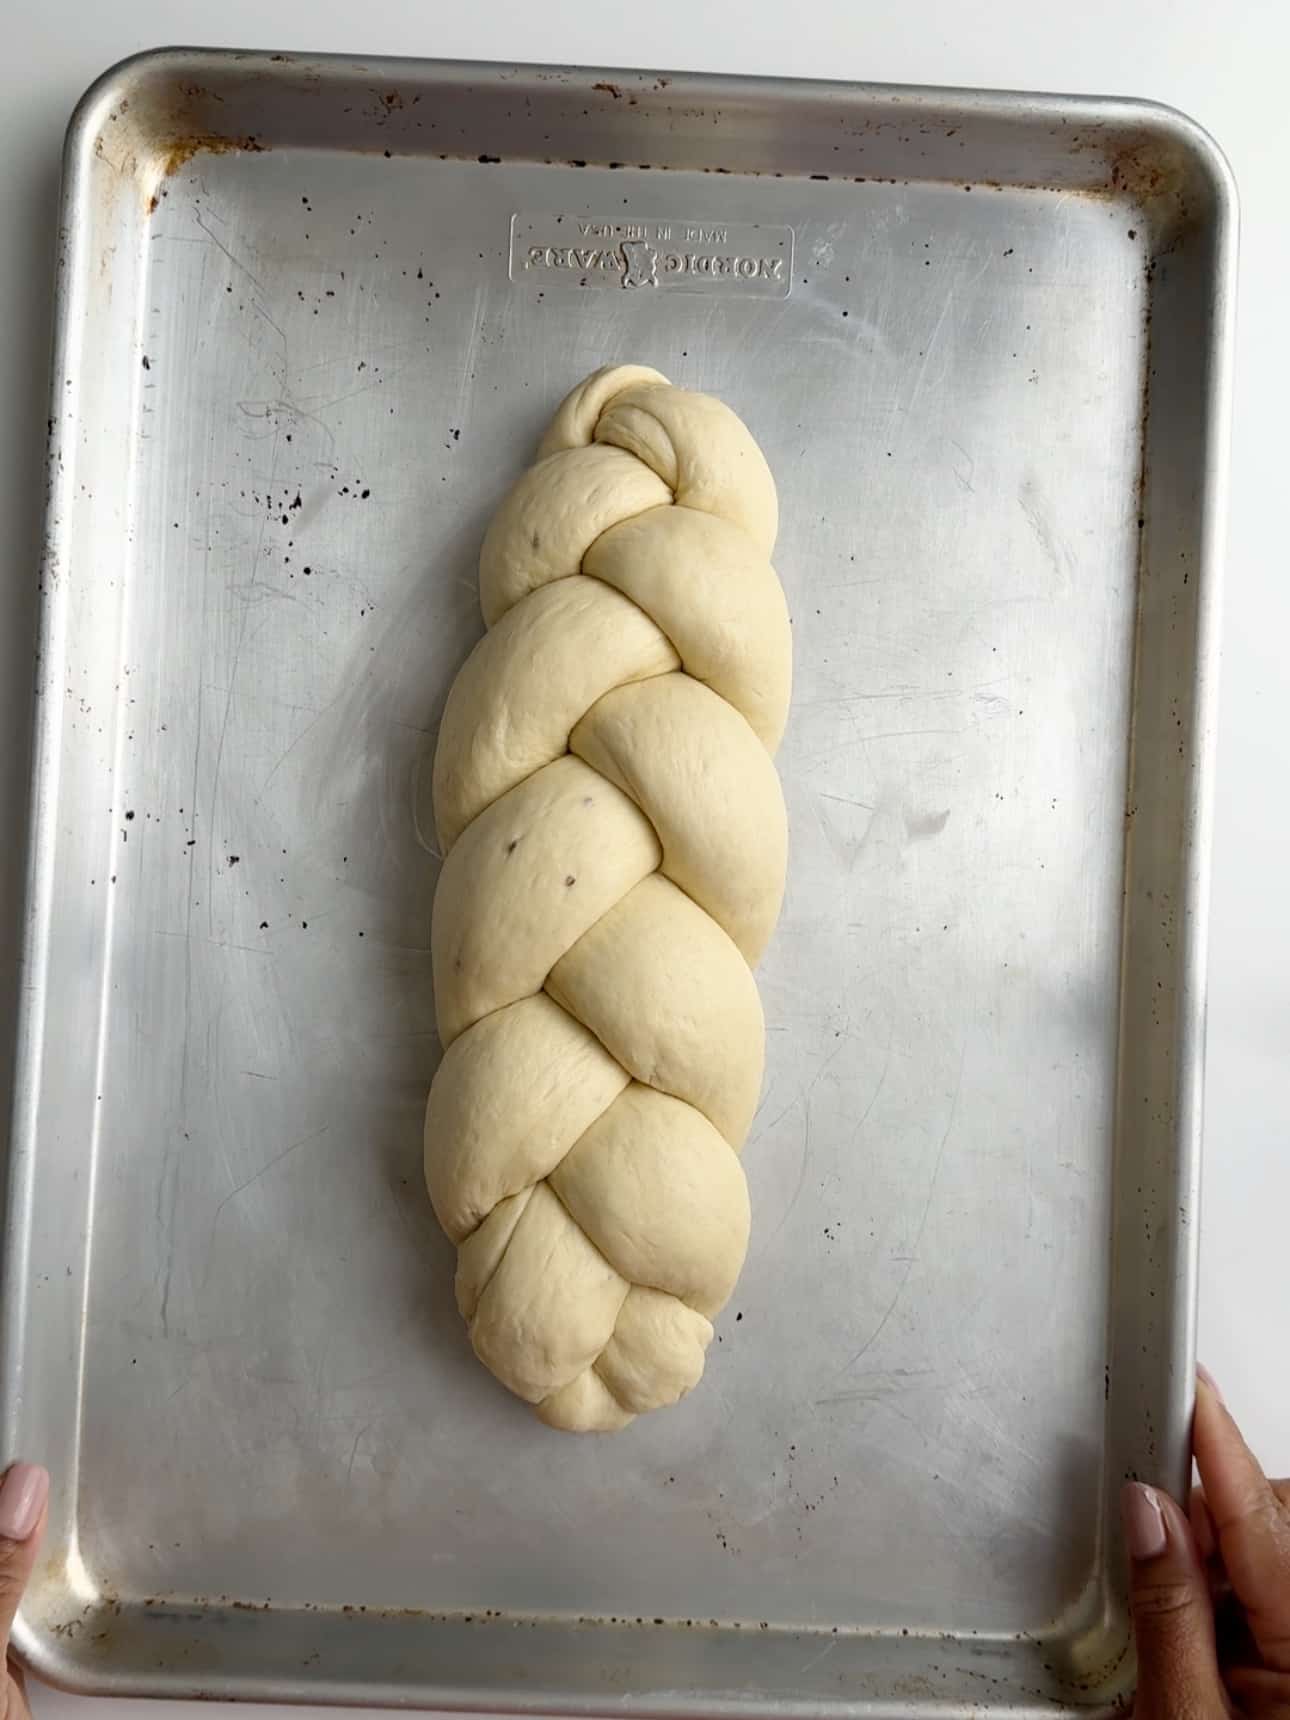
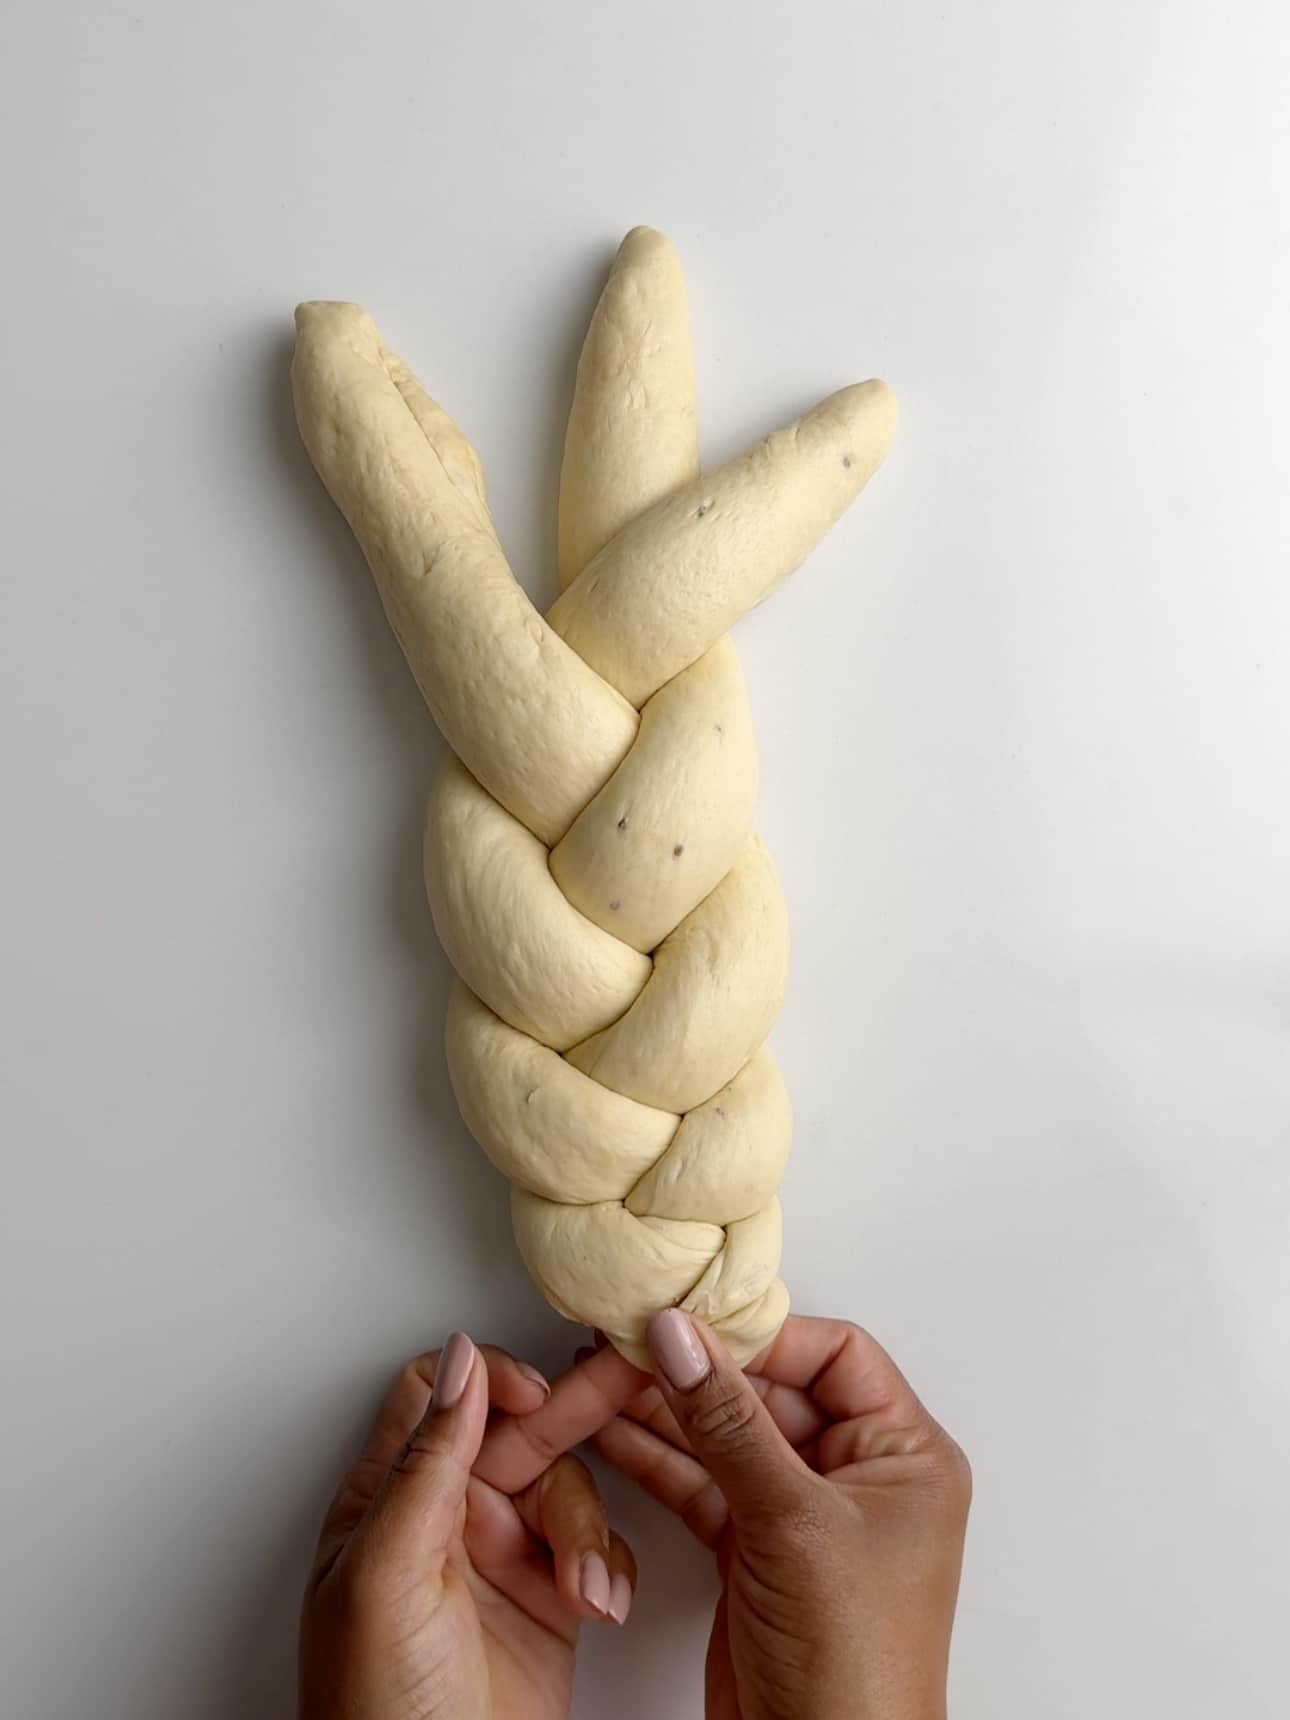
To braid plait bread place the three strands on a flat surface. Start in the middle and bring the right strand to the middle.
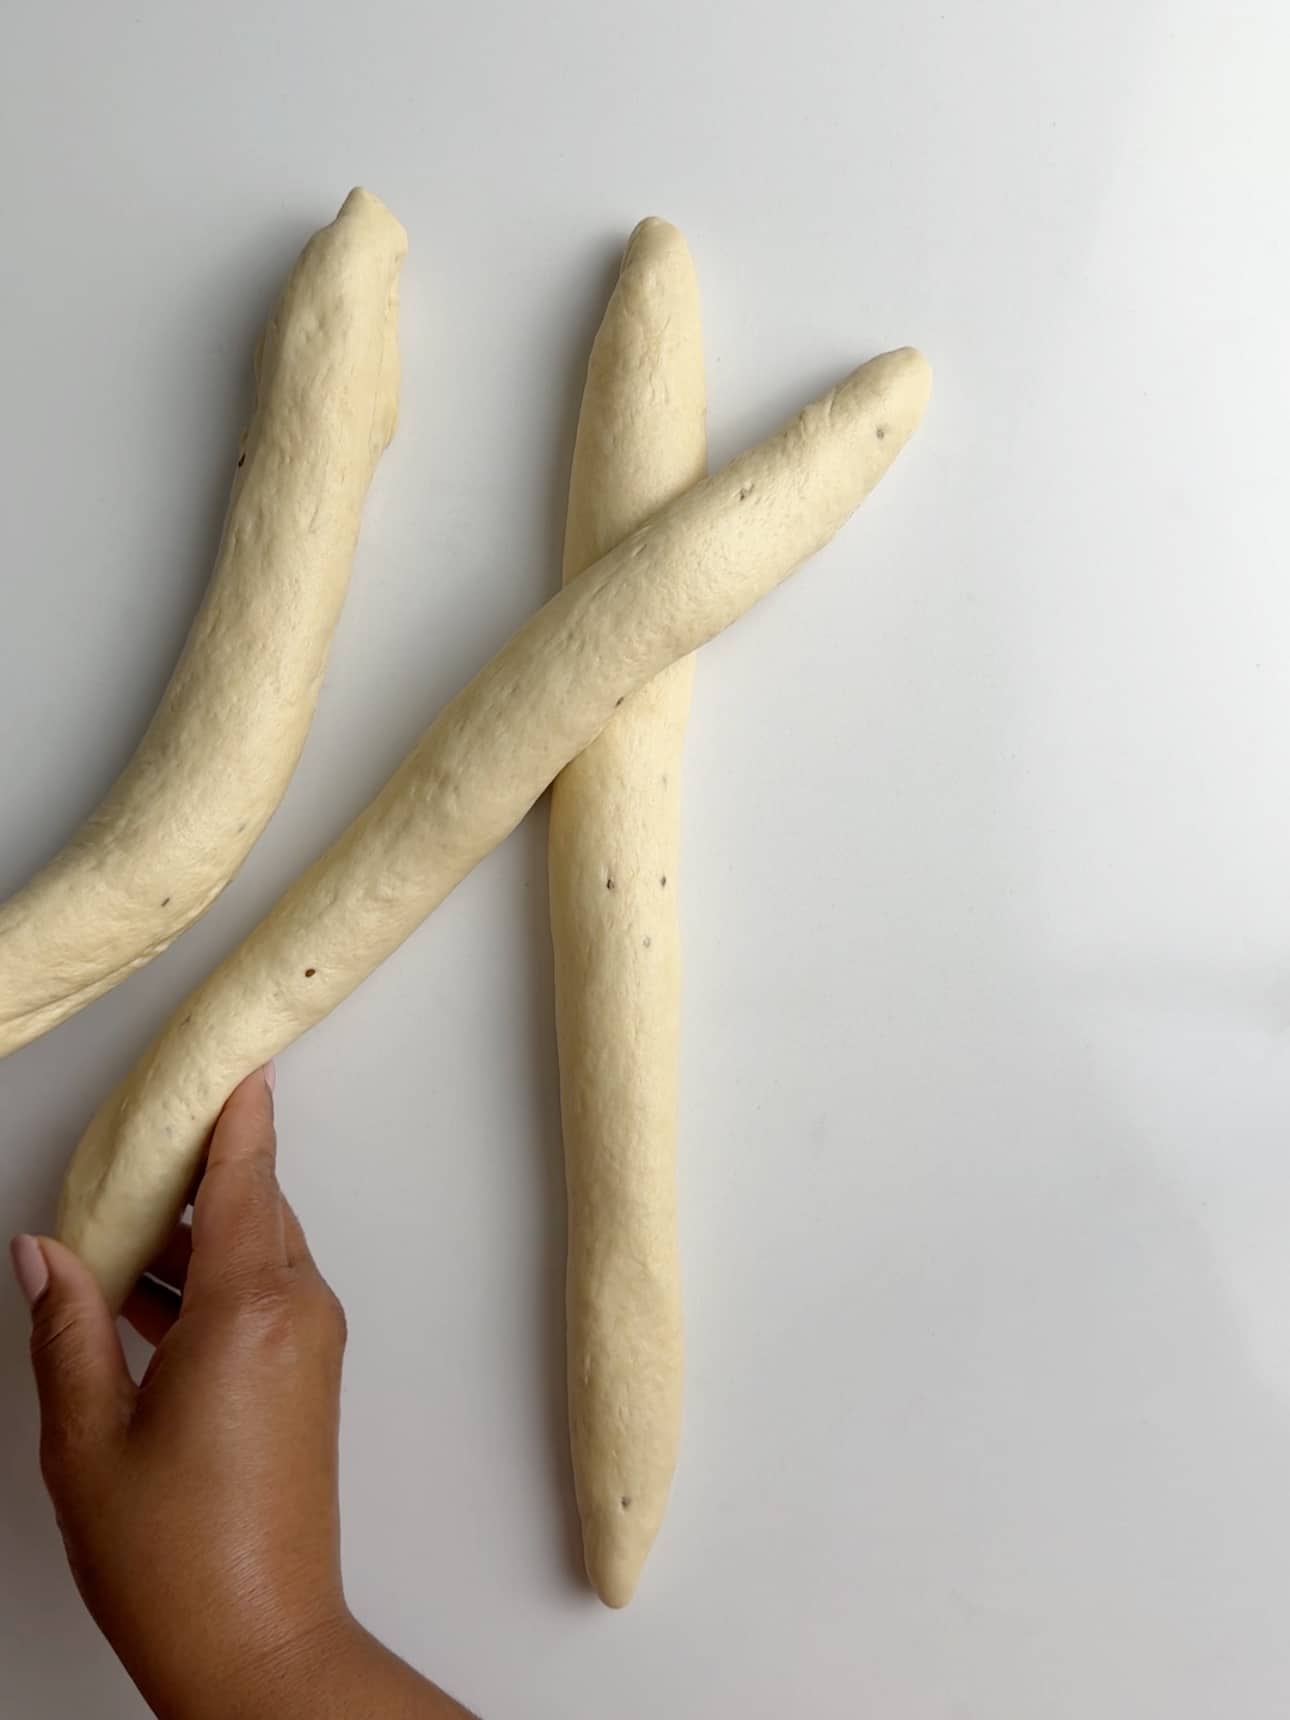
Then bring the left strand to the middle and repeat to the end.
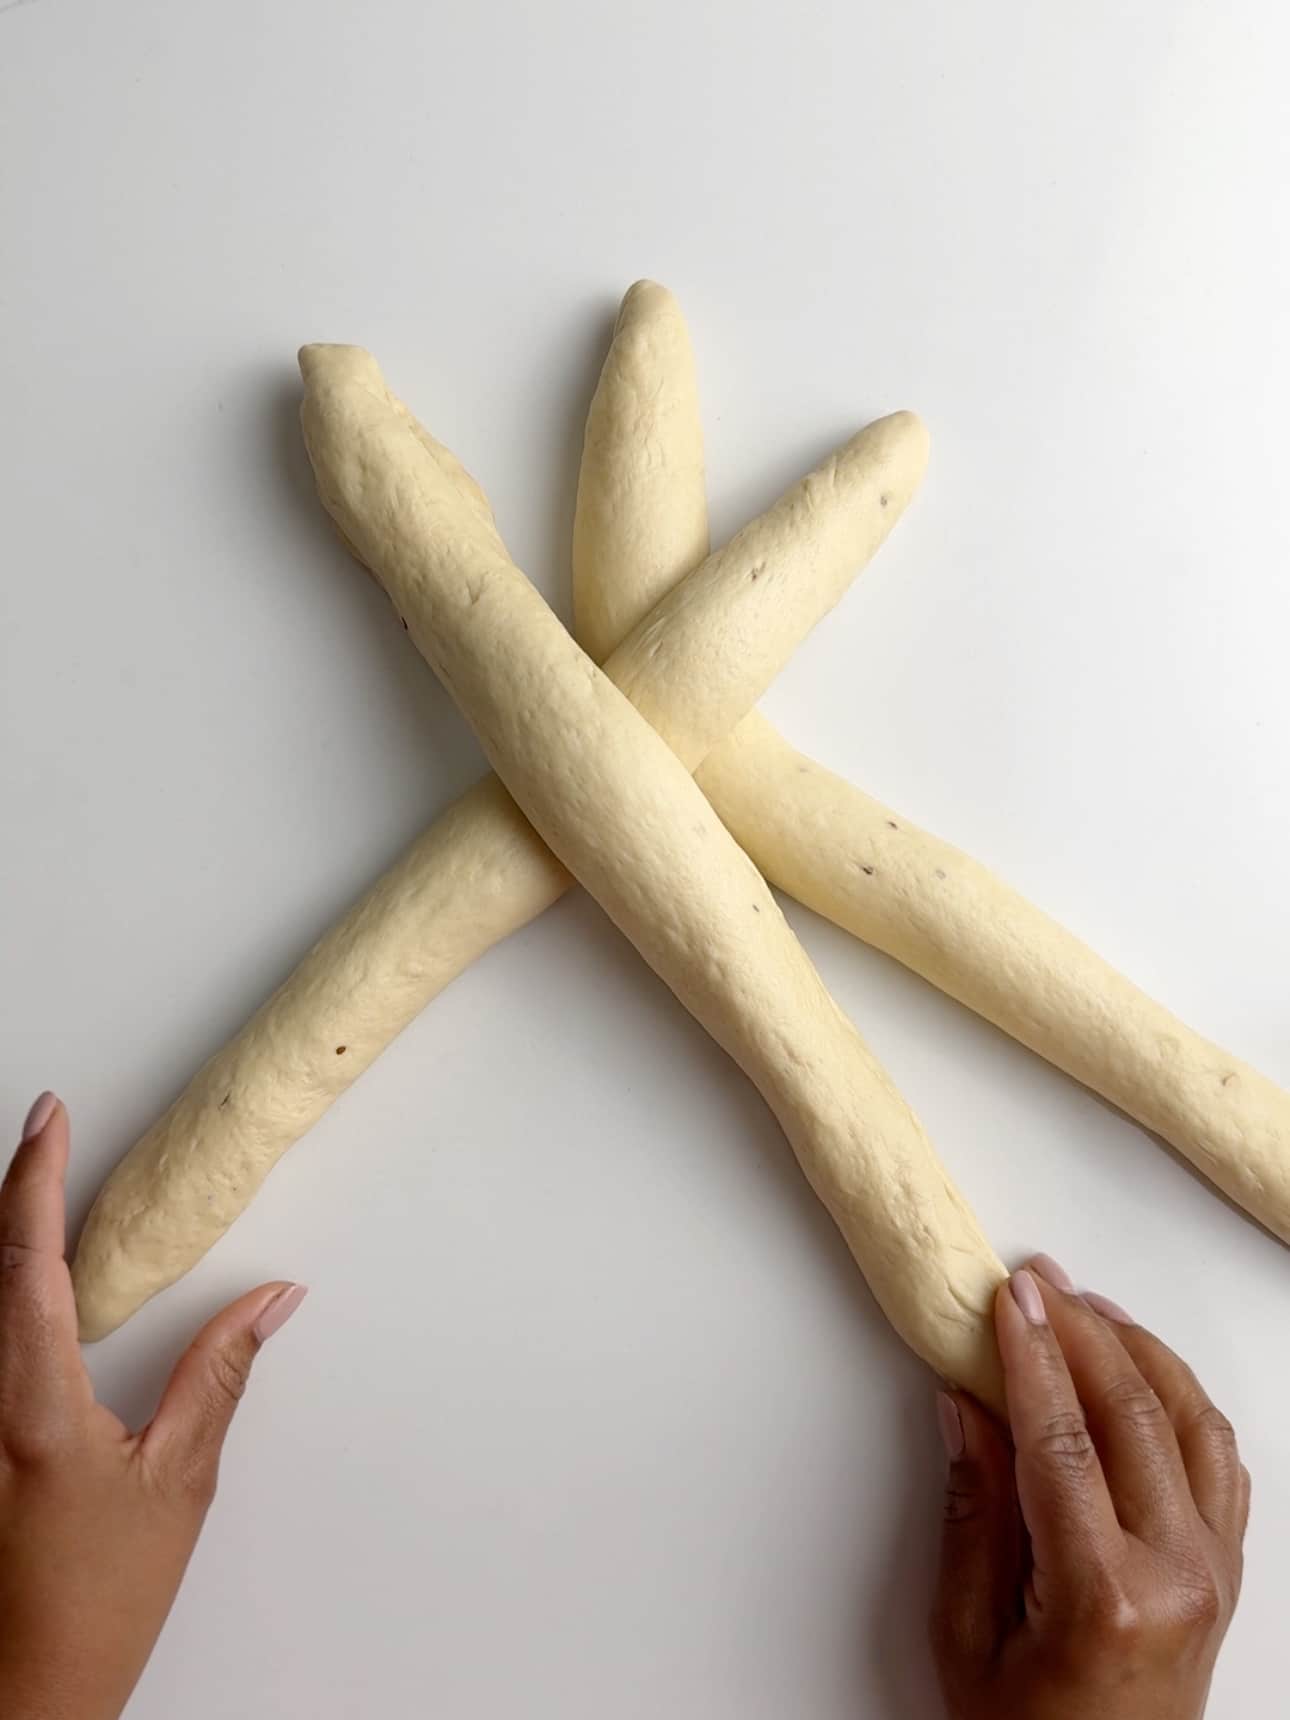
Braid all the way to the end, as far as you can go and when you get to the end tuck the ends under.
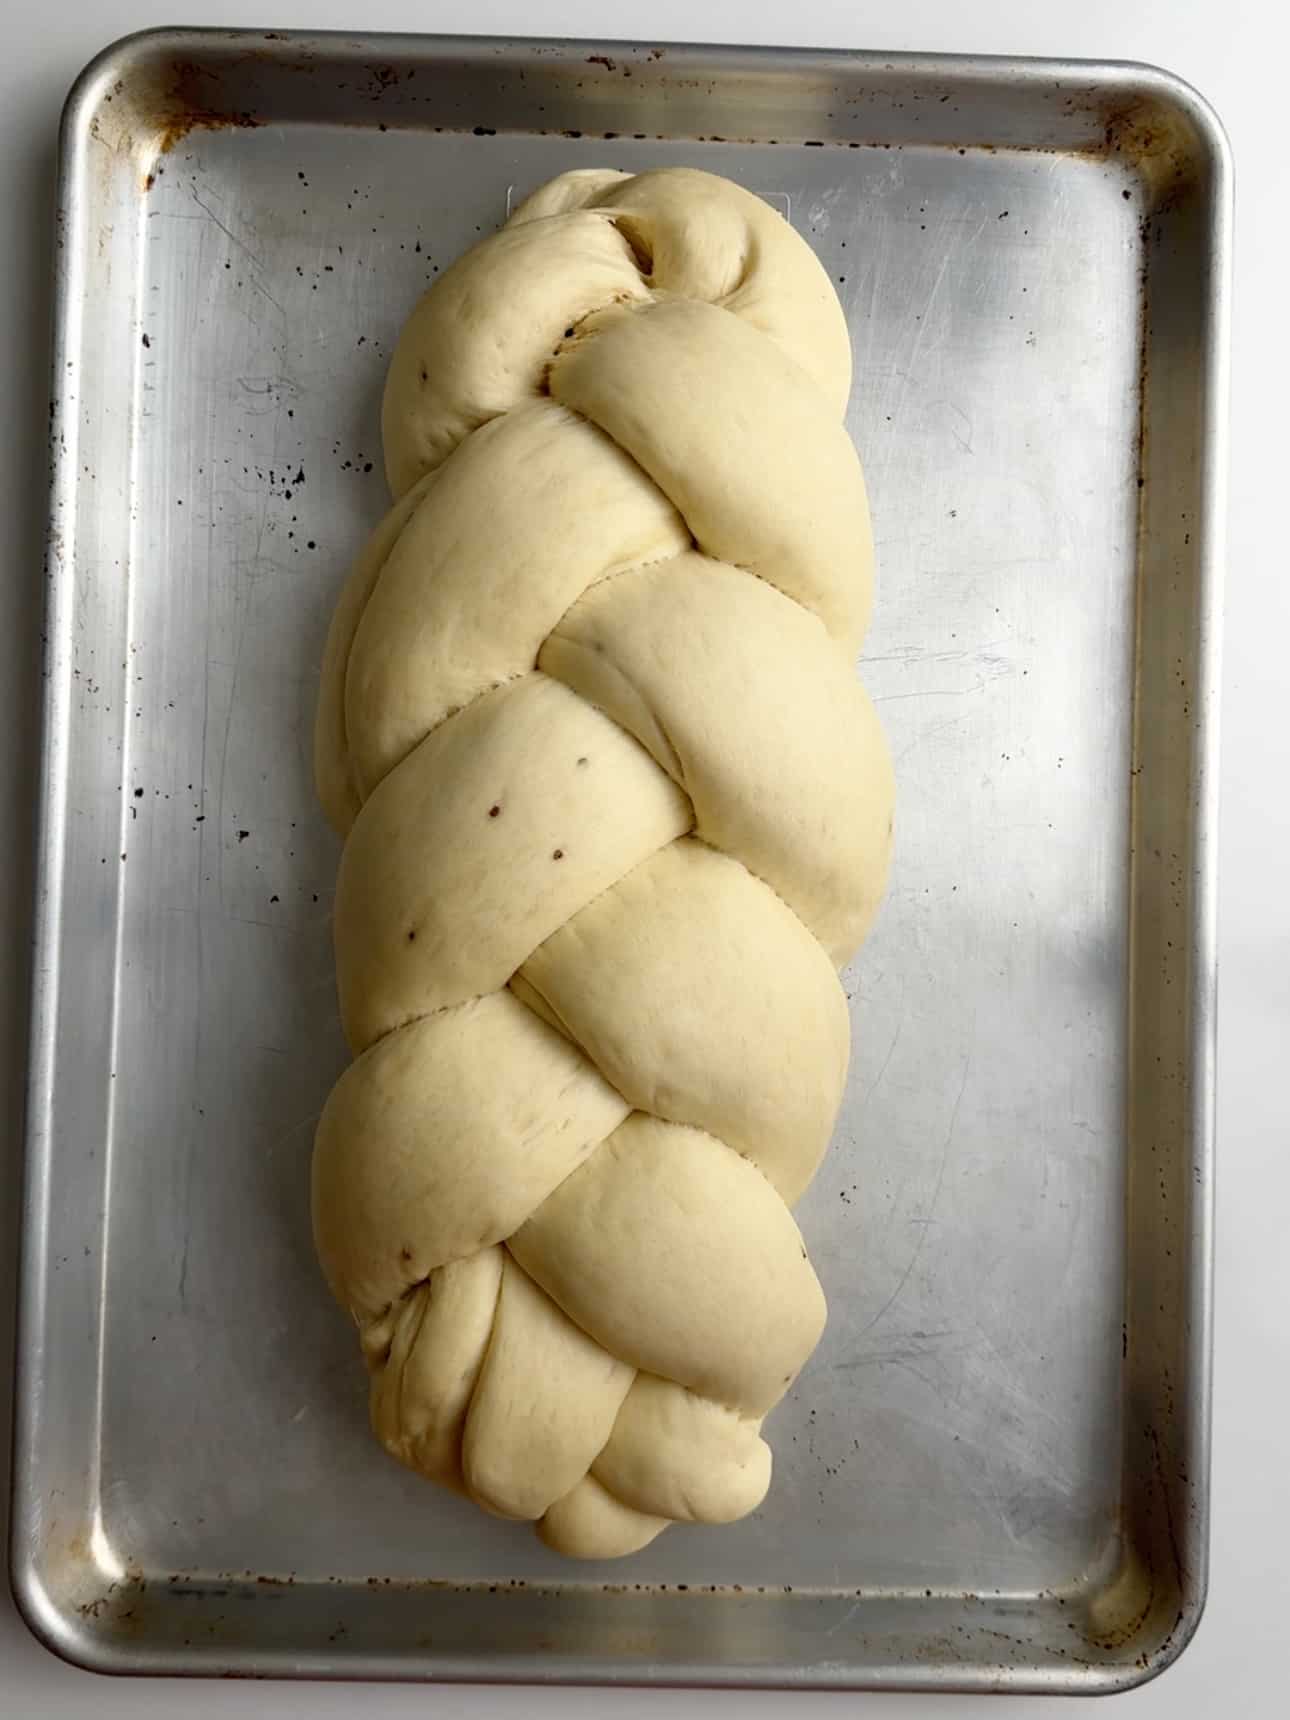
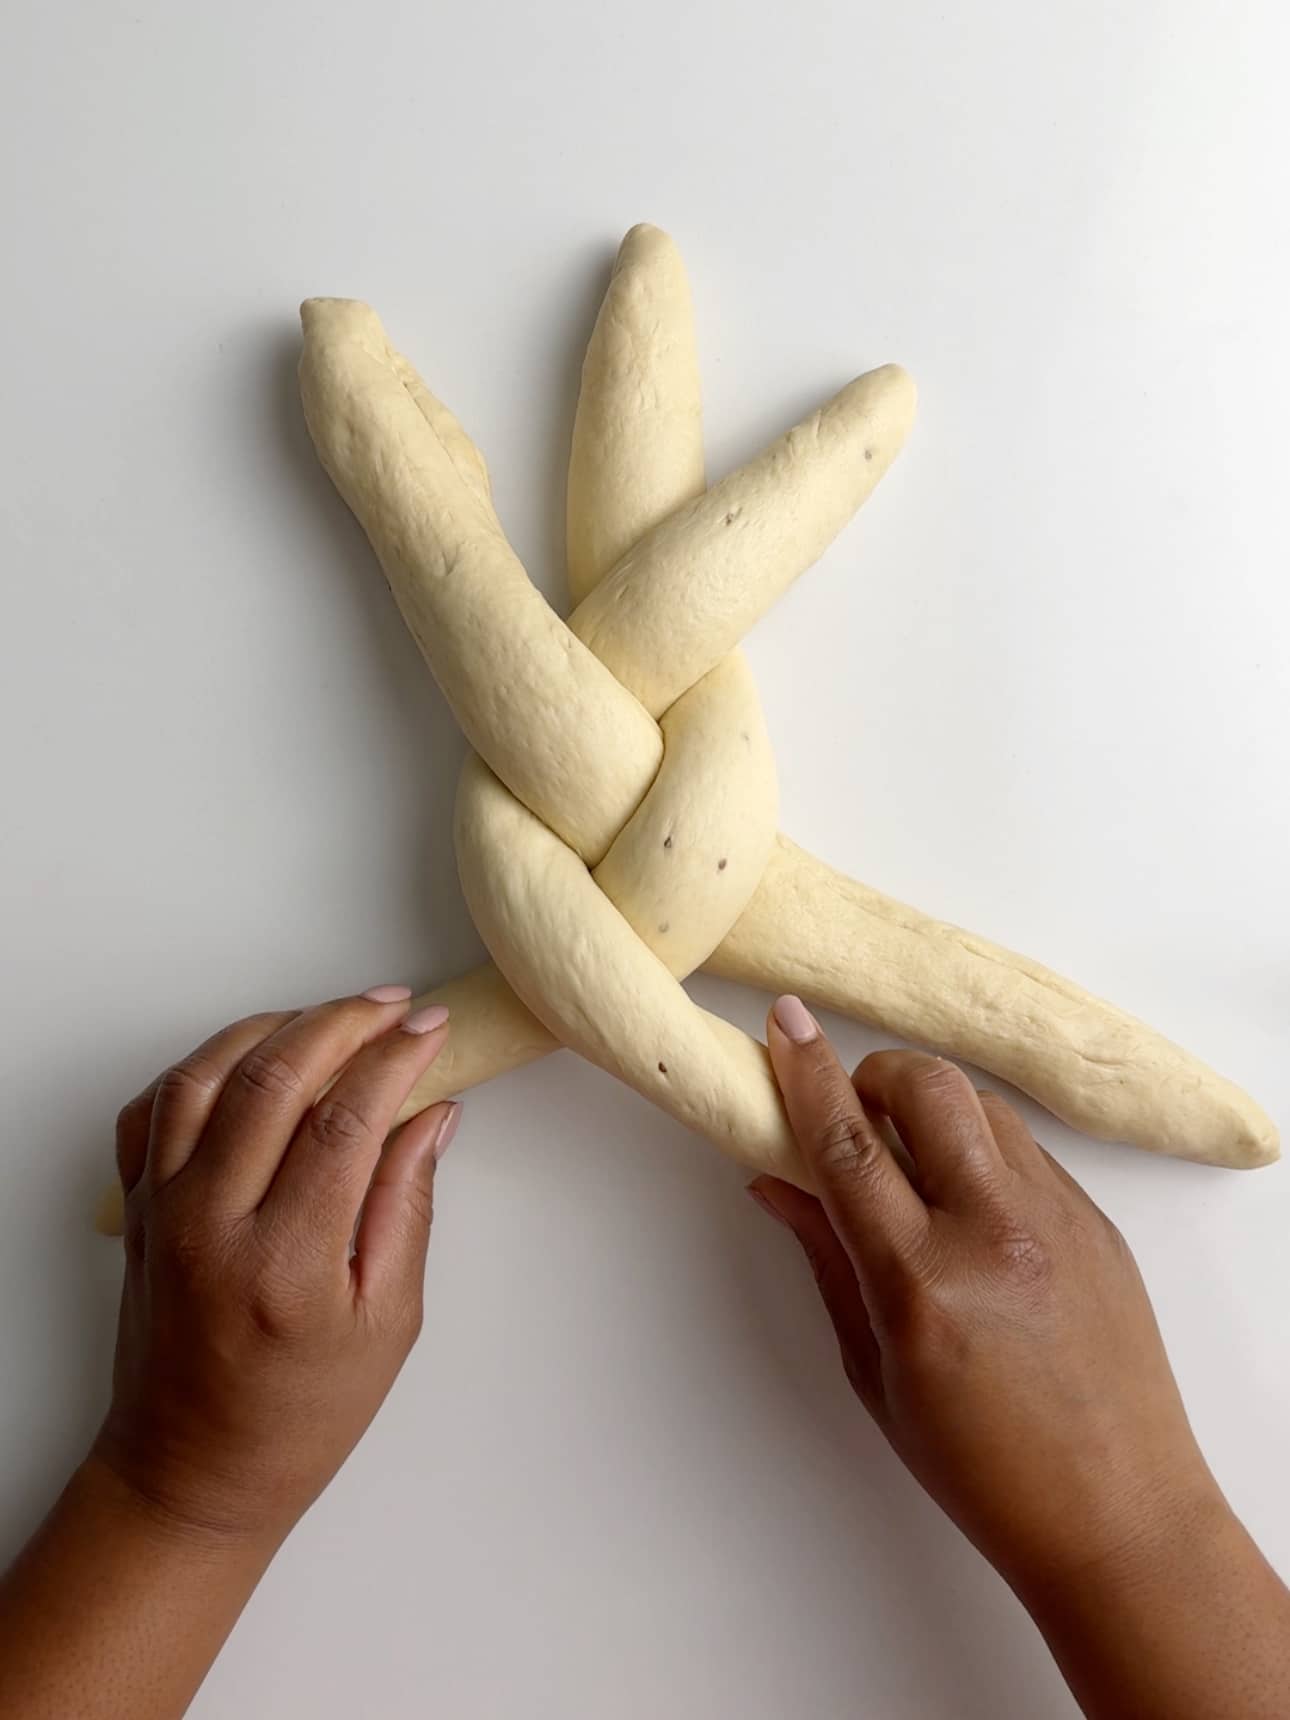
Then flip the loaf over, bring the open end towards you. And braid with the same right to center, left to center method. Go to the end, then tuck the end on top of the loaf. Remember this is now the bottom of the bread.
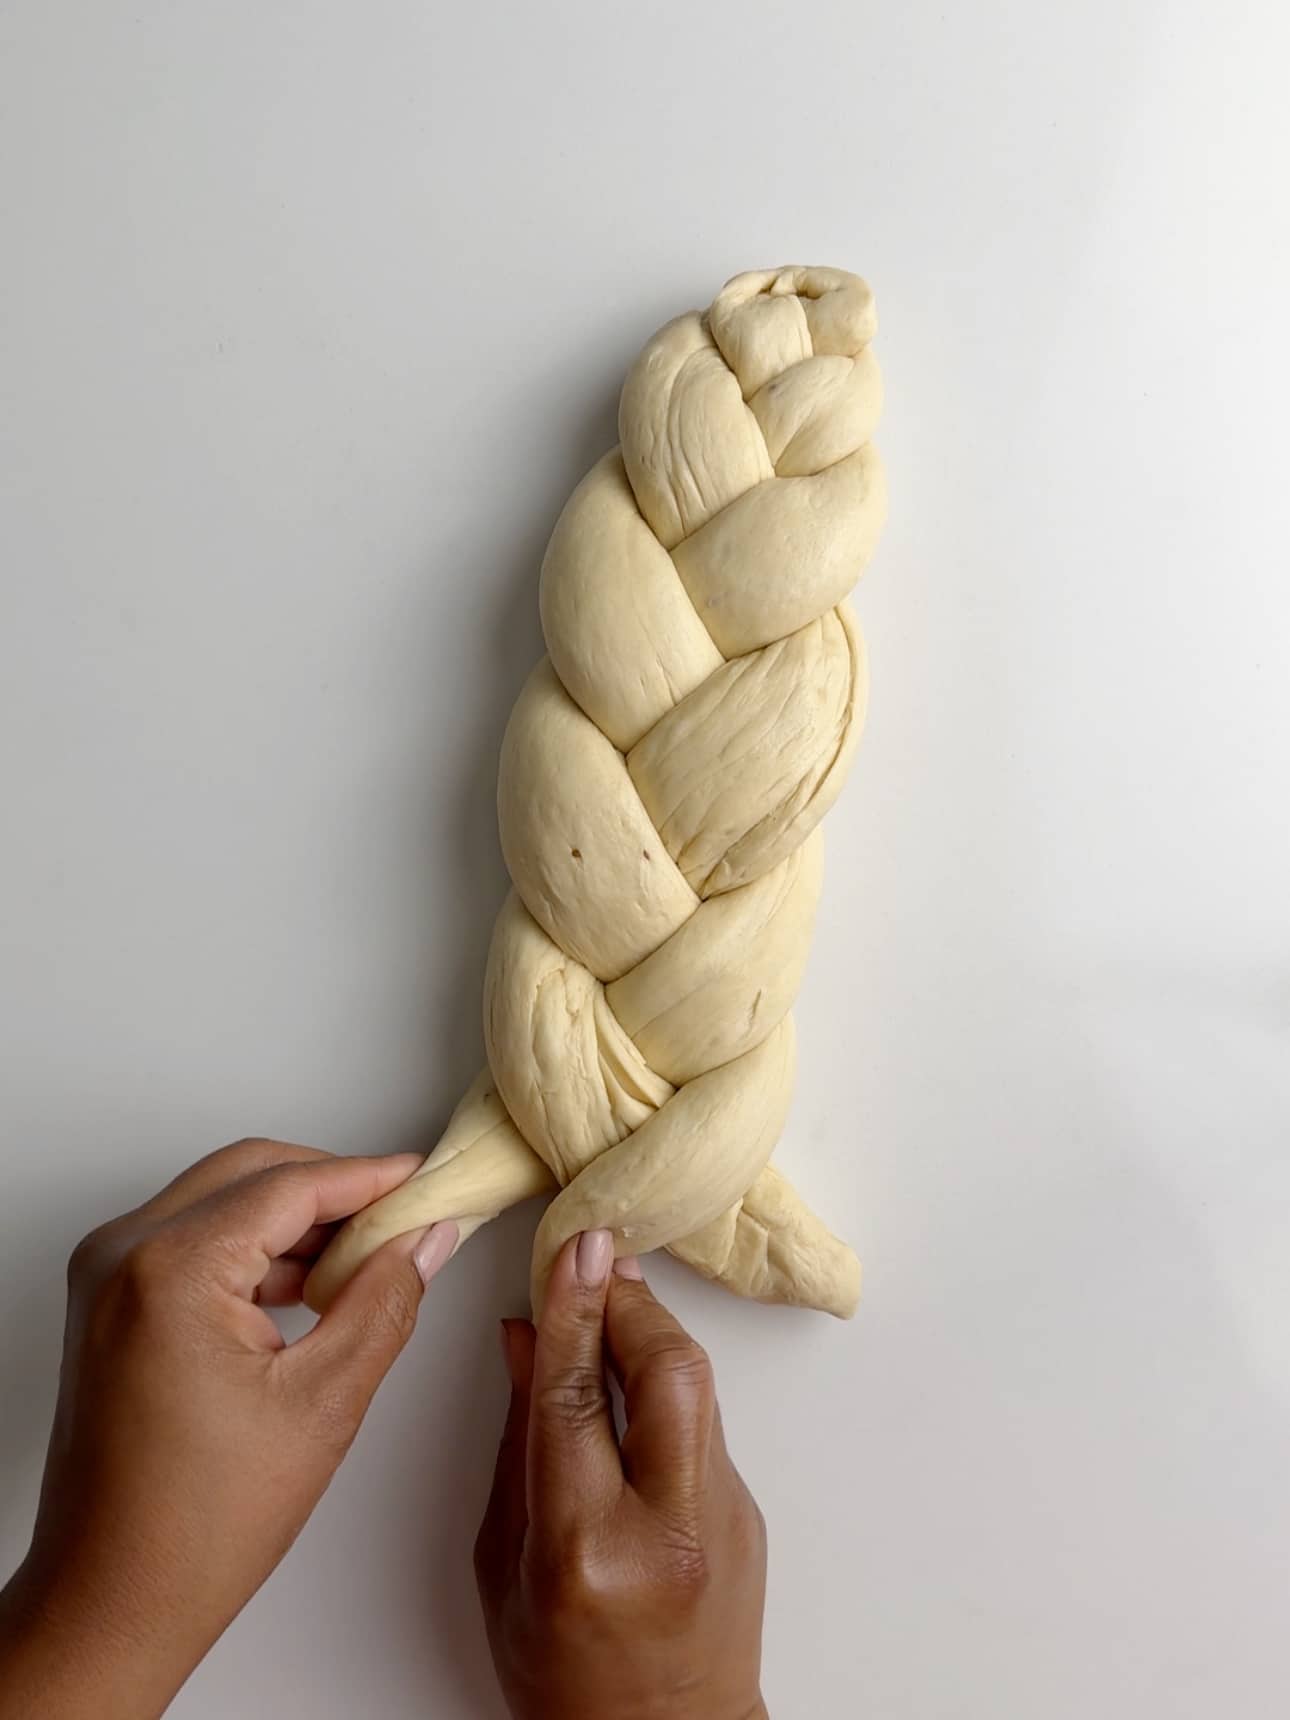
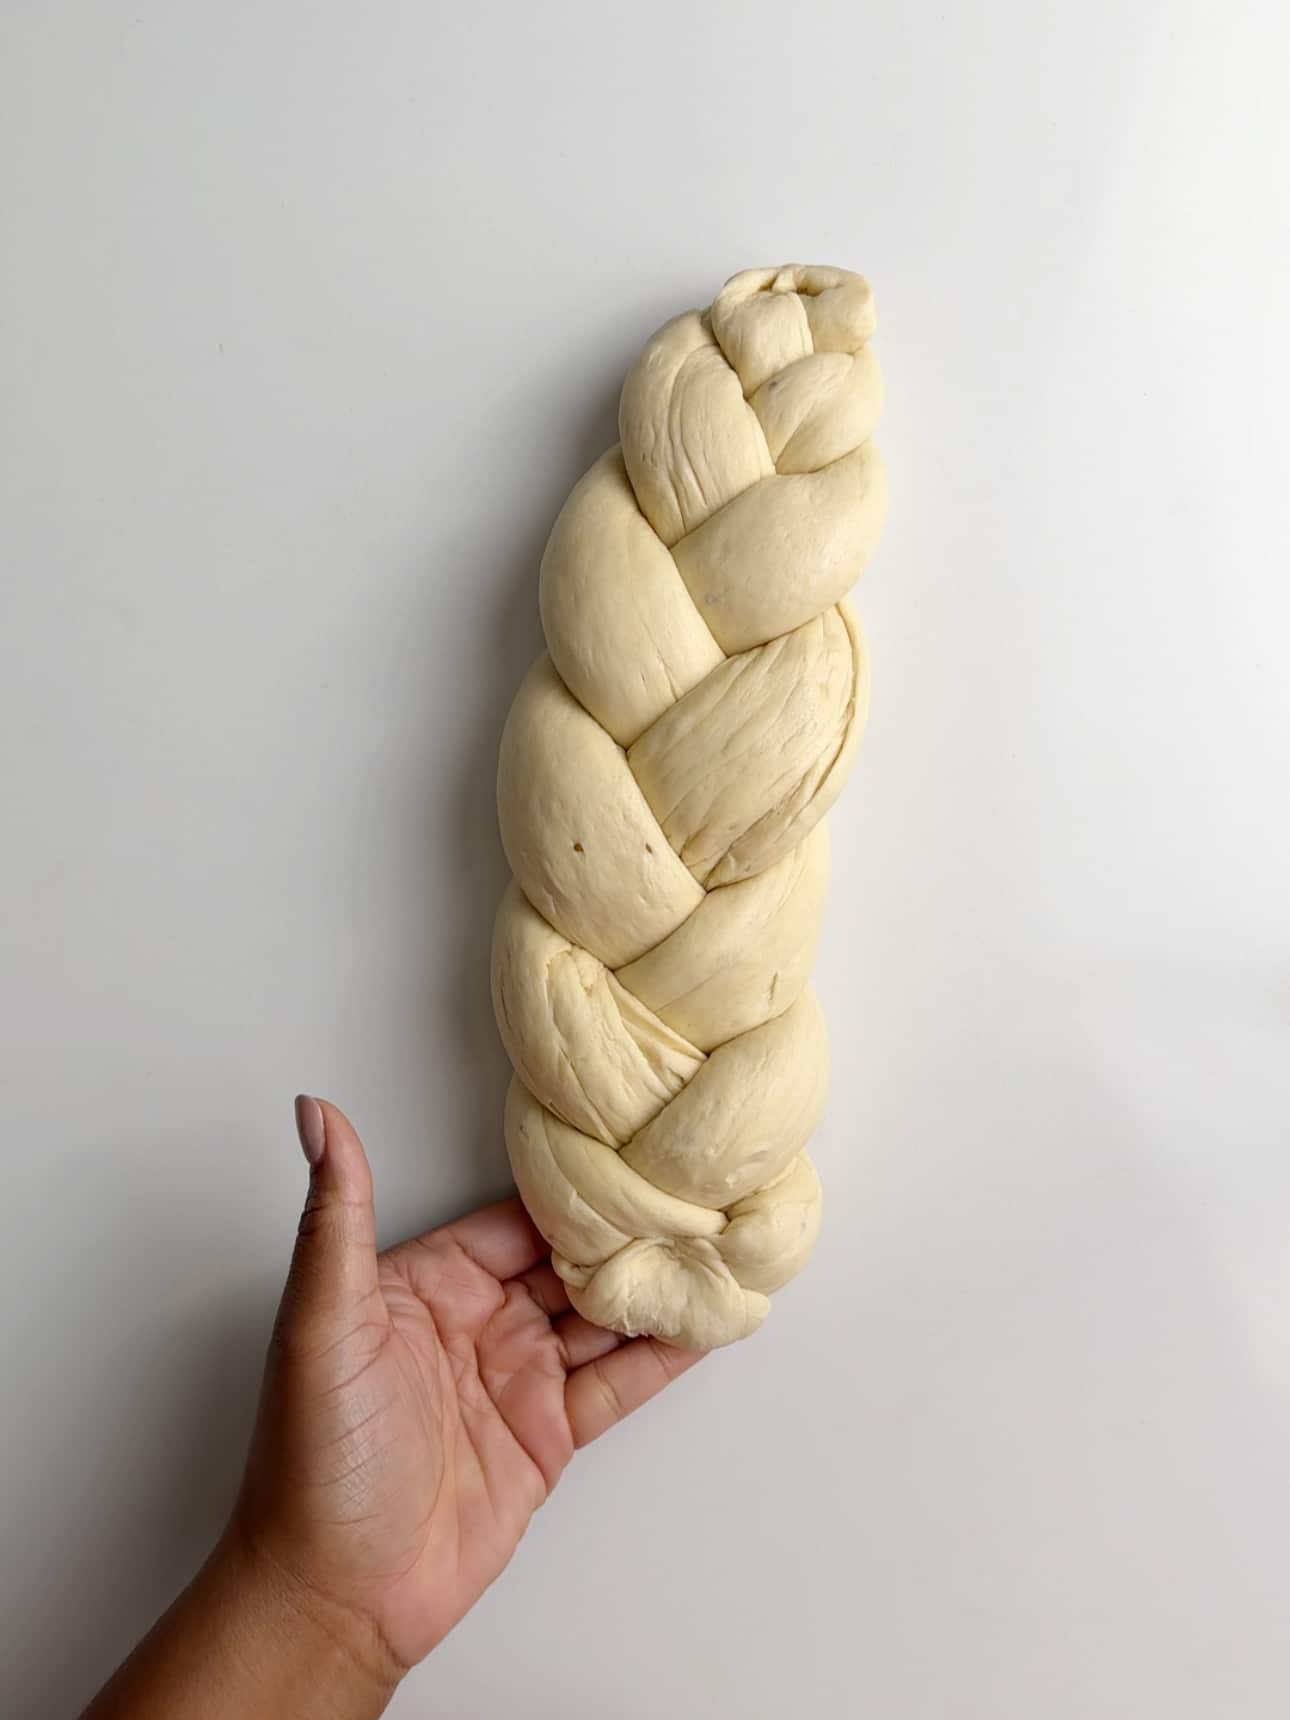
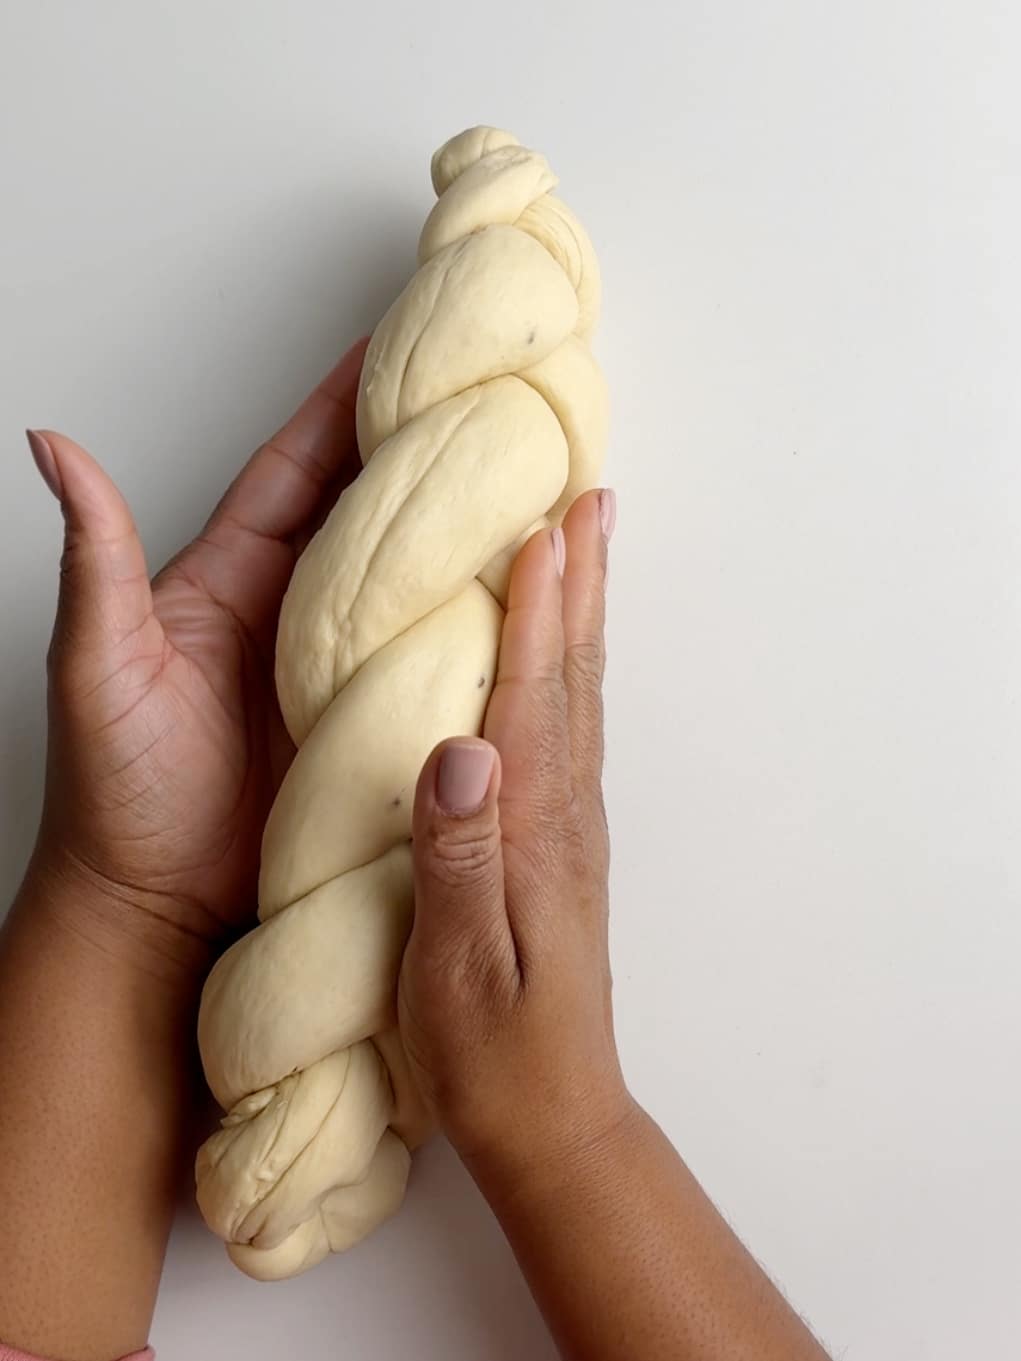
Then gently flip your braided loaf over.
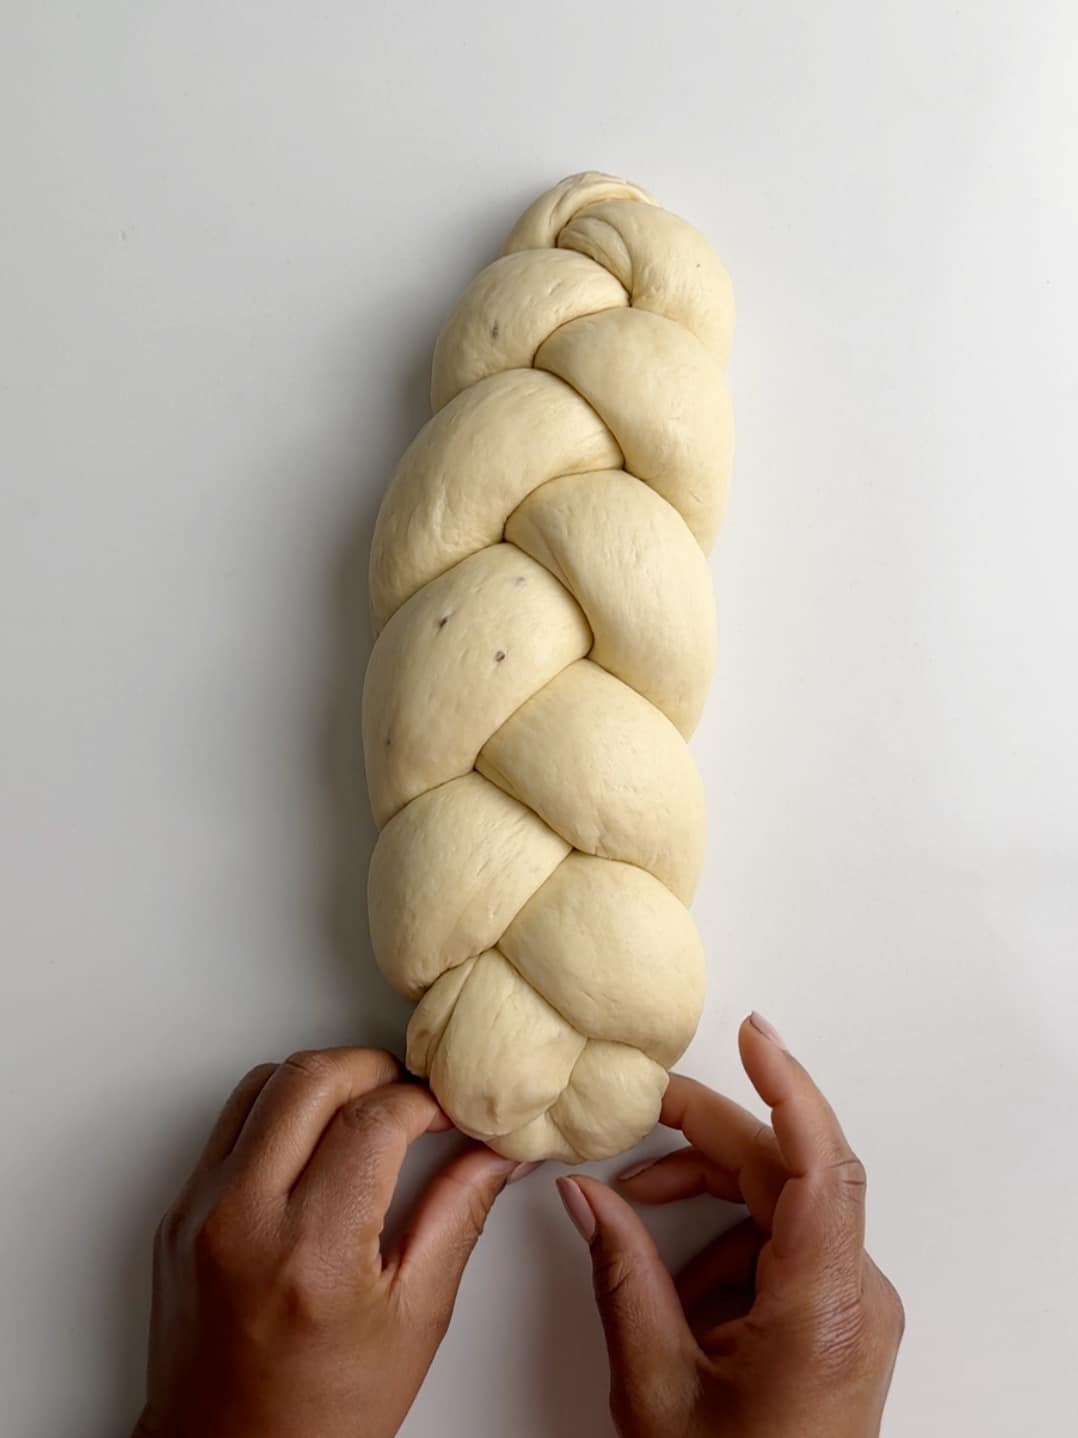
If you are adding a topper to the bread, roll out a very thing strip of dough, making sure it is long enough to add to loaf and tuck under both ends.
Baking Plait Bread
After braiding the bread, allow it to proof for an hour at room temperature. Then preheat your oven to 350°F. Bake the bread for 25 minutes. Then rub with butter, immediately after you take it out of the oven and move to a cooling rack. Cover the bread with a clean kitchen towel while it cools to prevent it from drying out.

The Step by Step Video Tutorial
Substitutions & Variations
- Aniseed (Anise Seed) Bread: A lot of Guyanese people love to add anise seeds to their bread. See below for how to incorporate anise seeds to your bread.
- Vegan. Make this Guyanese bread vegan by using vegan butter.
- Sugar. You can use white granulated sugar instead of brown sugar but I prefer the taste of Demerara sugar or sugar in the raw in this recipe.
- Same Recipe without Plaits. If you are not a fan of plait bread, use this recipe to make two loaves of bread instead. After the first rise, punch down and knead the dough into a ball, then divide the dough ball in half and roll into two logs. Place on a greased baking sheet or in two loaf pans and let the dough rise again before baking.
- Wholewheat Plait Bread. If you prefer wholewheat bread try this Guyanese Style Wholewheat Plait Bread recipe. It is an oldie but yields delicious results.
Guyanese Aniseed (Anise seed) Bread
To make Guyanese Aniseed Bread add 1 teaspoon of anise seeds to 1 1/4 cups of boiling water and allow to sit until the water cools down (about 110°F). Then follow the steps for making plait bread dough, using this water to bloom the yeast.
Equipment
- Whisk: This is used to combine wet ingredients and dry ingredients.
- Rubber Spatula: To scape the bowl and incorporate all the ingredients.
- Mixing Bowl: To contain the dough.
- Baking Sheet: For baking the plaited bread.
Storage
After the bread has completely cooled, place the loaf in a plastic bread bag to keep it soft and fresh. If you don’t have a bread bag you can wrap it with a clean kitchen towel to keep it from drying out.
Store it in a cool dry place for 2-3 days. Placing it in the fridge can make it stale prematurely.
Tips for the Best Plait Bread
- Have patience. This is not a quick bread. It needs time to rise, punch down and rise again before baking. But it is absolutely worth it!
- This bread is perfect for French toast (if it lasts long enough to get stale) or tawa toast: toasting it on a hot skillet with butter!
- To speed up the dough rising process, place covered dough in a warm oven (turn oven on to 200°F for 10 minutes, then shut it off). This is great to speed up the first proof, but should not be used for the second proof or your plait will rip apart.
- For best results let the second proof happen at room temperature and let it proof for the full hour.
- If the dough gets sticky add a little flour.
- Plait the bread tightly because it will loosen as it proofs
- This bread is cooked uncovered but if it looks like it is browning too quickly, cover it with aluminum foil.
FAQ
The two breads may look alike but they have different ingredients. Unlike challah bread, plait bread does not contain milk or eggs.
If your dough isn’t soft, your bread will not be soft and fluffy. Hydration is very important. Make sure your dough is not dry. Also knead your dough until it is spring to the tough.
Guyanese plait braid is influenced by Portuguese laborers who came to Guyana in the 1830s.
After braiding your loaf, allow the bread to rest at room temperature for a full hour before baking and preheat your over before adding the loaf. This prevents the bread from ripping apart. 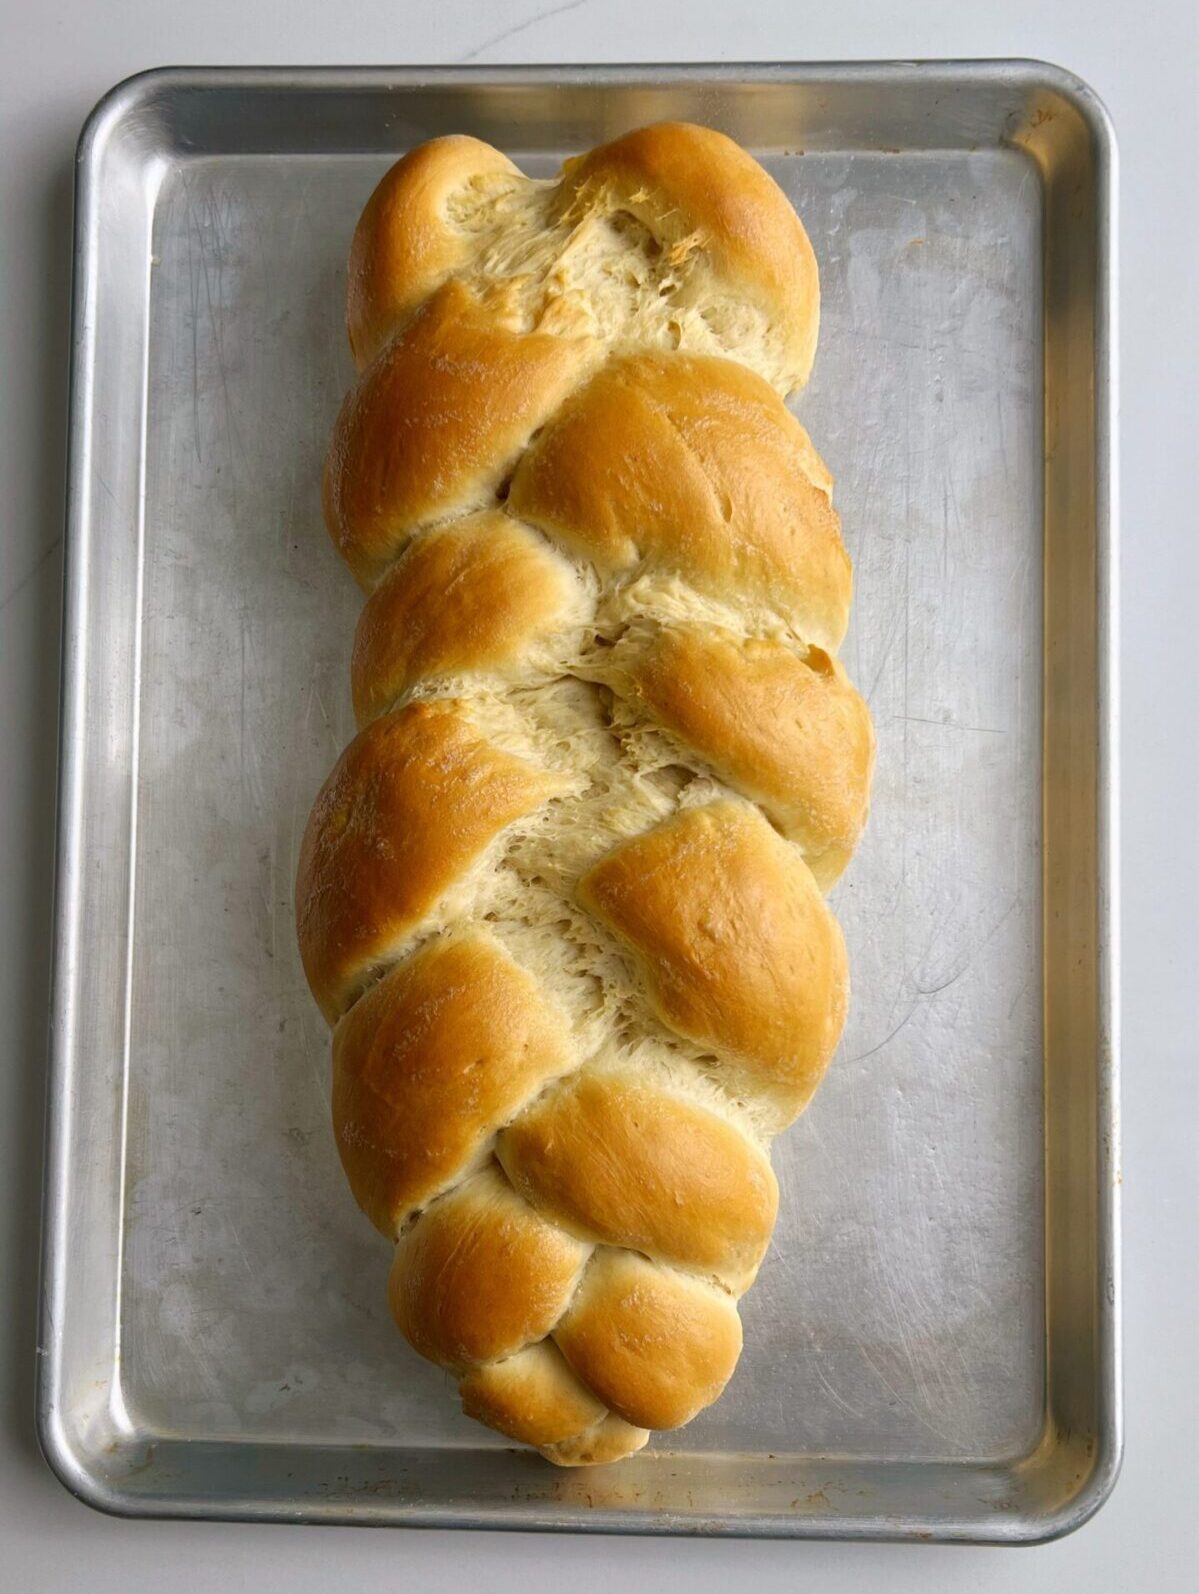
Plait Bread
Equipment
- Whisk
- Rubber Spatula
- Mixing Bowl
- Baking Sheet
Ingredients
- 1 1/4 cup warm water (110 °F)
- 1/4 cup brown sugar
- 1 tablespoon dry active yeast
- 3 1/2 cup all purpose flour (plus more for dusting)
- 1/4 teaspoon salt
- 1/4 cup room temperature butter (plus 1 tablespoon for basting after baking)
Instructions
- In a small bowl combine the warm water and sugar. Mix until the sugar dissolves, then add the yeast and give it a stir. Cover with a towel and set aside in a warm place to bloom.
- In a large mixing bowl, combine the flour and salt and mix well. Then using a fork or your finger tips mix the butter into the flour until the mixture looks crumbly.
- Next, form a well in the center of the flour and butter mixture then add the bloomed yeast. Using a whisk mix together to slowly form a pancake batter consistency, this is best achieved using a whisk. Then use your hands or a rubber spatula to pull the rest of the flour into the mixture to form a soft dough ball.
- Turn the dough onto a floured surface and knead for 5 minutes into a smooth ball or until the dough bounces back when pressed with a finger.
- Place the dough ball into a greased bowl, cover with a towel and allow to rise until it doubles in size. This takes about 45 minutes to 1 hour.
- When the dough doubles in size, punch down and knead again into a smooth ball. Then if adding the topper to the bread, cut a 2 inch piece of dough off from the ball and set aside.
- Divide the remaining dough into 3 equal parts. Tuck the cut ends of each piece of dough into the bottom (see photos above) and roll into long logs about 12 to 15 inches long.
- Next starting in the middle, braid the three pieces into a braid by going right over to center, then left over to center (step by step images are in the write up above). Go all the way to the end and tuck the ends into the bottom.
- Then flip the loaf over bringing the open ends to you and repeat the steps for braiding the open end. Then tuck the ends into the top. If this is confusing following the images under the section on "How to braid Plait Bread" above.
- If using the topper, roll the 2 inch piece of dough that was set aside earlier into a long strip, place the strip on top of the braided loaf tucking the ends under the loaf, then place the loaf on a greased baking sheet. Cover and let rise for at least an hour at room temperature.
- When ready to bake Preheat oven to 350 °F. Add the bread to the middle shelf of the oven and bake for 25 minutes or until it is golden brown. Remove from the oven and brush with 1 tablespoon of butter, move to a cooling rack and cover with a clean kitchen towel.
How to make the Dough in the Stand Mixer
- Follow the steps above to bloom the yeast and set aside.
- Then add the flour, butter and salt to your stand mixer bowl and using a whisk or paddle attachment, mix to combine.
- Next add the bloomed yeast to the dry ingredients in the stand mixer bowl and using a whisk attachment, mix for a few seconds to form a pancake like mixture. You do not need to mix all of the flour into the mixture just about a 1/3.
- Switch to a dough hook, making sure to remove any batter from the whisk attachment first. Then place the stand mixer on speed 2 and let it run for about 10 minutes. The mixture should come together in a dough ball that clings to the dough hook.
- Turn the dough onto a lightly floured surface and shape into a smooth dough ball. Place the dough ball into a greased bowl, cover with a towel and allow to rise until it doubles in size. This takes about 45 minutes to 1 hour.
- Then see above for instructions on how to shape and bake.
Notes
- When doubling this recipe do not double the yeast, or you will be left with a very yeasty bread. When tripling the recipe use 1 1/2 tablespoons of yeast. Most people get better results by making separate batches instead of doubling or tripling the recipe.
- To speed up the dough rising process, place covered dough in a warm oven (turn oven on to 200°F for 10 minutes, then shut it off). This is great to speed up the first proof, but should not be used for the second proof or your plait will rip apart.
- For best results let the second proof happen at room temperature and let it proof for the full hour.
- After my bread cools I place it into a bread bag to keep it fresh. If you don’t have a bread bag you can wrap it with a clean kitchen towel to keep it from drying out.
- To make Guyanese Aniseed bread 1 teaspoon of anise seeds to 1 1/4 cups of boiling water and allow to sit until the water cools down (about 110°F). Then follow the steps for making plait bread dough, using this water to bloom the yeast.
Nutrition
The information listed in the recipe card is an estimate provided by an online nutrition tool. The tool evaluates ingredient names and amounts then makes calculations based on the number of servings listed for the recipe. It is provided as a general guideline and not as a precise calculation. For precise nutrition information please feel free to add the ingredients to your preferred nutrition calculator or consult a doctor or licensed nutritionist.
 Non-alcoholic Guyanese Black Cake
 Pumpkin Flan
 Almond Flour Black Cake
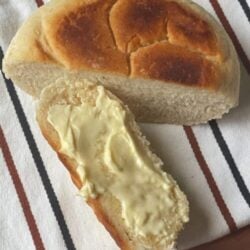 Gluten Free Pot Bread
Britt Says
This recipe is amazing, and easy to follow. My bread came out super soft and delicious.
Althea Brown Says
Thank you for sharing Britt so happy that you loved it.
Dd Wlsn Says
Watching you make the bread gave me the courage to try it. My husband walked in while I was kneading the dough, he sat down and watched until I was done. Then he smiled and said,” That’s how my Grandmother used to make bread.” Such a cute moment for us.
The bread turned out great! Next time I make it I will bake it for a few extra minutes to get a deeper color and add a little more salt.
Thank you for sharing, Althea.
Althea Brown Says
You’re so welcome. What an awesome moment. It’s how my grandmother made bread too. Much love to you and your family.
Fayola Says
Made this bread during the early days of the covid 19 pandemic and I’ve continued since then. You wouldn’t believe it was my first time making bread when it was finished. The receipe was easy to follow and the video visually guided me. Thanks Altee!!!
Althea Brown Says
Thank you so much for sharing. Much love and happy holidays.
Rachel Says
Thank you for the recipe,would you use salted or unsalted butter?
Althea Brown Says
I used unsalted butter and a pinch of salt. If salted butter no salt
Johanna Says
Altee this recipe was PERFECT! It tasted so great that I couldn’t stop eating it and you know what was the best part? It was not only easy, but your method didn’t use much of my time. I was don’t pronto!
Althea Brown Says
Yay. So glad you love it. Thanks for sharing.
Jen Says
Made this today was amazing and ingrendients was exact. Thankyou so much only one thing happen to me is that the button was a little burn but it was amazing. I will try it again
Althea Brown Says
You may need to adjust your shelf position for next time
Caroline Says
One of Best instructions ive had since my graNdmOthers teachings. Im not one to read directions, i prefer to watch them. I usually Just read the ingredients and get straight into watching. This vIdeo was clear and i enjoyed hearing her background of How she started getting into baKing. I ended up using the hOle stick of butter instead of the 1/4. I do agree the bread is softer and taste scrumPtious! My bread was even baked in a toaster oveN!! Thank you! You have made this guyanese proud!
Althea Brown Says
Thank you so much for the support. More butter = yummy bread.
Mala P Says
Hi Althea!
This recipe is amazing! Since Covid I started baking more and was happy to find your recipe. It’s soft and delicious. I’ve been baking this every week ????
Althea Brown Says
Thank you so much. I love the smell of bread baking, so I can only imagine what a weekly treat that is!
tvg Says
Hi there,
Can I use coconut oil in place of butter?
Althea Brown Says
Yes you can
Saby Says
My sister did your recipe 2 days ago and absolutely loved the results, so she sent me the recipe to try, going to try it today..
Althea Brown Says
Thank you. Merry Christmas
Marg Says
Hi Althea, thank you for this recipe!! It came out amazing when I baked it the other day, I wish I could post a picture for you. The whole house loved it. I wanted to make it a few more times and was wondering if i had to adjust the cook time or temperature if I was making 2 loaves to be in the oven at the same time. Please let me know what you think. Thank you again and I will be making more of your recipes in the future!!!
Althea Brown Says
Hi There. Thank you so much for this and for sharing. No need to adjust cooking time or temperature while baking two loaves. If you mix the two loaves in one batch you don’t need to increase the yeast in the recipe. Thanks again.
Tandieka Says
I used this recipe to make a loaf at christmas time to accompany my pepperpot, it came out great!
Simone Says
I made this today and it was dicine! First time.making bread and was really pleased at how w
Well it came.out. just as good as tou said it would be. I’ve already shared with multiple people. Thanknyou!
Althea Brown Says
Thank you so much for trying the recipe and for sharing. Glad it came out great! It’s a favorite in my home.
Ange Says
The bread is sooo soft and delicious, the whole family loved it! This is my new go to bread recipe.
Althea Brown Says
So glad it was a hit. Thank you for sharing.
Mariam Ali Says
I just made thei bread and I was totally amazed at how perfect it came out. I have alWays wanted to bake bread,.I dId Try one tIme wHen I was younger and living in Guyana but it was A dIsAster. I threw out. This bread is soft aNd amazing. Thank you for sharing this Recipe. Wish i can post a picture of it. Thank you again.
Althea Brown Says
I’m so happy you tried and had success with this recipe. Now that you’ve made bread you have to try tennis rolls. If you are on Facebook you can share pictures on my Facebook page. Facebook.com/metemgee or just search for metemgee. Thanks for sharing.
Mariam Ali Says
I did and also I need to tell you this. I love to look at ur videos and listen to you. I looked at your roti video. Man you make roti making into an art. I have been cooking roti since I was 10 years old and still cooking them. Taught all my kids to make them too. I was so over making roti, until I saw ur video and how lovingly you made each one. Now roti making has taken on a new meaning for me. You have an amazing way to present cooking! Keep up the good work. I am so tempted to share your recipes on my Facebook page but not sure how well recipes and quotes go together. Have a great day.
Oma Says
Thank you for the recipe. It was delicious. It came out so soft. I bake today and only have a quarter of it left. Lol. I was wondering if you double the recipe do you double the yeast as well. Thanks .
Althea Brown Says
I’m so happy it worked! If you want to make two loaves of bread double the flour, butter and liquids but not the yeast. Good luck!
Oma Says
Thank you so much. I appreciate what i have learn from you.
Kellianne Says
Omgggg!!! THIs bread is everything you said it would be. DELICIOUSness!!! This is my bread recipe going forward. My family loved it too. Thank you for putting ANOTher tradition on my table.
Althea Brown Says
You’re very welcome. I’m so glad you and your family enjoyed it! Thank you for trying my recipe and adding bread making to you family traditions!
Farah KassiM Says
Thank you so much for this wonderful bread recipE!!! My mom and i have tried many bread recipe but this is the best by far! So easy and comes out Soft, fluffy and so Delicious everytime!
Althea Brown Says
Thank you so much for your kind words. So glad you guys tried and liked it.
Yvonne Richards Says
Althea,
“Bread and buTter is your Jam … eh.” That was cute irony:) . I love your work in the kitchen!! You made me want to go and make brEad, but i don’t have to because my mom (your aunt ) made some … also, i would be TEMPTED to eat it all so i just don’t bake:)
Great job with the BrEad and thank you for memories of granny.
Althea Brown Says
You are beyond lucky to have your mom right there. Girl if she lived with me we would rock out in the kitchen everyday. I would record, document and write everything down. I aspire to be like her when I’m that age. Just cooking for my kids and grand kids. I learn something new about cooking EVERY single time I talk to Aunty Cheryl. I miss granny. I think about her often. Every time I want to fancy up a dish or blog post with some gadget I’m like “you think granny would use this?” 😀 I just hope this bread made her proud. My favorite memory of eating her bread was with a sweet and sour chicken stew. To this day I can’t recreate that stew. She was truly an inspiration!!!
Ethel Ross Says
Thank you do you have a recIpe book
Althea Brown Says
In a sense this is my recipe book. I aspire to have a cook book one day!
wendy Says
Althea! Thank you very much for sharing these wonderful recipes with us. I’ve been a follower for years and this is my go to bread recipe (especially at Christmas time. lol). your words made me think of my amazing grandmother, mary pitt (Aunt zerry-who use to bake & sell in kitty/campbellville area). thank you again!
Althea Brown Says
Thank you for being a faithful follower. I love memories of my grandmother. It’s amazing how much these women gave to their families.
paula dover Says
Thanks for your recipe. I followed and my bread came out very good. Have a Merry Christmas and a happy New year.
Althea Brown Says
Merry Christmas
wendy Says
Note to self: “do not type public responses from your phone.” no capitalization of proper names…ugh! lol
getting ready to make some bread today. I really should have done the whole 30 with you while we are confined to our homes.
stay safe
Althea Brown Says
Ha. I’m starting another one (joining a global Whole30) on April 13. Come join me!
Wendy Says
I’m in! Let me make these tennis rolls today (your recipe), so that I can dedicate myself to the challenge. lol
Althea Brown Says
Haha. Ok. Awesome.
Althea Brown Says
Hope you’re using the updated tennis roll recipe. That’s the best one.
Bibi Says
Why is my bread still raw in the middle even after following the steps?
Althea Brown Says
Your yeast was probably not good. Did it get a good rise?
DC Says
Hi Althea,
I can’t wait to try this recipe! Can I put all the ingredients in my bread machine on the dough setting? The dough setting cycle is completed in 2 hours.
Althea Brown Says
I’m not sure. I don’t have a bread machine and have never used one.
Sharlima Says
Hi Althea.
Would like to send a pic. This bread recipe is amazing. My daughter asked me to make a Guyanese plait bread. I made your recipe. Excellent. She is thrilled to bits. Thanks for sharing. I read about your roti recipe. I am going to Google it. Thanks again.