Salara is a coconut stuffed sweet bread baked until golden brown and then glazed with sugar straight out of the oven. With its signature red color, this Guyanese treat is sure to satisfy any coconut lover.
Guyanese Salara
Back in Guyana, my grandmother baked every Saturday. She made everything from bread and coconut buns to cassava pone and coconut salara. As a child, I loved devouring this Guyanese pastry and nothing has changed!
With its mesmerizing red swirls, salara is similar to a cinnamon bun. The dough is rich and soft and when pulled apart, you smell all the fragrant warm spices. My family loves this sweet indulgence and yours will too. Get ready to learn how to make the best Guyanese salara!

Why You’ll Love This Salara Recipe
- Dairy Dessert: This baked good is made without so those with dietary restrictions can still enjoy it. My children have dairy allergies and I wanted them to enjoy one of my favorite childhood treats so I adapted my original recipe.
- Adaptable: Although I make this dairy-free with coconut milk and oil, you can definitely make salara with whole milk and butter. It’s also easy to make vegan.
- Easy: With step-by-step instructions, this recipe is easy to follow and great for new bakers.
What is Salara?
Guyanese salara, also known as red cake/red roll/red bread/coconut roll, is a rich soft dough, rolled with a sweet, sticky mixture of grated coconut dyed red.
Ingredients for Salara
These red coconut rolls are made with just a handful of simple ingredients.
For the coconut filling
- Grated coconut: You can grate fresh coconut or frozen shredded coconut.
- Granulated sugar: This is used to sweeten the coconut filling.
- Spices: Use ground cloves and ground cinnamon to enhance the overall flavor.
- Red gel food coloring: This gives the filling a vibrant red hue.
For the Sugar Sling
Boiling water and sugar creates a sweet glaze for the freshly baked salara.
- Water
- Sugar
For the Dough
- All Purpose Flour: The base structure of the dough. You will also use it to dust your work surface.
- Instant / Rapid Rising Yeast: This allows you to bake dough with just one rise.
- Salt: Without salt, the dough would rise too fast and the flavor would not develop.
- Coconut milk: This enriches the dough.
- Warm water: This makes the dough softer.
- Brown sugar: This makes the dough more moist than regular sugar.
- Fat: Use coconut oil or another fat such as butter, lard, shortening, or margarine.
- Egg yolk: Brush this on the salara before placing it in the oven for a golden brown crust.
- Room Temperature Water: Use about two tablespoons of room to seal the salara before baking.
See recipe card for quantities.
How to Make Salara
Making the Filling
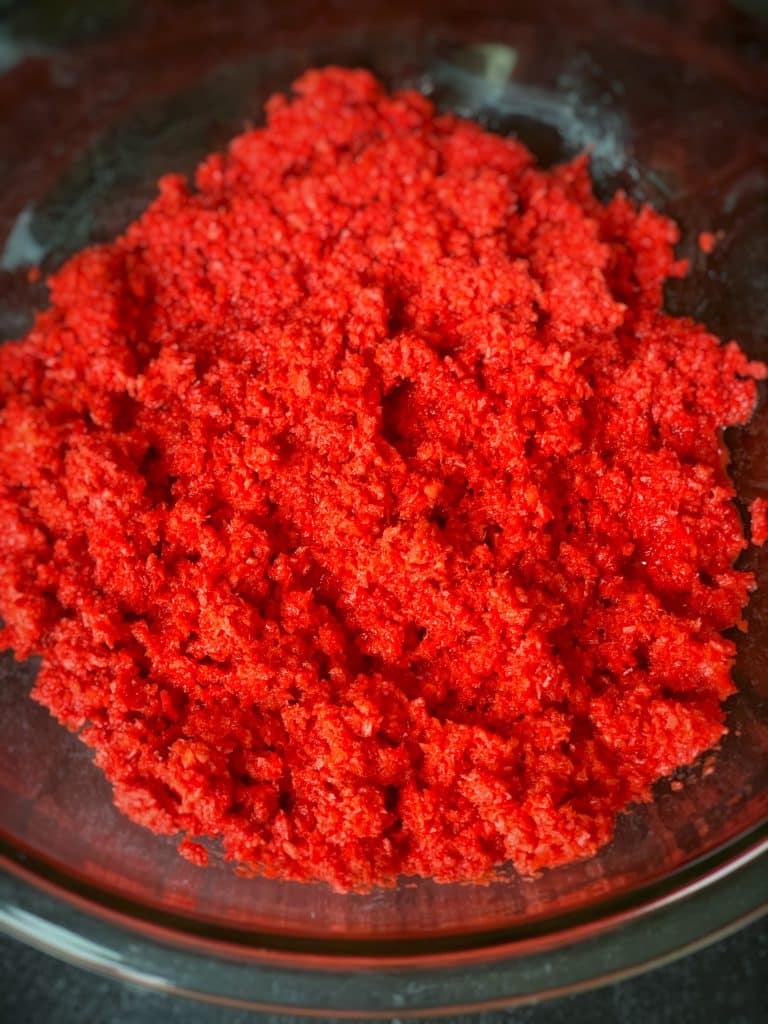
In a large pot on medium-low heat combine the grated coconut, sugar, ground cloves, and ground cinnamon and mix together well. Then add the red food coloring. Cook the coconut filling for at least 5 minutes, to bring together all the flavors and melt the sugar into the grated coconut.
Prepare Dough
Combine the dry ingredients for the salara dough then add fat to the flour. Once it’s combined, make a well for the wet ingredients. Add your liquid, whisking most it into most of the dry ingredients.
Fold in the remaining dry ingredients with your hands to form a sticky dough. Add more flour and knead for about 10 minutes. Then place the dough in a greased bowl and cover it with a wet paper towel.
Let it sit for about 1 hour so it can rise and double in size. Then knead for an additional 5 minutes before splitting the dough in two. Roll each dough out into squares and brush the edges with warm water to keep the salara sealed while baking.
This recipe makes two rolls. Roll the dough out to about 1/4 inch in thickness. Try not to go much thinner than this or the dough will get punctured with the coconut filling when you are rolling it into a log.

Fill the Salara
Your filling should be completely cool before it is added to the dough or it will weaken the dough and cause punctures.
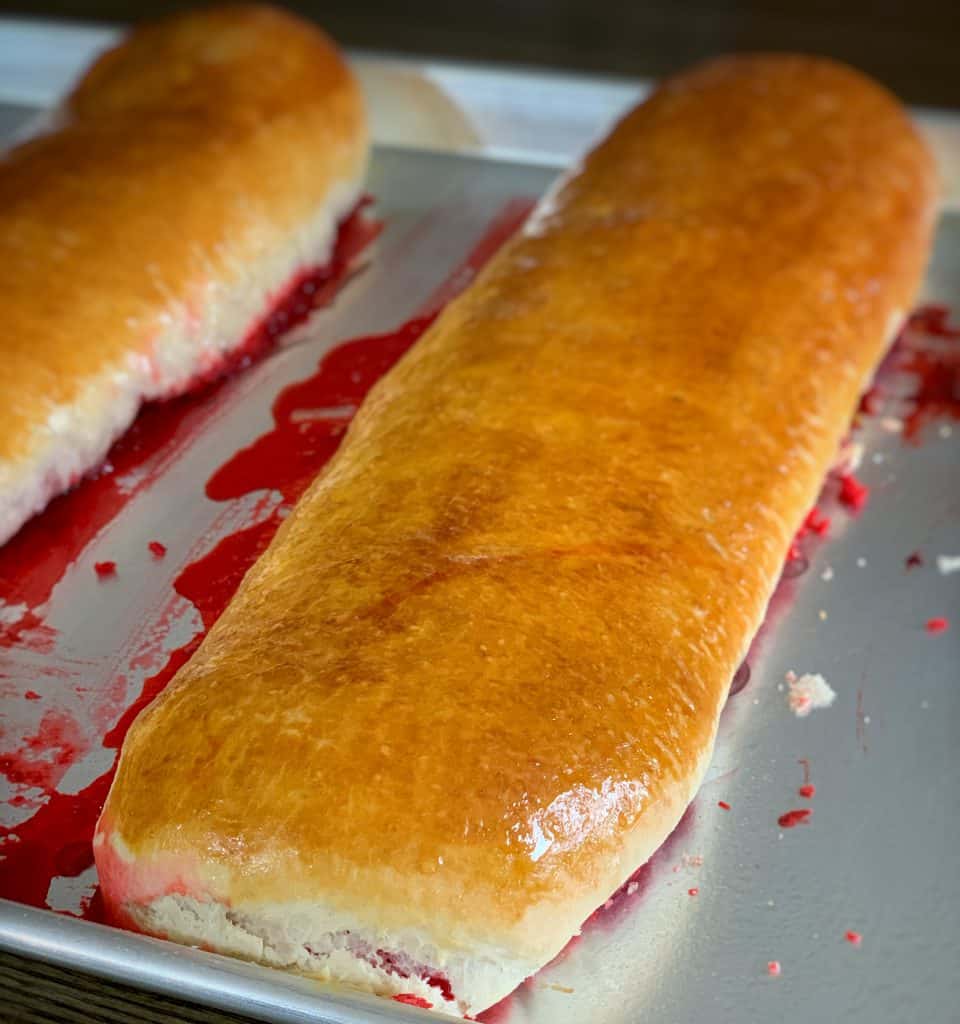
If you are using frozen grated coconut, be sure to squeeze some (but not all) of the liquids out before combining the coconut with the other ingredients. This will help to avoid the crime scene of red liquid as seen in the photo above. I completely forgot this step while filming but the salara was still perfect.

The Salara Step by Step Video Tutorial:
I’m uploading weekly tutorials to my Youtube Channel (metemgeeblog) so please subscribe so you don’t miss any of my amazing upcoming recipes.
Substitutions & Variations
- Salara with Dairy. Instead of coconut milk and oil, use whole milk and butter in the same measurements.
- Vegan. To make vegan salara, brush it with a bit of water instead of the egg before baking.
- Coconut Flakes. I’ve made salara with both coconut flakes and grated coconut. I prefer my salara with finely grated fresh coconut but coconut flakes are a worthy substitute. For instructions on how to make the filling using coconut flakes, see below for the recipe card with my original Salara recipe and instructions using coconut flakes.
Storage
Allow the salara to completely cool. Then wrap it in foil or place it in an airtight container. It lasts at room temperature for up to 2 days. For longer storage, keep it in the fridge for up to 1 week.
Tips for the Best Salara
- Food Coloring. Salara is known for its bright red coconut filling. It is important to use the right food coloring to get that signature bright red color. In this recipe I am using a gel food coloring. Over time I’ve discovered that this is the best type of coloring. You can use regular liquid food coloring that is readily available but you will need a lot more than the 2 teaspoons of coloring that I recommend for this dish. However, sometimes food coloring can add a bitter taste to the coconut filling, so thread lightly and taste as you go.
- Dough to Filling Ratio. I love my bread overflowing with rich coconut, so I used 4 cups of grated coconuts (about two whole coconuts) for this recipe. Feel free to use less coconut but no less than 3 cups or you will have more dough than coconut filling.
- Only want to make one salara? Use the other half of the dough to make Beefy Pinwheels.
FAQ
Salara contains red food coloring to achieve those red swirls.
Salara is an anytime snack. Enjoy it for breakfast, as a mid-day snack, or after dinner for dessert with a hot cup of tea.

Salara
Ingredients
For the coconut filling
- 4 cups of grated coconut about two whole coconuts
- 1 cup of granulated sugar
- 1/2 teaspoon of ground cloves
- 1 teaspoon of ground cinnamon
- 2 teaspoons of gel red food coloring
For the sugar sling
- 1 cup of water
- 1/2 cup of sugar
For the Dough
- 3 1/2 cups of All Purpose Flour plus additional flour for dusting your work surface
- 1 tablespoon of Instant / Rapid Rising Yeast
- 1/2 teaspoon of salt
- 1/2 cup of coconut milk
- 3/4 cups of warm water
- 1/4 cup of brown sugar
- 1/4 cup of coconut oil or other fat such as butter lard, shortening, margarine
- 1 beaten egg yolk
- About two tablespoons of room temperature water to seal the salara before baking
Instructions
Prepare the coconut filling
- In a large pot on medium-low heat combine the grated coconut, sugar, ground cloves and ground cinnamon and mix together well
- Then add the food coloring and mix until all the coconut is coated with the color
- Continue to cook for 5 to 10 minutes to bring all of the flavor of the coconut filling together but be careful not to dry the coconut out
- Then set aside and let cool completely
Make a sugar sling or glaze
- Combine the water and sugar in a small pot or saucepan on medium-high heat
- Stir until all the sugar dissolves then bring to a boil and continue for 5 minute or until the mixture reduces to about half
- Then remove from the heat and set aside
Make the dough
- Mix together the coconut milk, sugar and water, stirring until the sugar completely dissolves and set aside (it may be necessary to warm this mixture up before adding to the dry ingredients)
- Then in a large mixing bowl combine the flour, yeast and salt and mix together well
- Next using a fork or your finger tips rub the coconut oil or other fat into the flour mixture
- Then make a well in the center of the dry ingredients in preparation for the warm milk, water and sugar solution you prepared earlier
- Add the warm milk, water and sugar solution to the dough and using a whisk combine with some of the dry ingredients to form a smooth batter (as demonstration in the video)
- Then using your hands combine the batter with the remaining dry ingredients in the bowl, to form a very sticky dough
- Next add the remaining 1/2 cup of flour and knead into a smooth dough ball. This should take about 10 minutes
- Place the dough into a greased bowl, cover with a kitchen towel or damp paper towel and let rise until the dough doubles in size. This should take 45 minutes to an hour
- Once the dough doubles in size turn the dough onto a floured surface and knead for 5 minutes, then divide the dough into half
- Lightly knead each half into a ball to smooth the edges
- Then roll the dough out into a square (if you can) until it is about 1/4 inch thick
- Then cover the rolled out dough with half of the prepared coconut filling, leaving about 1/2 inch of free space around the edge of the rolled out dough
- Reserve the rest of the filing for the other half of the dough
- Then brush the dough with some room temperature water and roll the dough, starting from one end, into a log
- Then tuck the ends of the log under to seal in the coconut filling
- Repeat steps 11 to 15 for the other piece of dough
Bake the Salara
- Preheat oven to 350°F
- Place your salara logs onto a greased baking sheet
- Brush with a beaten egg yolk and bake for 25 at 350°F
- After 25 minutes remove from the oven and immediately brush with the sugar sling/glaze you prepared earlier
- Set aside and allow the salara to cool before slicing and enjoying
Notes
Nutrition
The information listed in the recipe card is an estimate provided by an online nutrition tool. The tool evaluates ingredient names and amounts then makes calculations based on the number of servings listed for the recipe. It is provided as a general guideline and not as a precise calculation. For precise nutrition information please feel free to add the ingredients to your preferred nutrition calculator or consult a doctor or licensed nutritionist.


 Non-alcoholic Guyanese Black Cake
 Pumpkin Flan
 Almond Flour Black Cake
 Gluten Free Pot Bread
Gorgeous Says
Good day. I was just curious why there was no second rise. How does this make a difference to those with a second rise? Thank you.
I’m making this now andvjust realised there’s no second rise so I’ll see how mine came out
Ariana Says
This recipe is SO perfect. It tastes just like I remembered from when me been small.
Radha Says
This was delicious!! I used regular milk instead of coconut milk and I baked it for 30 minutes. The hardest part is waiting for it to cool before digging in. The best ratio of coconut filling to bread I’ve ever had. Better than the Guyanese bakery.
Althea Brown Says
Thank you so much for trying my recipe and sharing. And yummm.
Kamels Says
Am I able to use dried coconut for this recipe?
Althea Brown Says
You can but would have to reconstitute it a bit first with some water
Shameza David Says
Thank you for this recipe. Mine came out divine on the first try!
Althea Brown Says
Awesome. Thanks for sharing
Naomi Says
My boyfriend is Guyanese, I just made this for Father’s Day, and he approved!! I halved the recipe and it’s still one very big roll. Very delicious.
I made one small change, we don’t have fresh coconuts here (the Netherlands), so I used shredded coconut from the store and added a bit of the sugar syrup and contour oil to make it a little more moist. Worked out perfectly